When I was 9 years old, I saw the movie gremlins 2 and was fascinated by the creatures and fell in love with them. From this day on, I always wanted a 1:1 Mohawk Gremlin.
Lets fast forward 16 years, when I found some vinyl model kit Gremlin on ebay. I didn’t know much about those kits, I only had planes and tanks as a kid. Well, I was so excited I bought 2 kits, only to find out a little later, that they were recasts. Sidenote here. I don’t support recasts and don’t encourage buying them. I simply didn’t know about anything about it.
Even though I finished the first one, I never felt good about it. The colors were off and the kit in itself was not THE mohawk. I didn’t know exactly how to fix or improve it, so I didn’t even start with the second kit and let it collecting dust.
8 years later I stumbled over the second kit in the basement and thought why not make this darn recast my own model. As Steve Wang once said:
A good paint job can safe a bad model and a bad paintjob will ruin a great model.
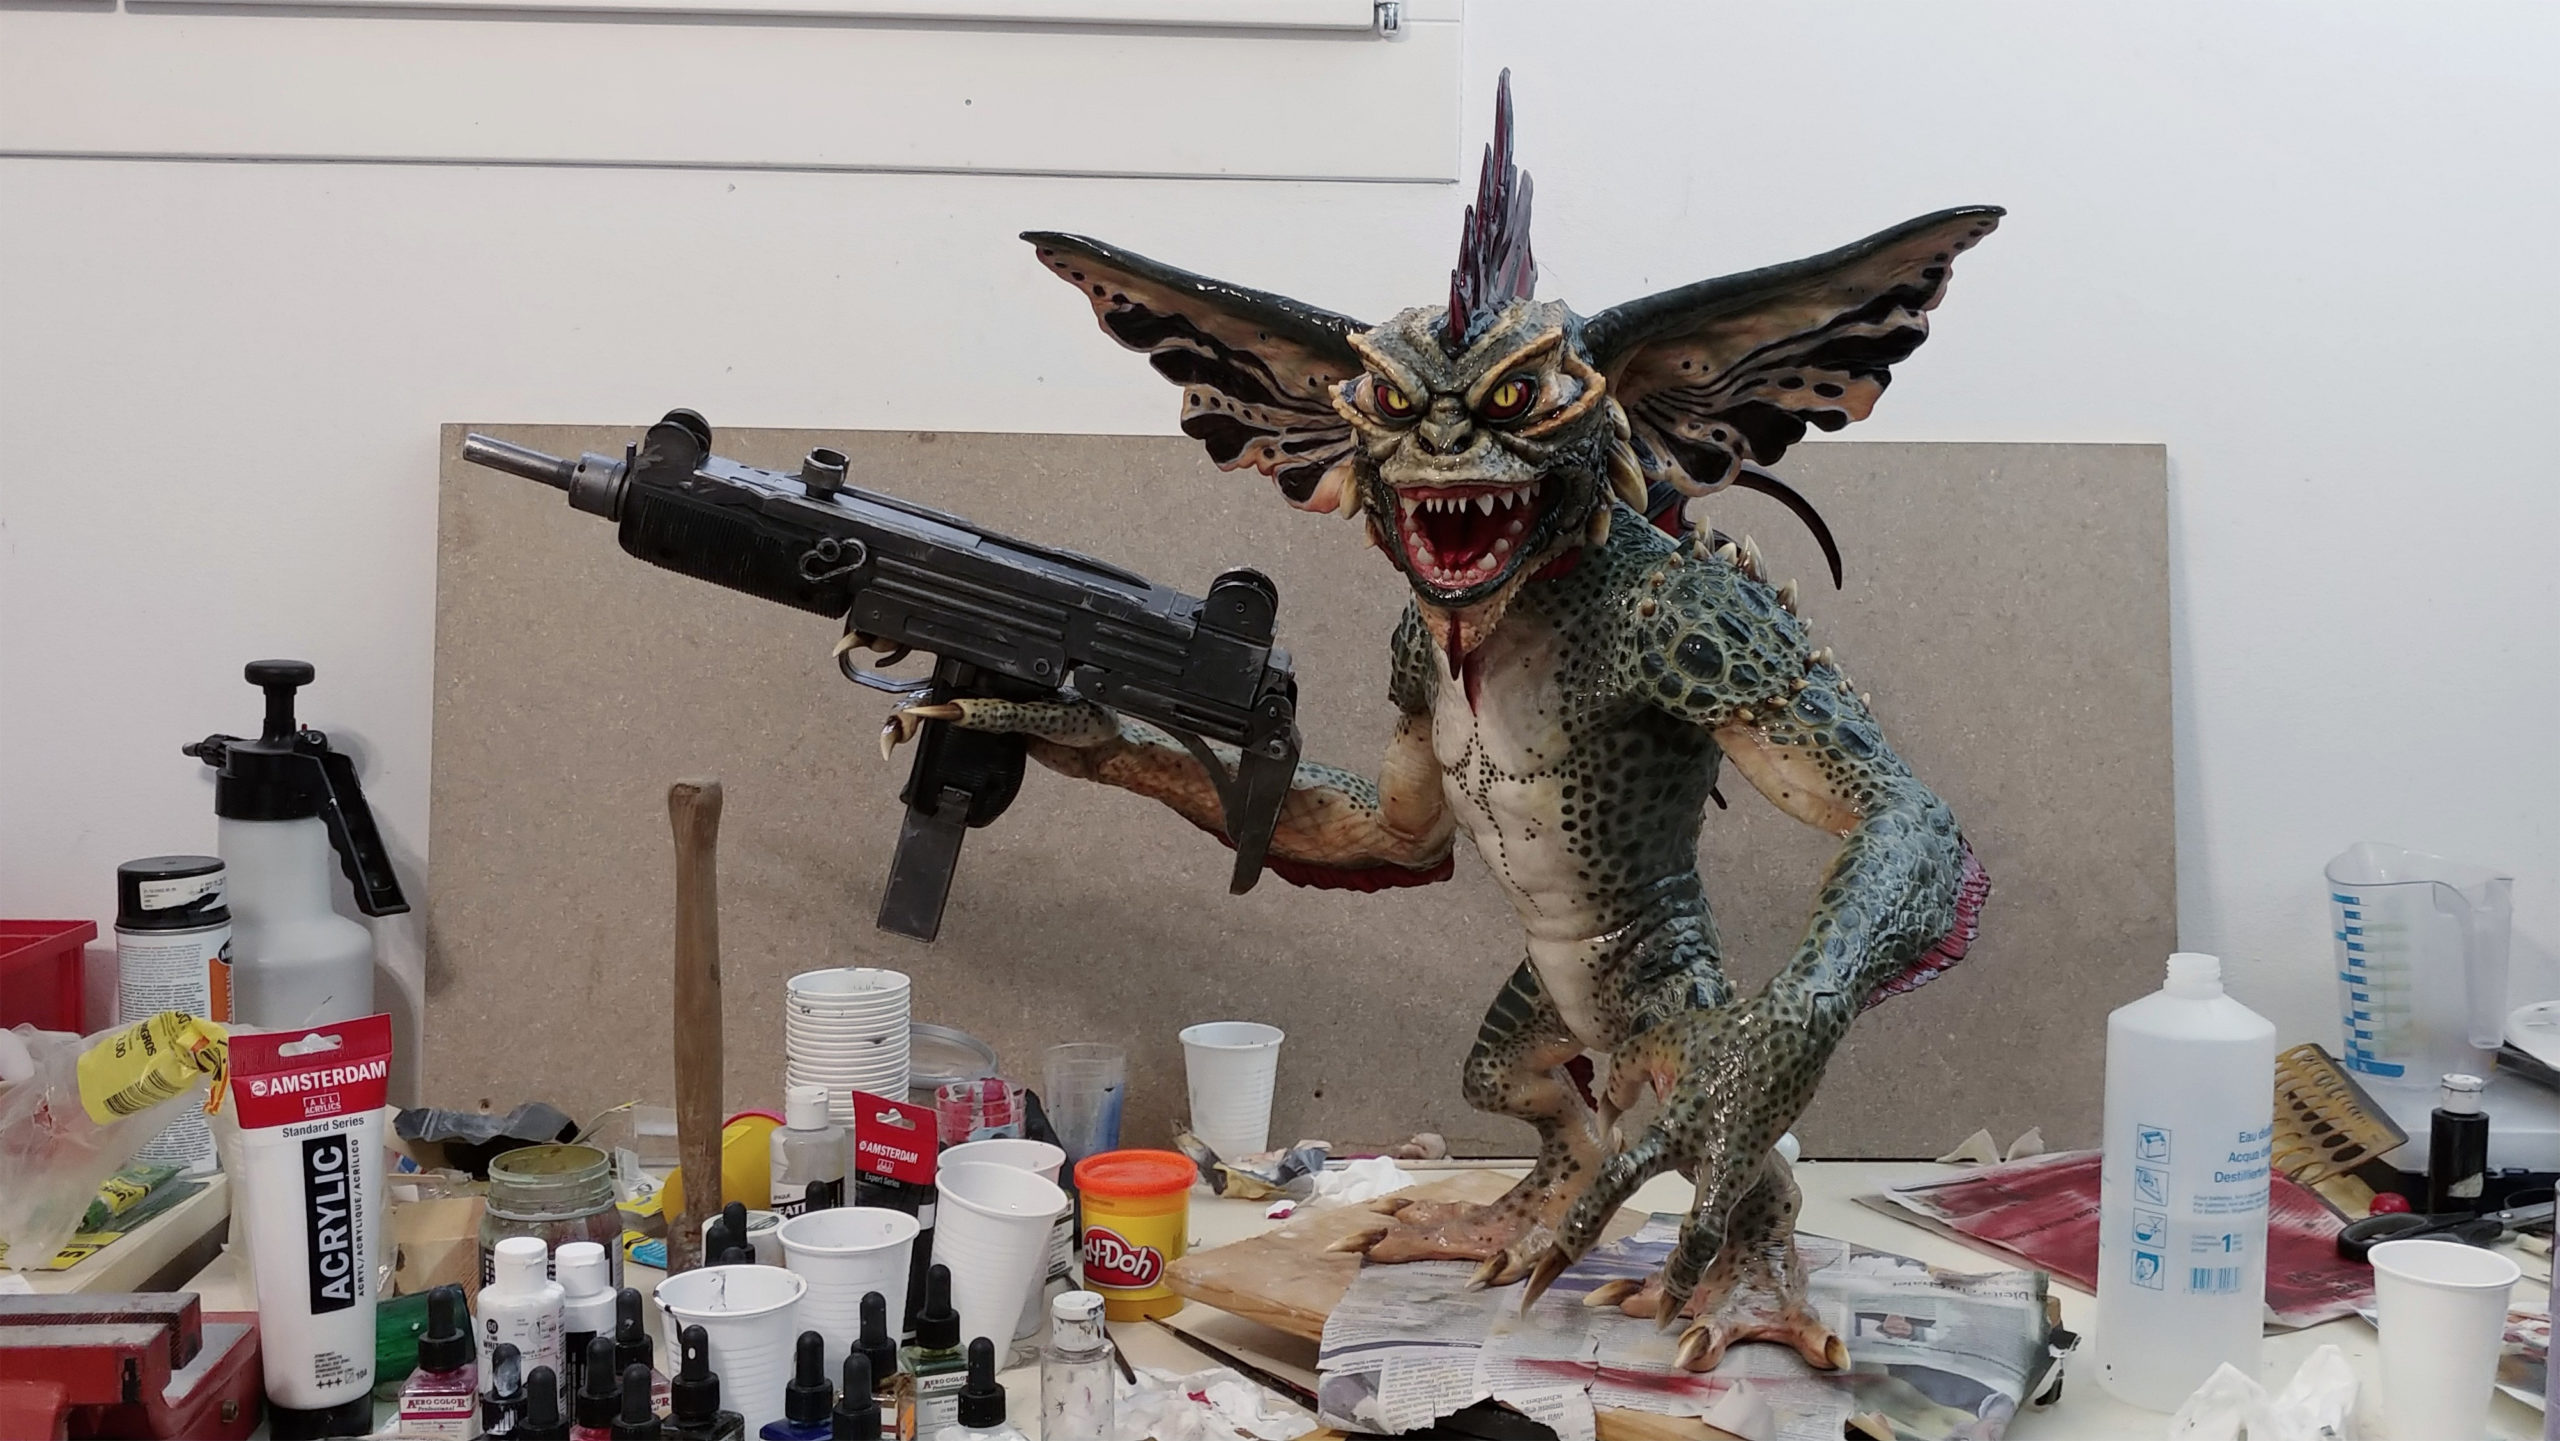
My initial Plans with the kit
I’m sure everybody has seen some of those gremlin kits. To me, they all look kind of lifeless. All have the same out of the box pose, the eyes are dead, the paint jobs don’t match my likings and the kit has a little smile/grin.
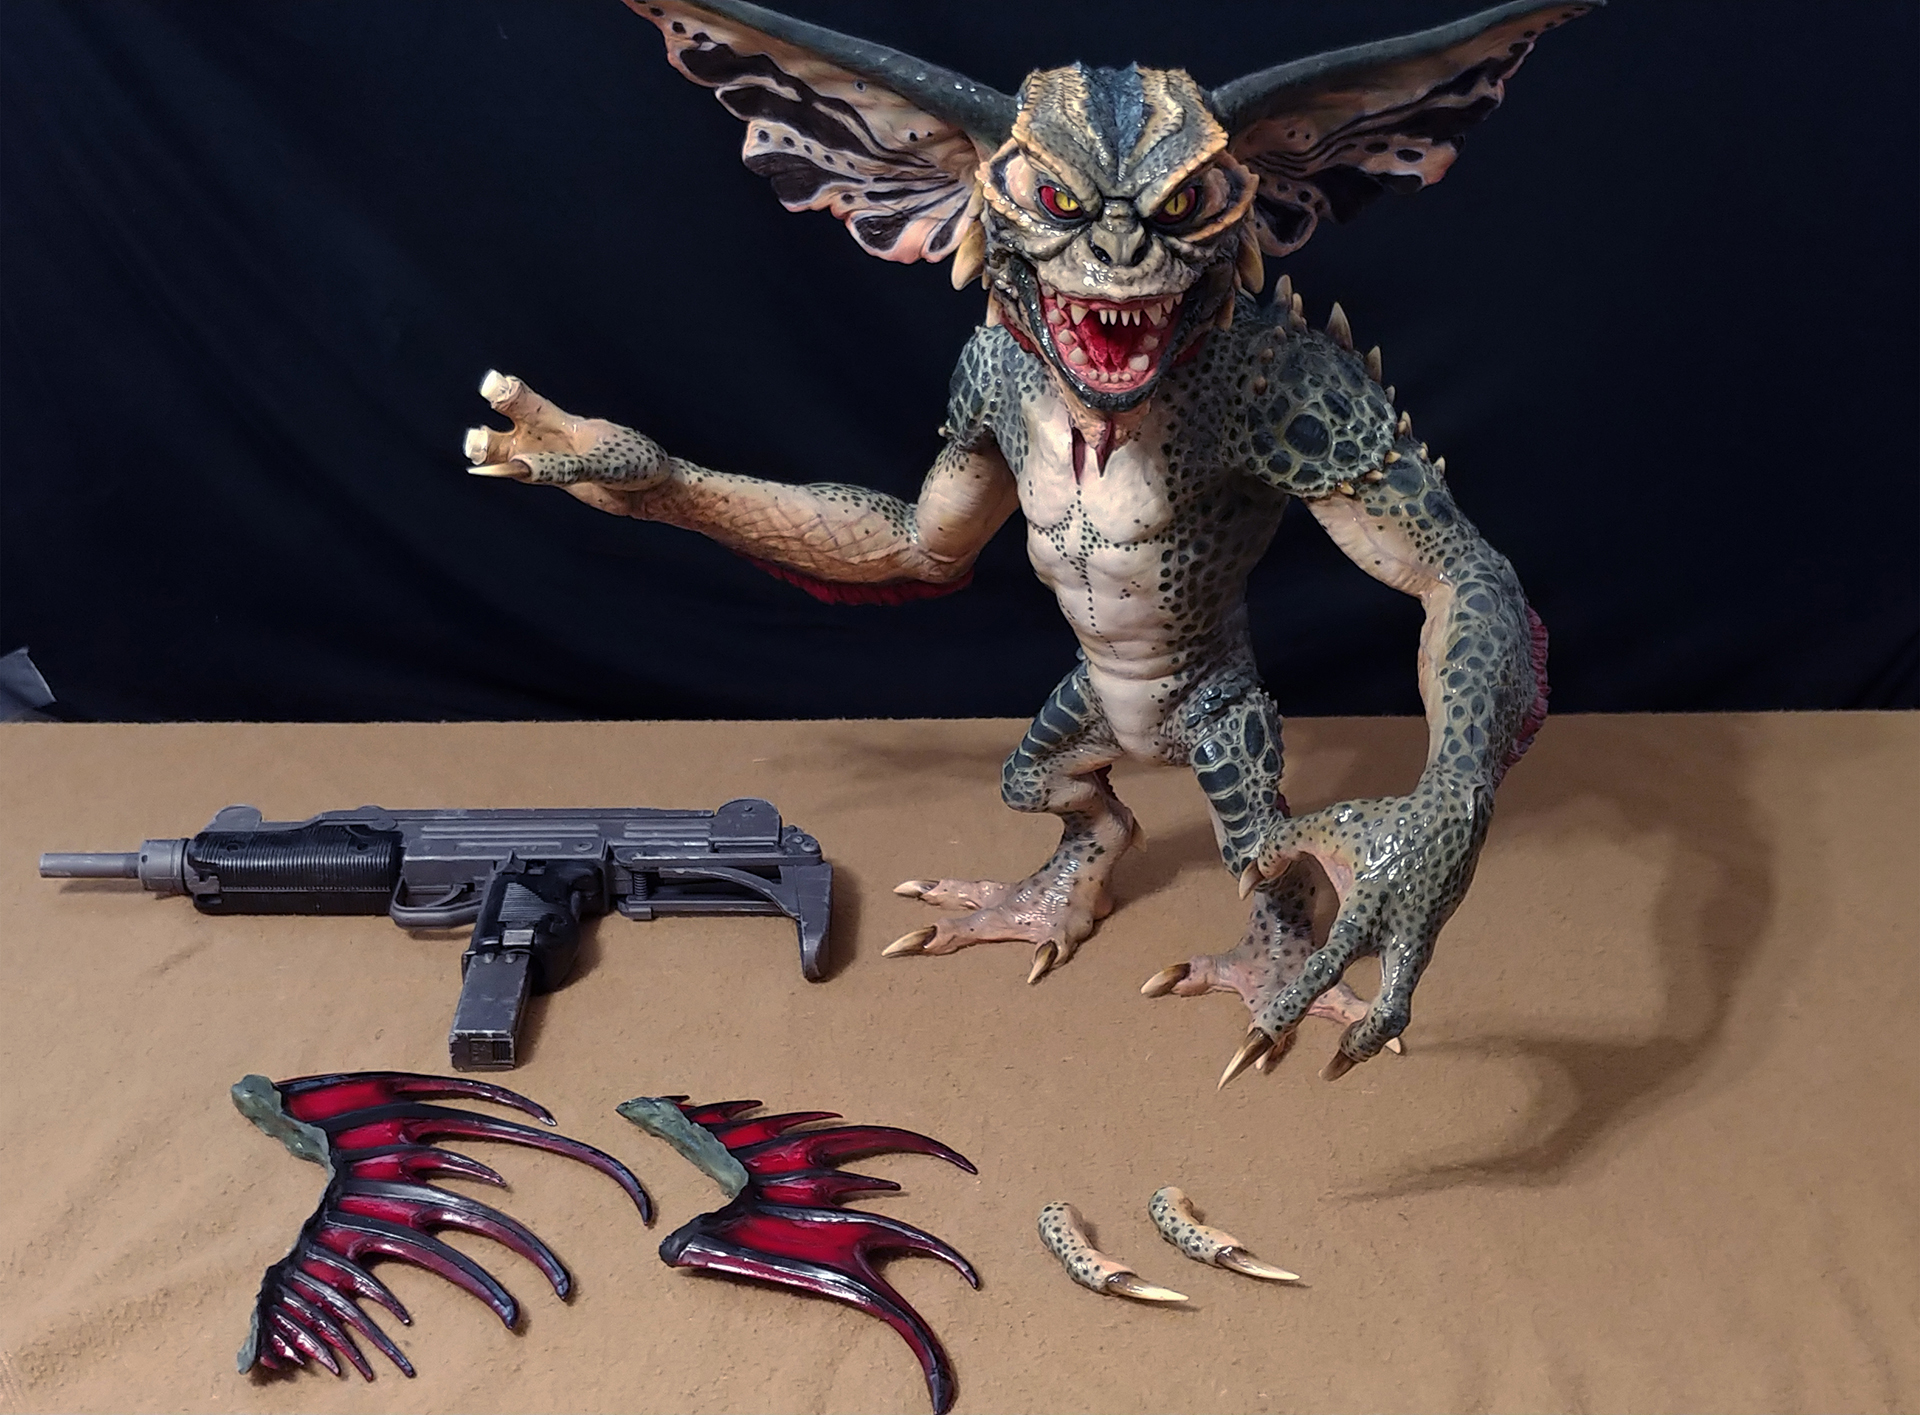
I wanted to create a more dynamic pose (as far as vinyl will allow it), more realistic eyes, an open mouth and somehow, he needed to have an Uzi because I love the scene where Mohawk grabs the Uzi in the lab. But I also wanted to be able to remove the Uzi and the spines for transportation. I figured magnets would be a good idea for this kind of removal.
For the Paint job I wanted to mix steve wangs original design with my own and keep the main pattern screen accurate. There is a big difference between the real puppet and the screen look.
The biggest problem were the eyes. I wanted to be able to move them. I don’t like that the eyes are fixed in one direction. If you move your piece it might look into the wrong direction.
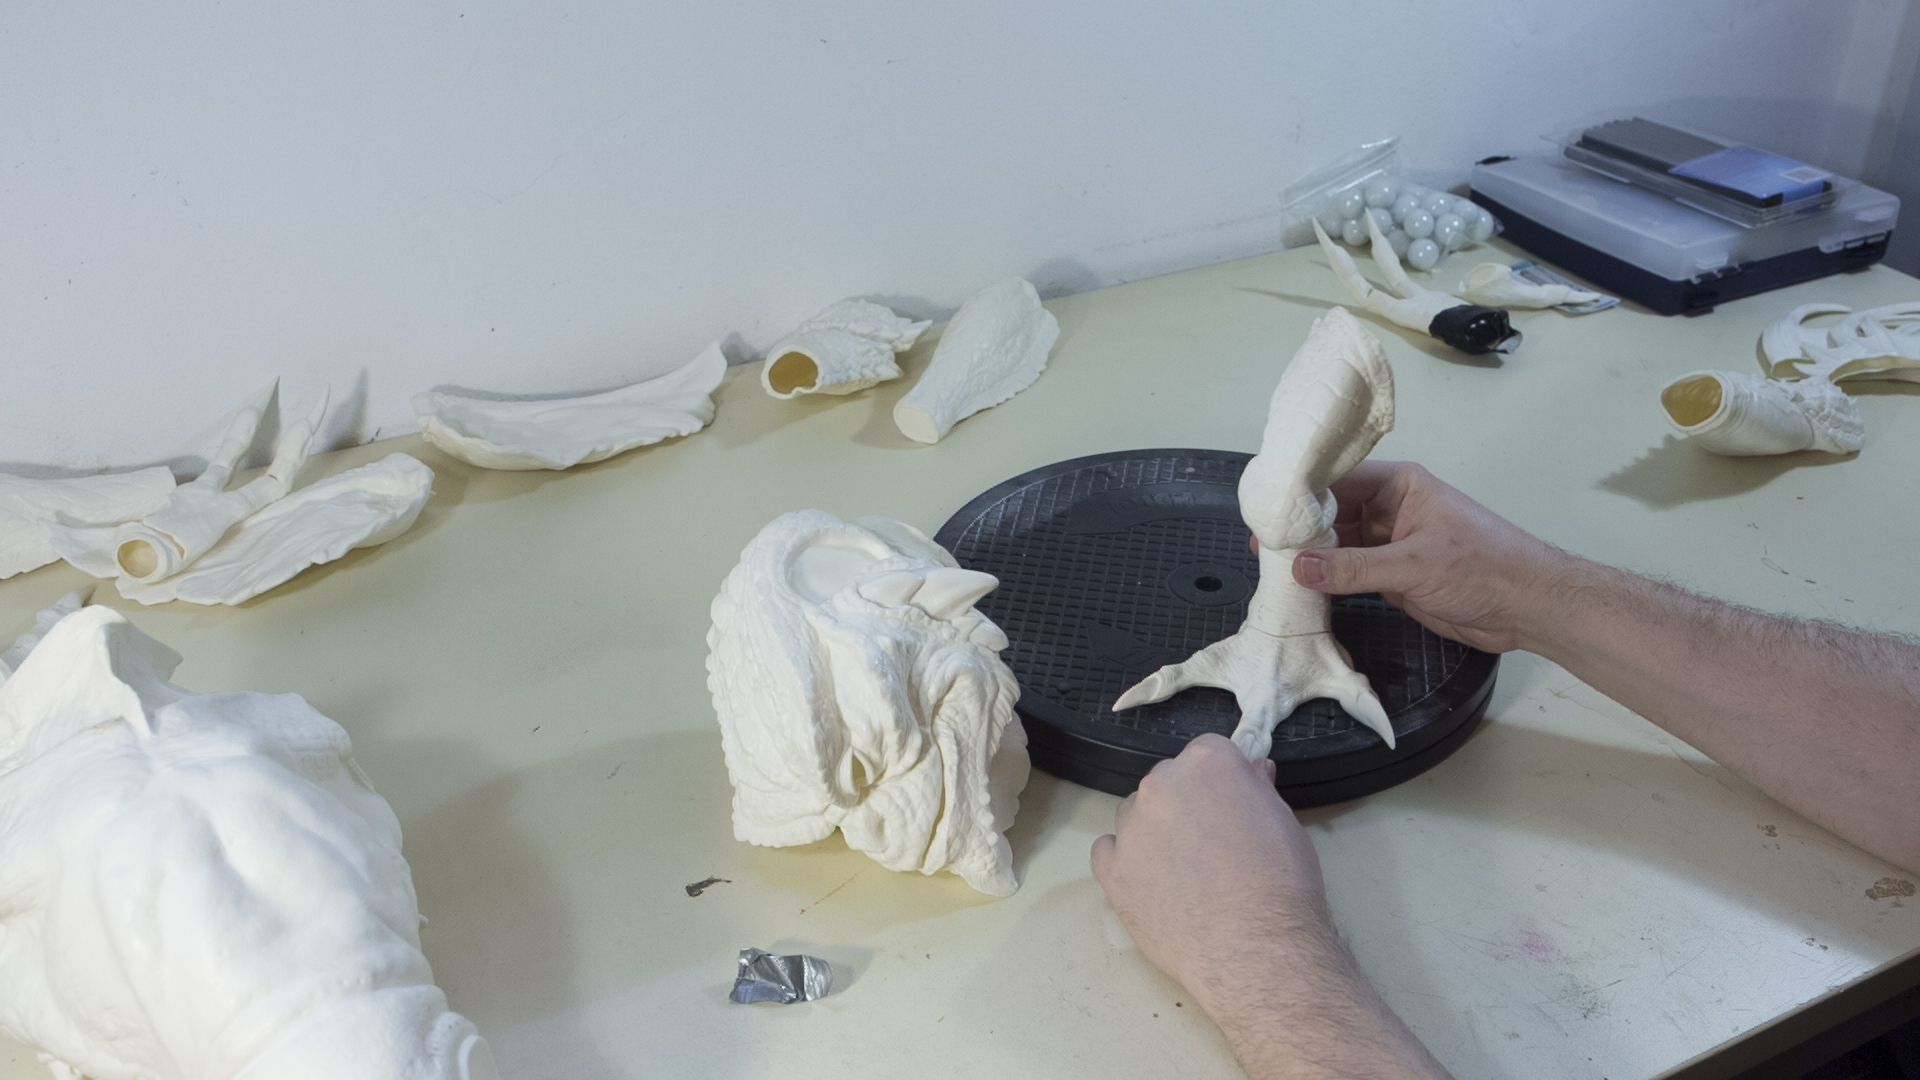
Building the body
The feet are the foundation to a good stand, so I heated them, pressed them on the ground and cooled them off with cold water. The legs were bent to create the illusion of carrying weigh and being in motion rather than standing upwards and almost stretching. To make them fit the feet, I heated them again and pressed them against the feet and cooled them. Again, and again and again, till it all lined up the way I wanted.
Forming the pose and seams
I did the same with the torso. Finding the position of the torso, cut and trim the legs, heat and cool them until they were the way they would carry the weight.
Forming torso
Always test the pose and stand before going to the next parts. This goes for all the parts: Arms, hands, fingers. It takes a while until everything is where you want it, but patience pays off.
Testing pose and fitting
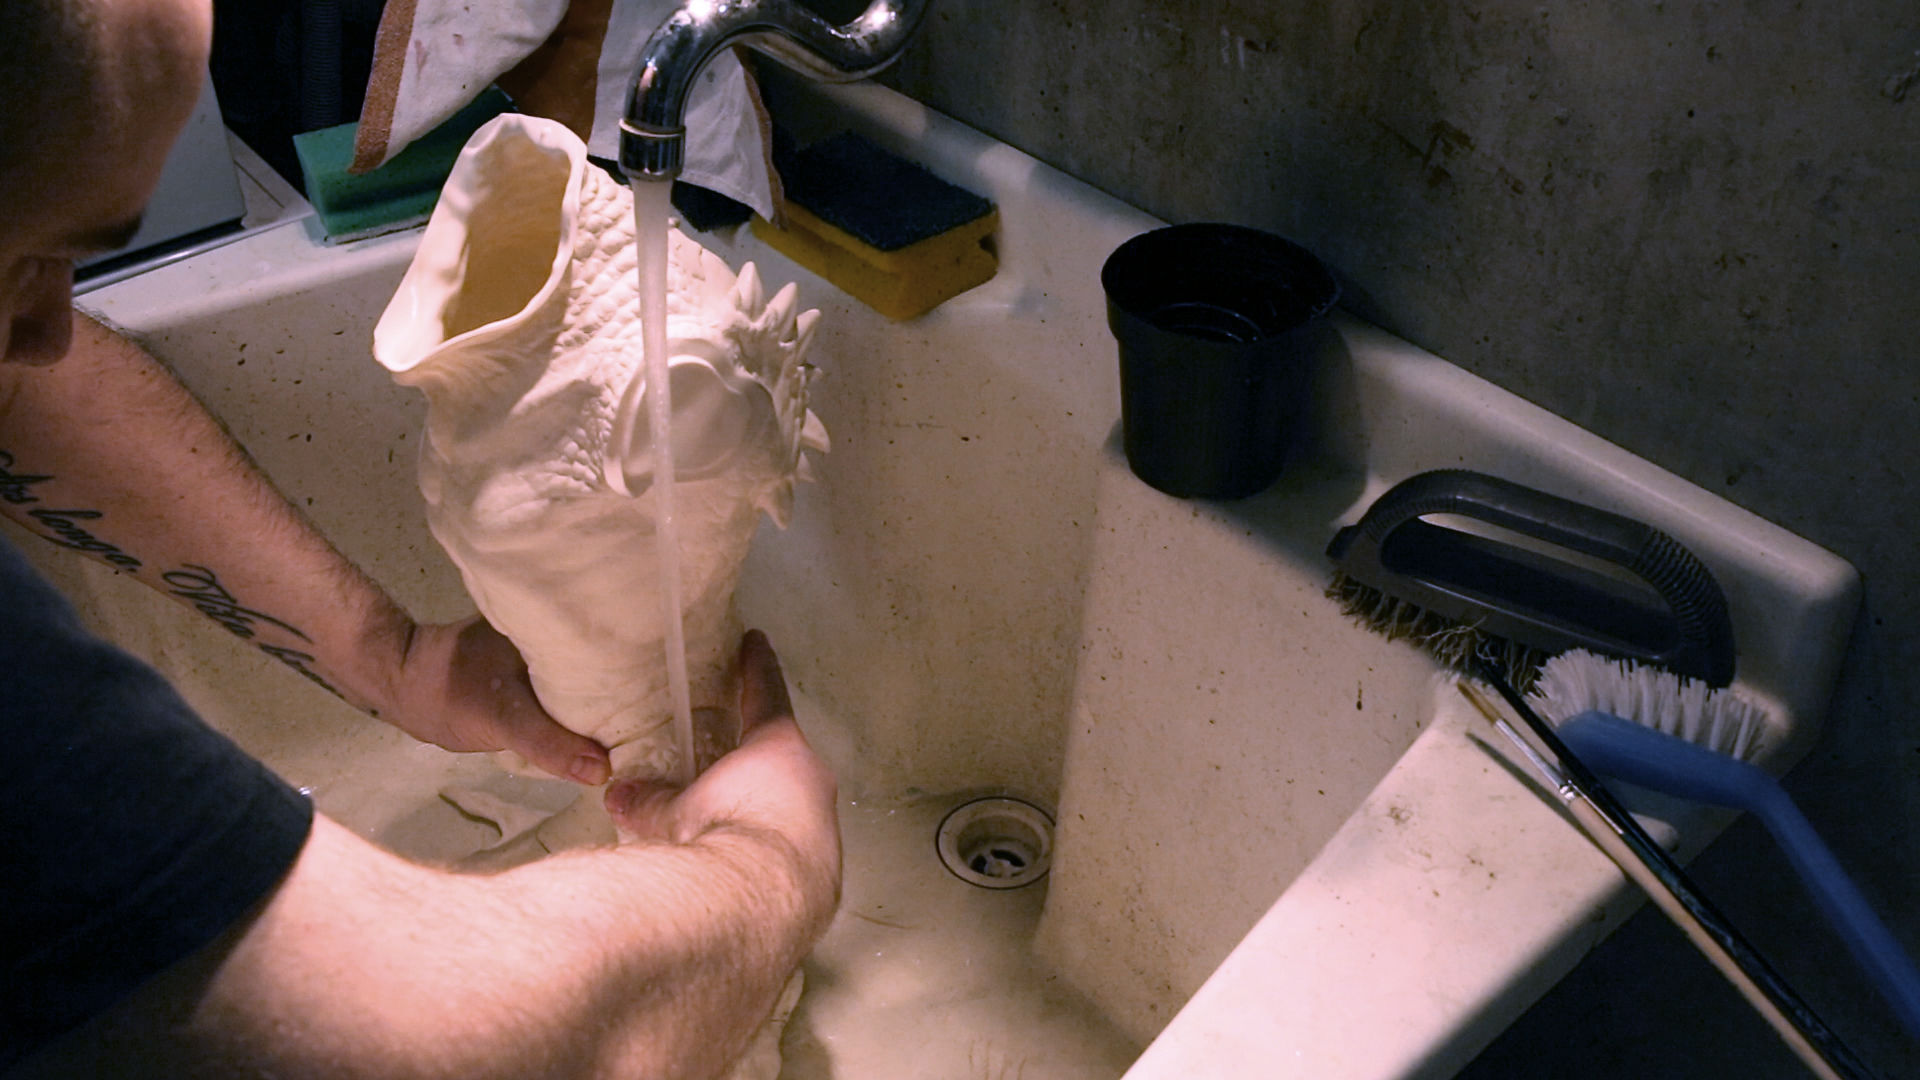
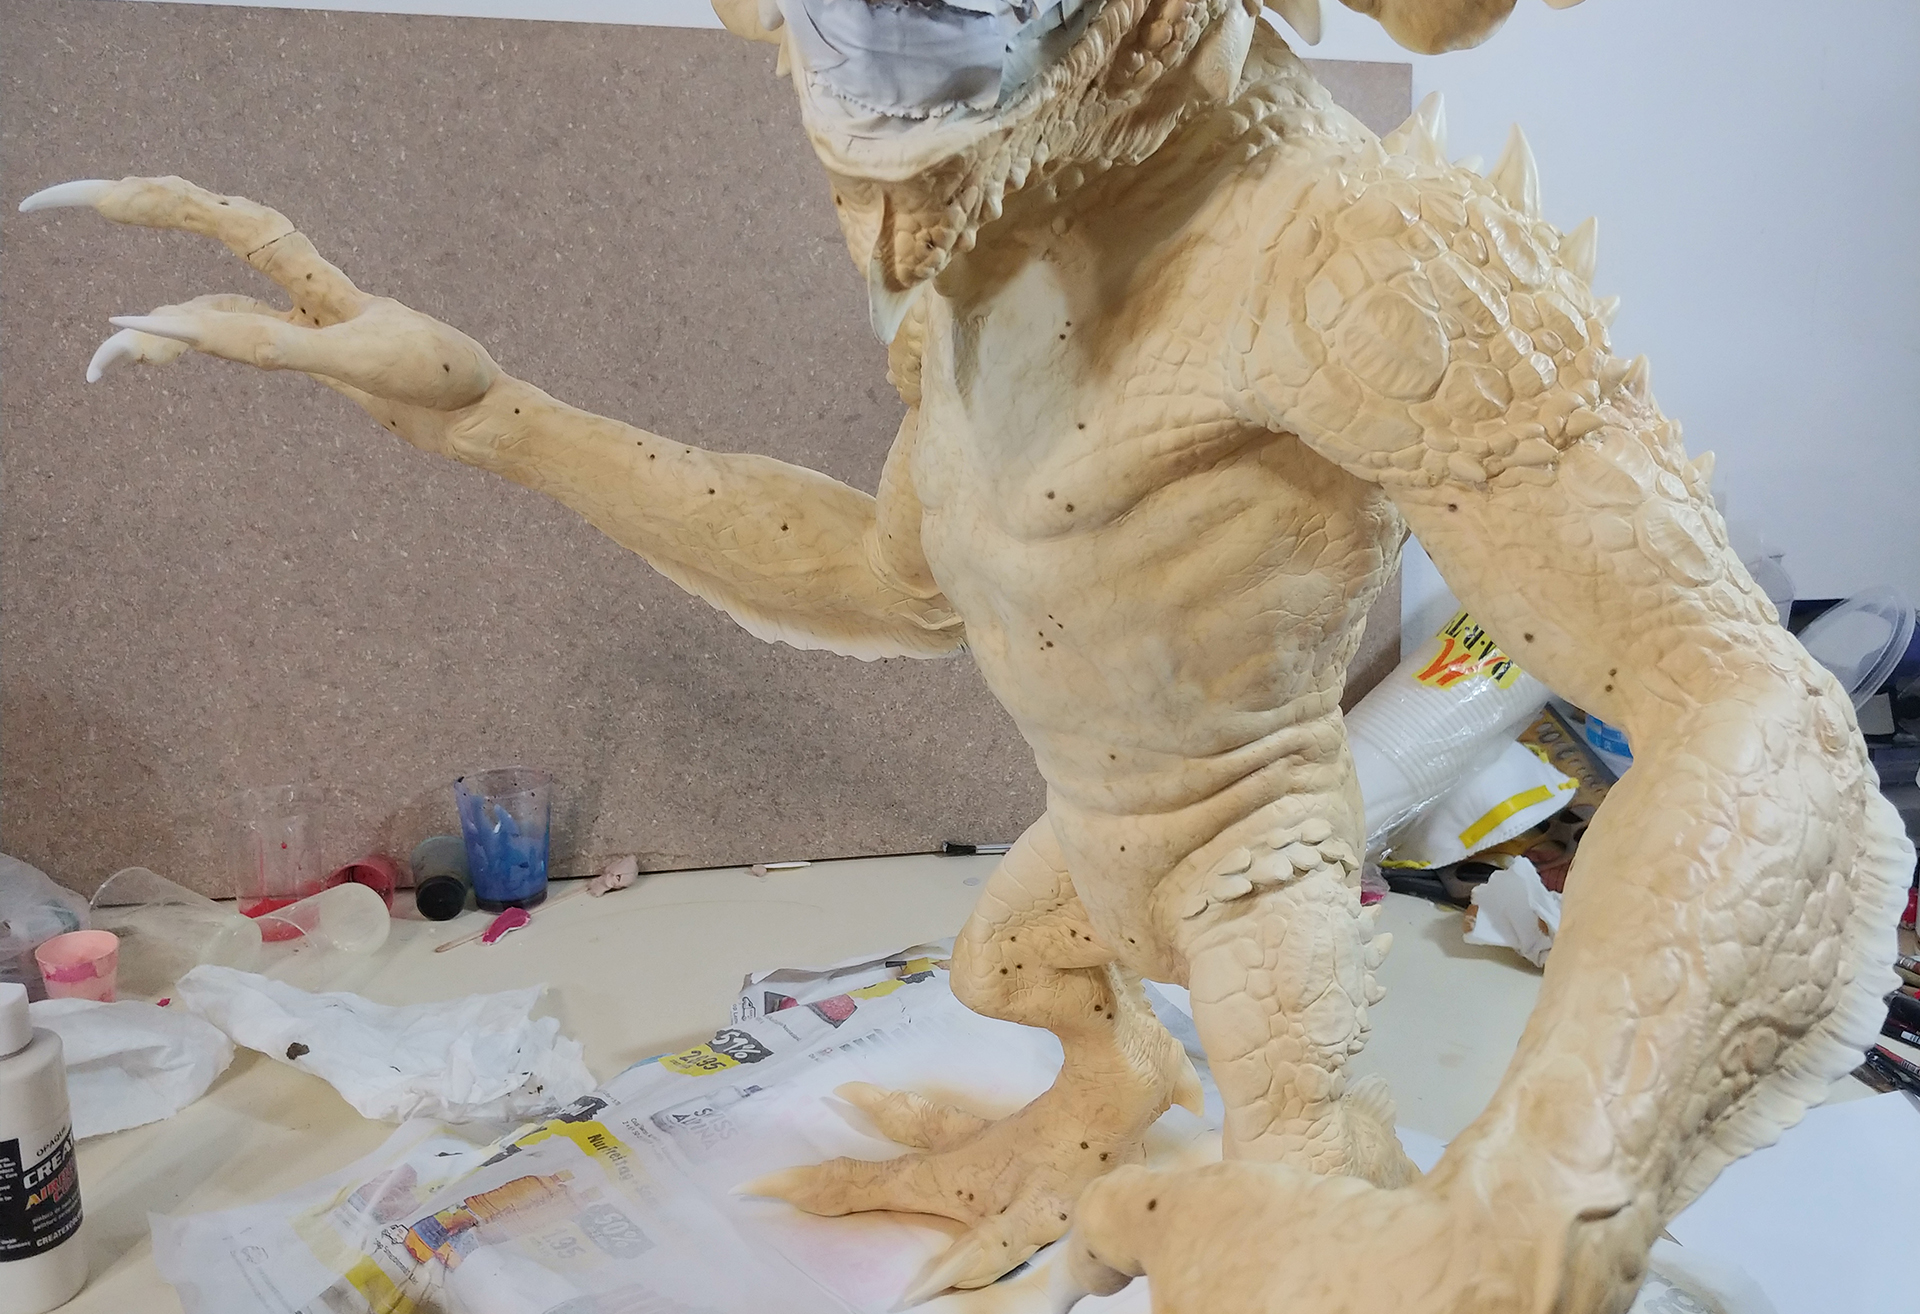
To give it more strength while building and preventing the vinyl from warping later on, I decided to fill the gremlin with plaster. The first 5cm I used hobby building plaster. After that I went the the more expensive and sturdier route with a material called Art Stone. It really gets hard and heavy.
Spoiler: This was my biggest mistake. The gremlin gets so heavy that the pose doesnt carry all the weight and starts to bend forward. At some point, I have to cut off the legs and reposition the torso more backwards.
Filling with plaster
I filled and remodeled all seams with Apoxie Sculpt. You can fill and resculpt in one go. You can smooth it with water and adding more details. It is really easy to work with and super strong when dry.
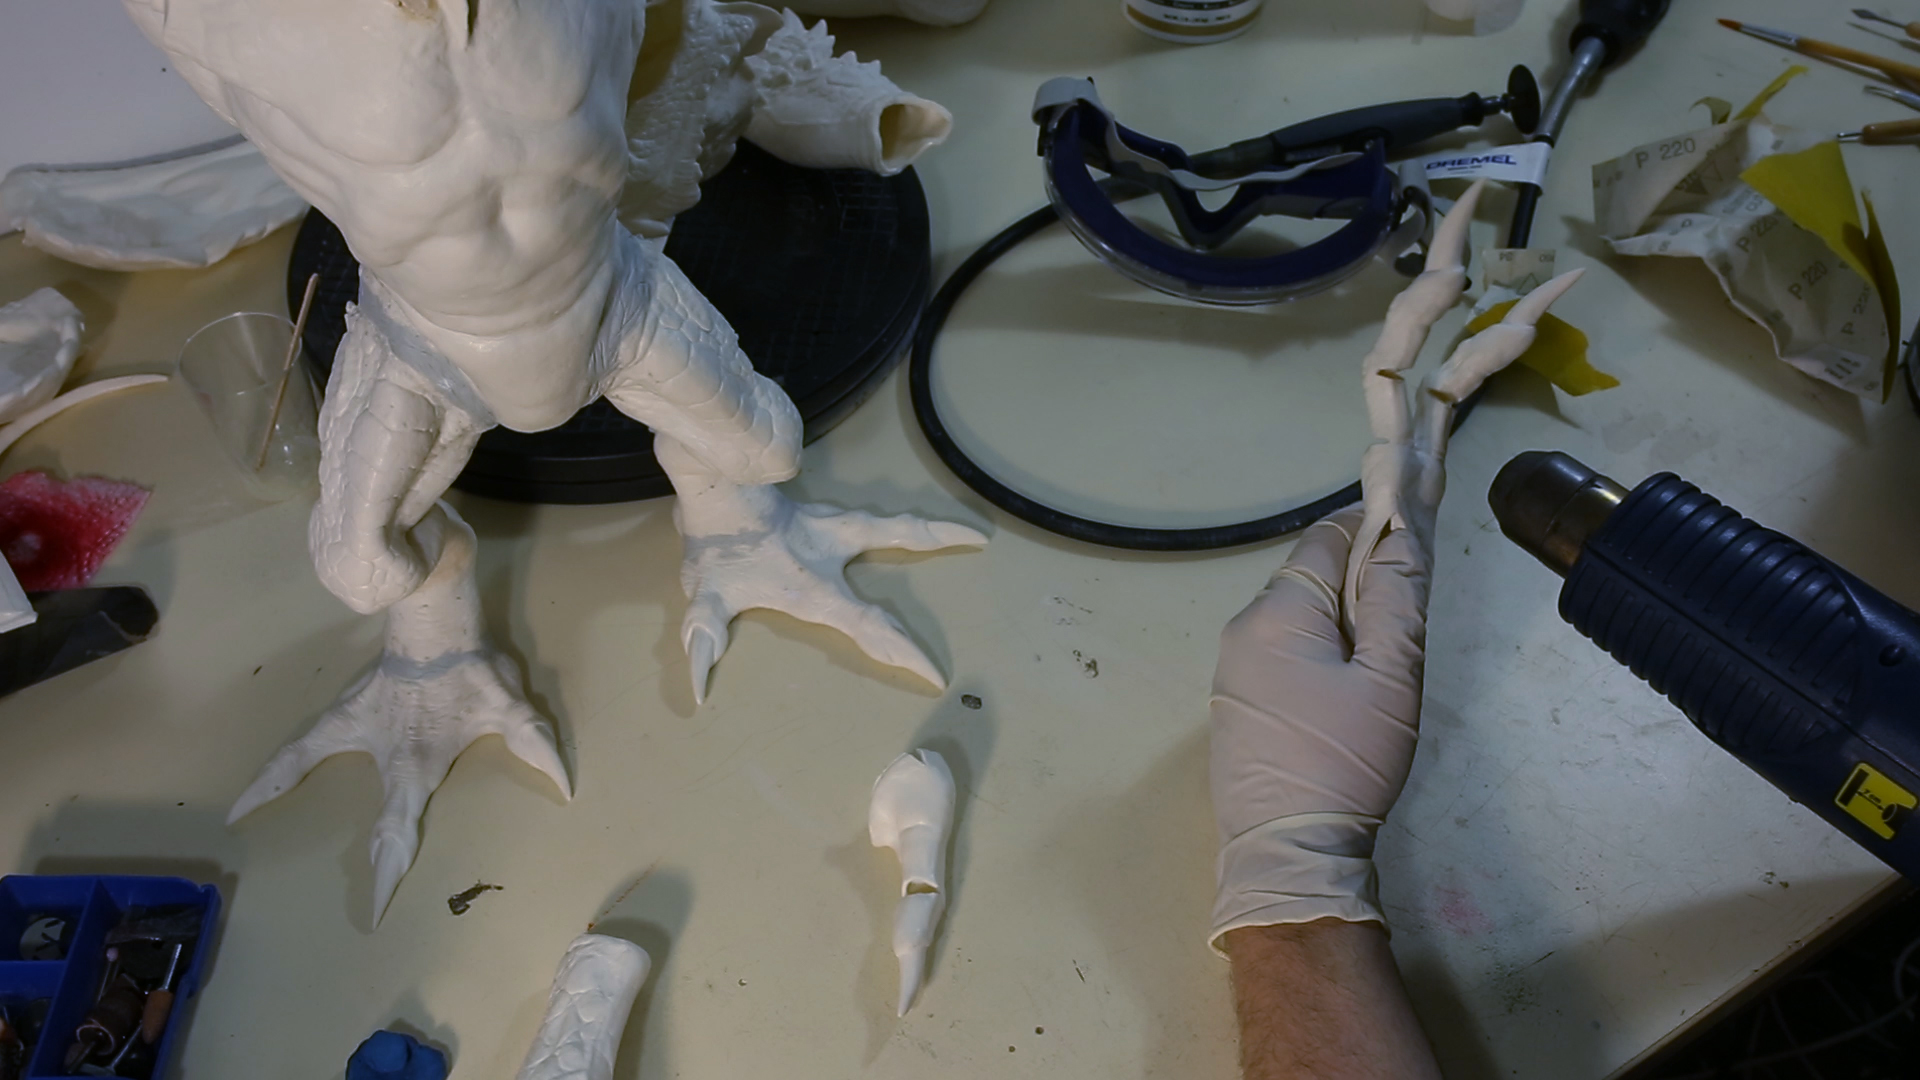
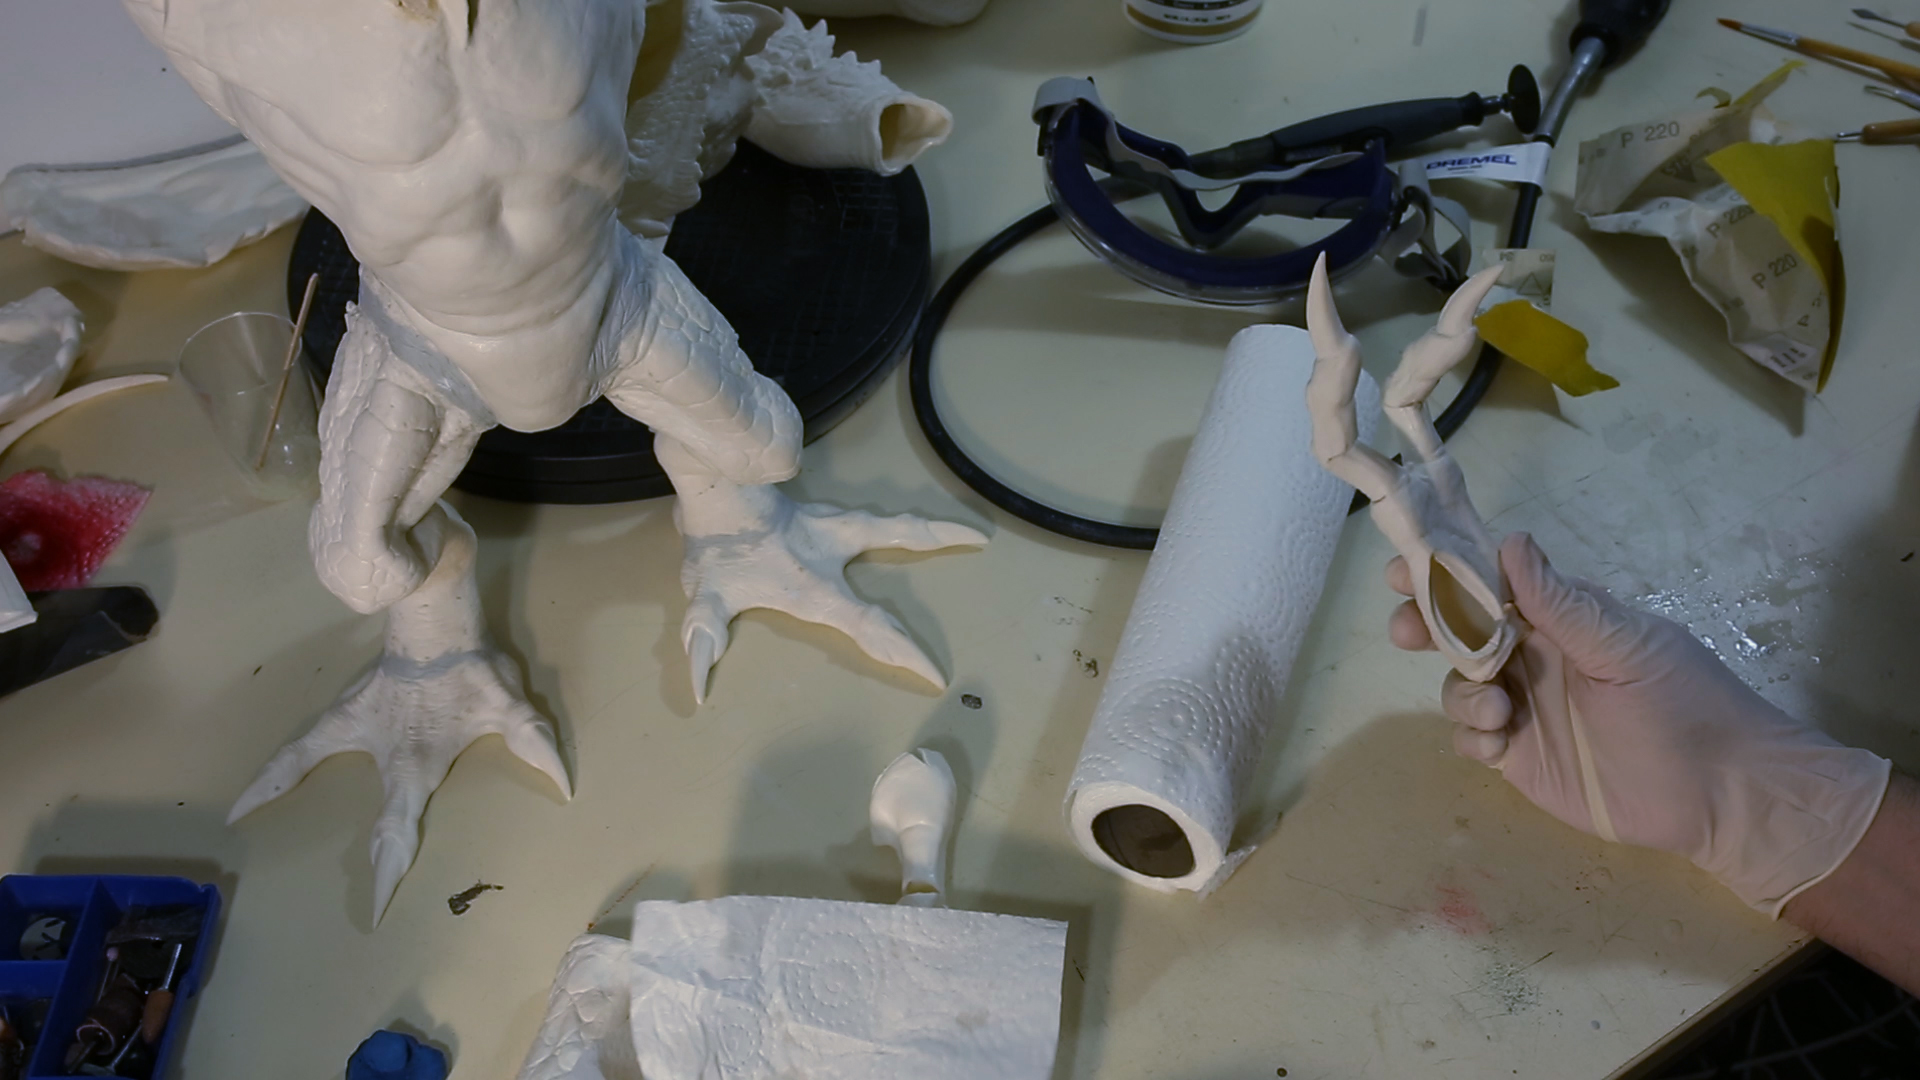
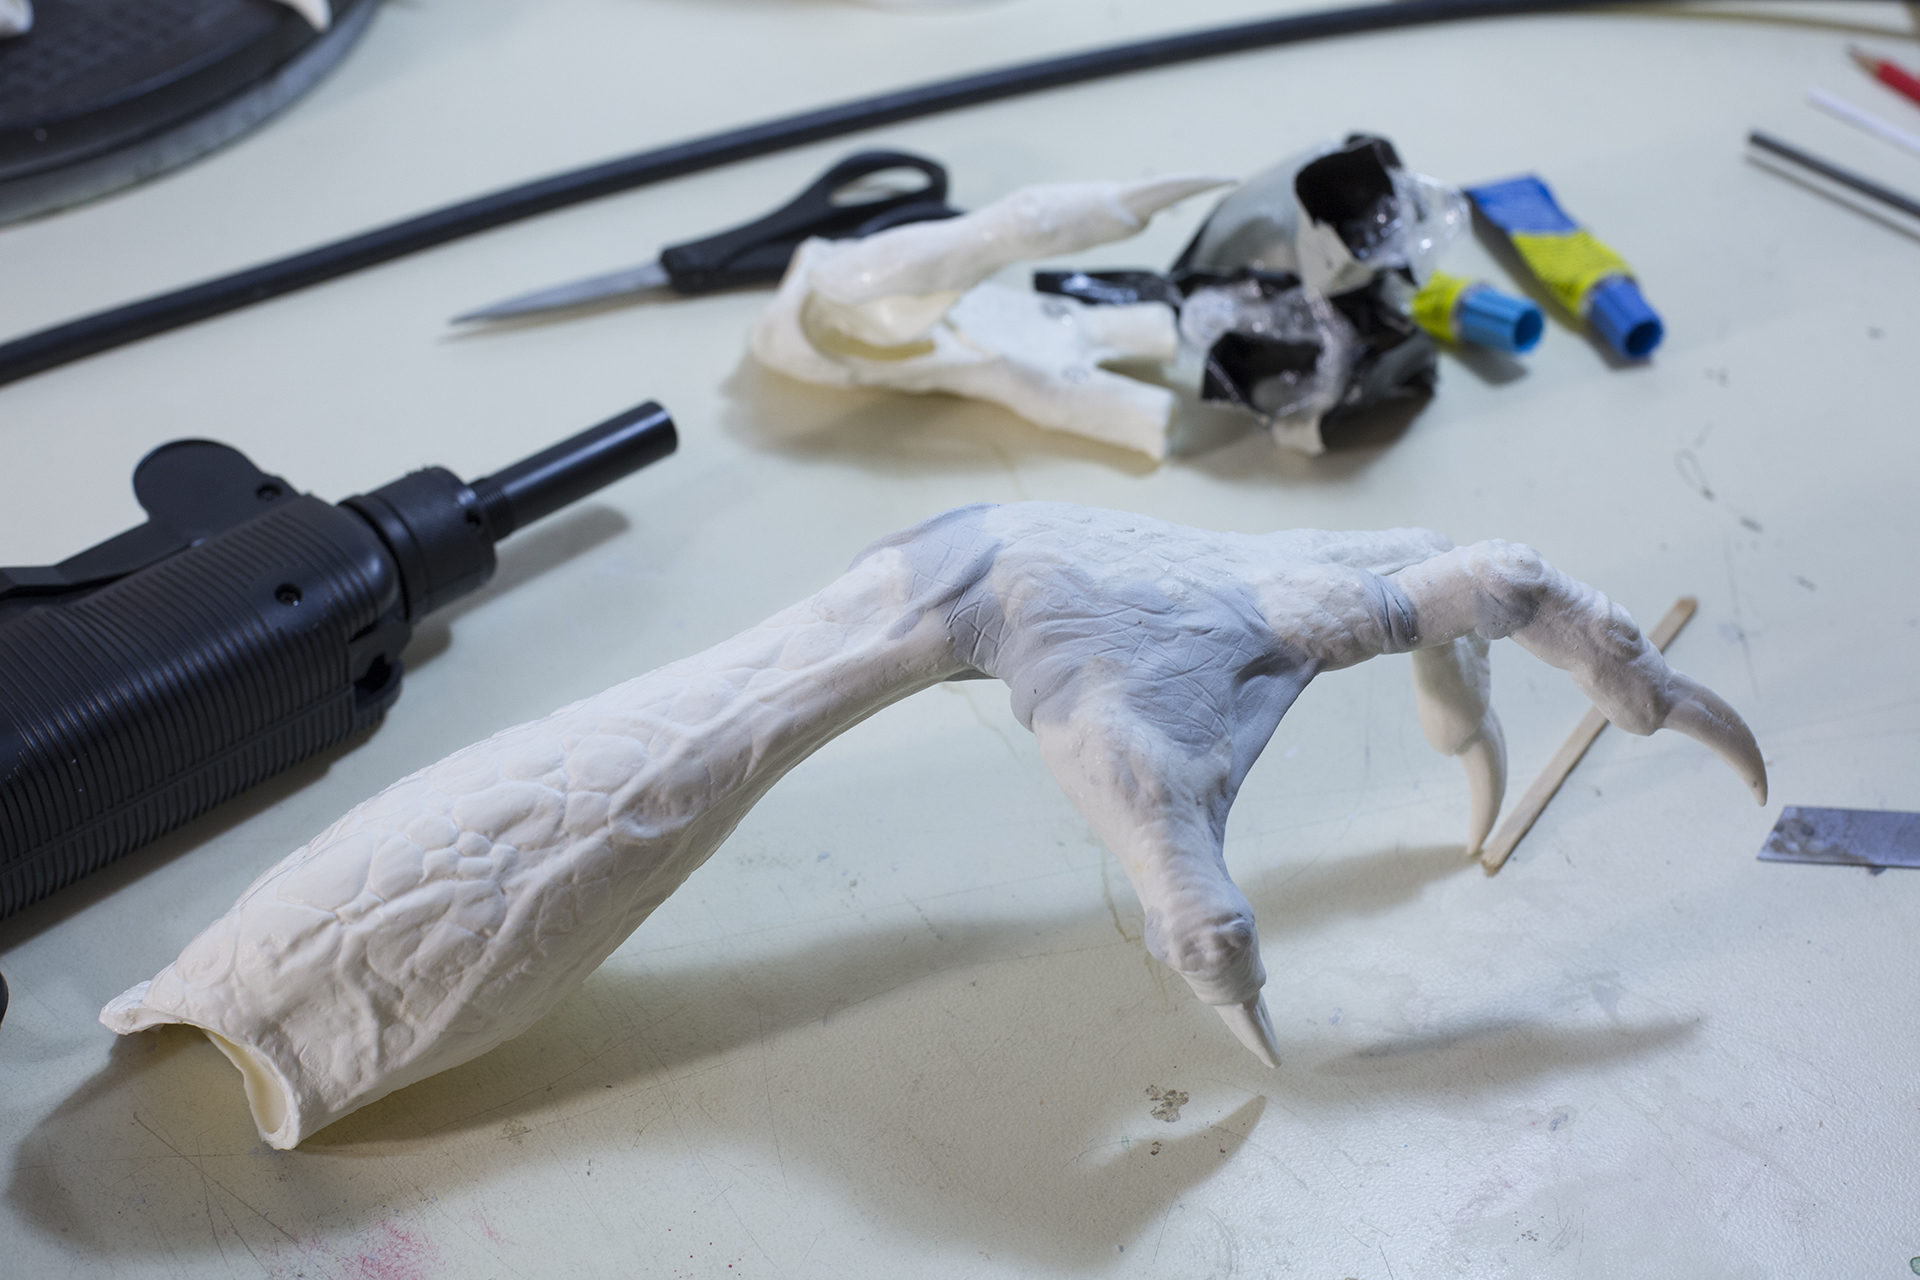
For the empty hand I wanted a more aggressive pose with slight curl in the fingers.
I cut pieces out of the joints to be able to bend the vinyl. Later I filled those gaps with Apoxie Sculpt and remodeled the details.
Cut and pose the fingers
Finger posed
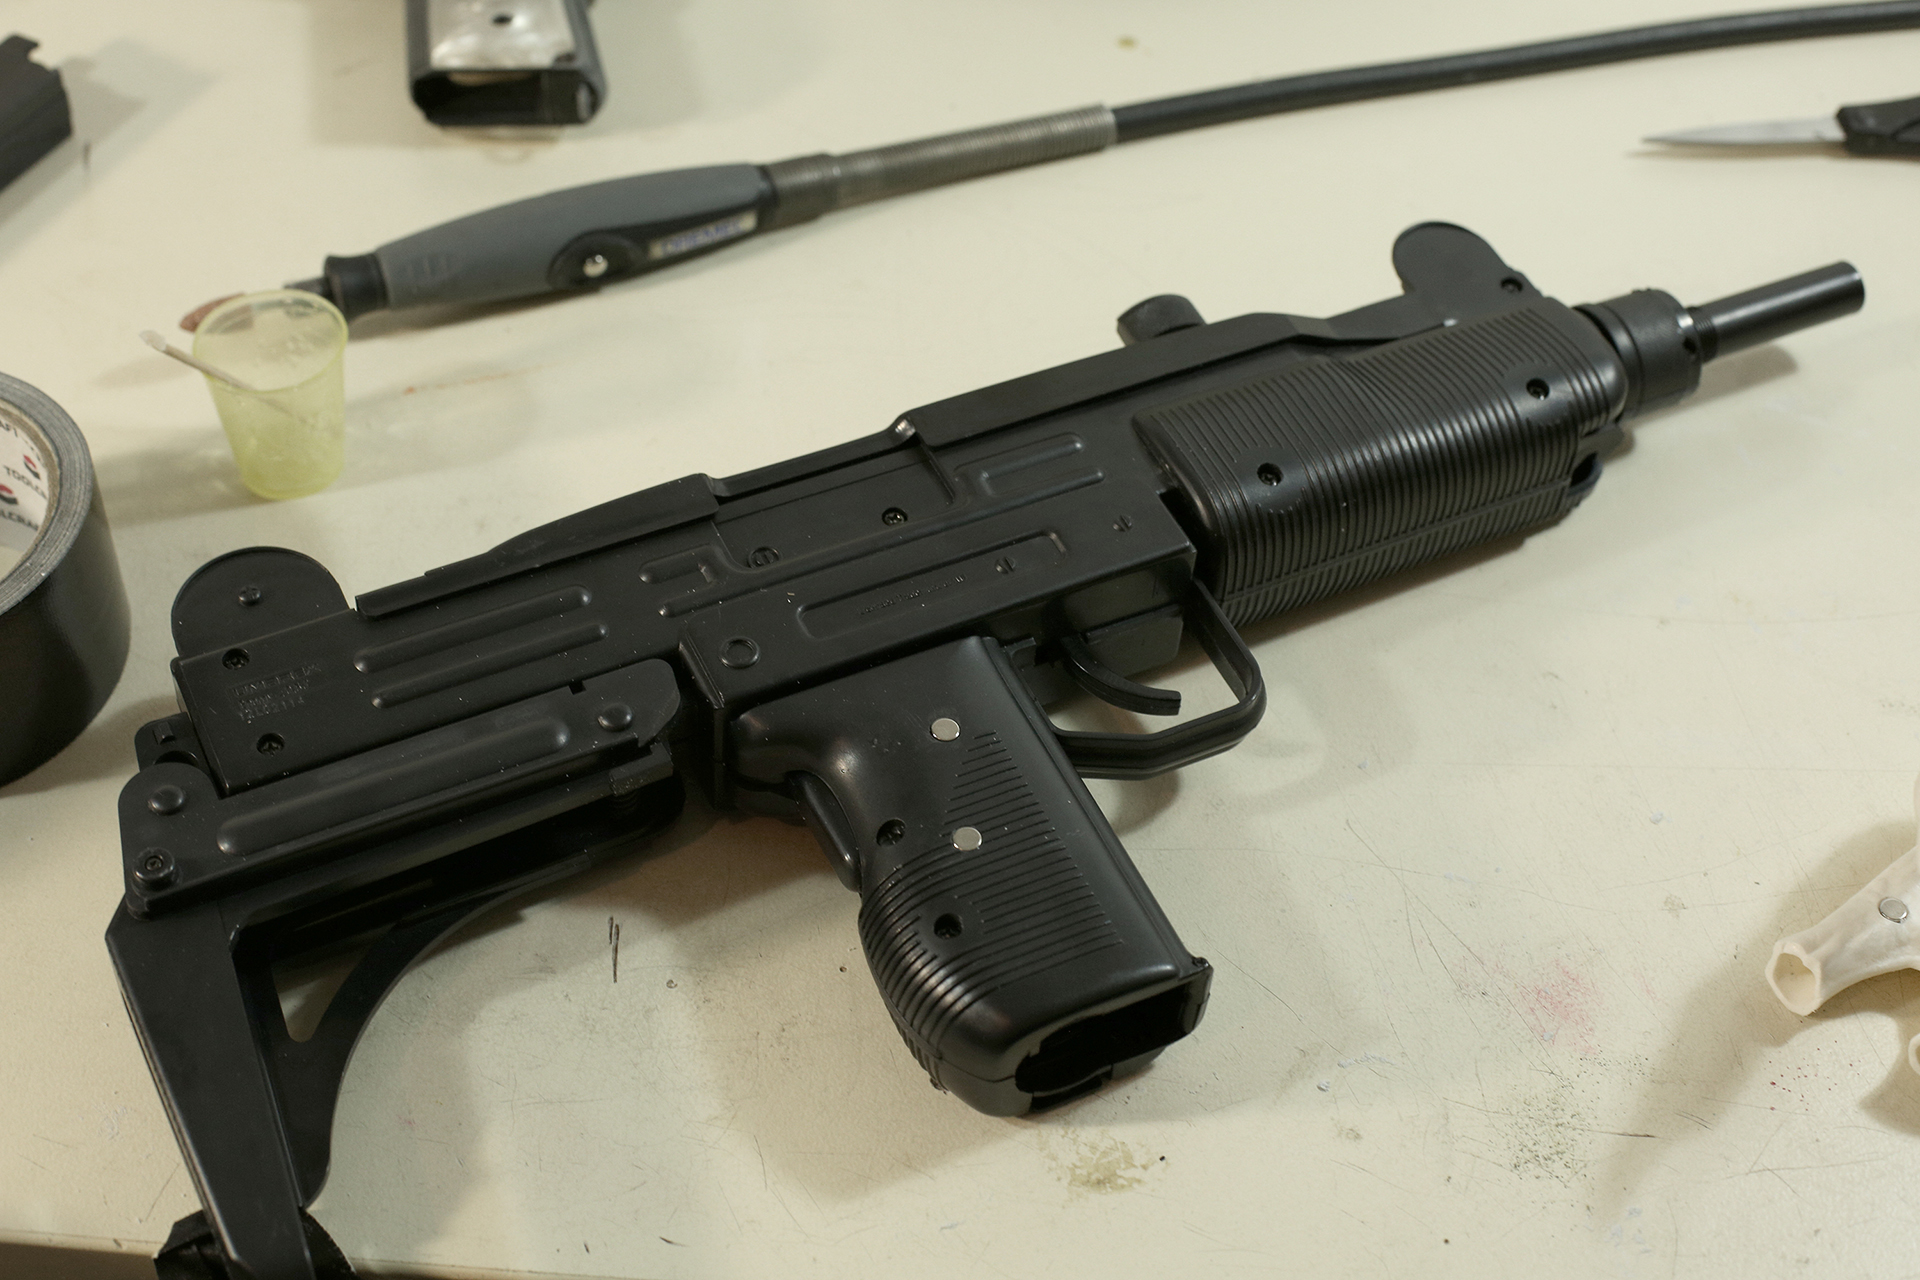
I bought a Airsoft Uzi (plastic) and emptied it out, so it would be as light as possible. To make the hand fit the gun, I cut off the thumb, put a good portion of Apoxie Sculpt on the hand and pressed it against the Uzi grip. This way it will fit the grip perfectly. I let it dry and remodeled the rest of the hand. To finish it, I reattached the thumb.
Fitting the hand to the grip
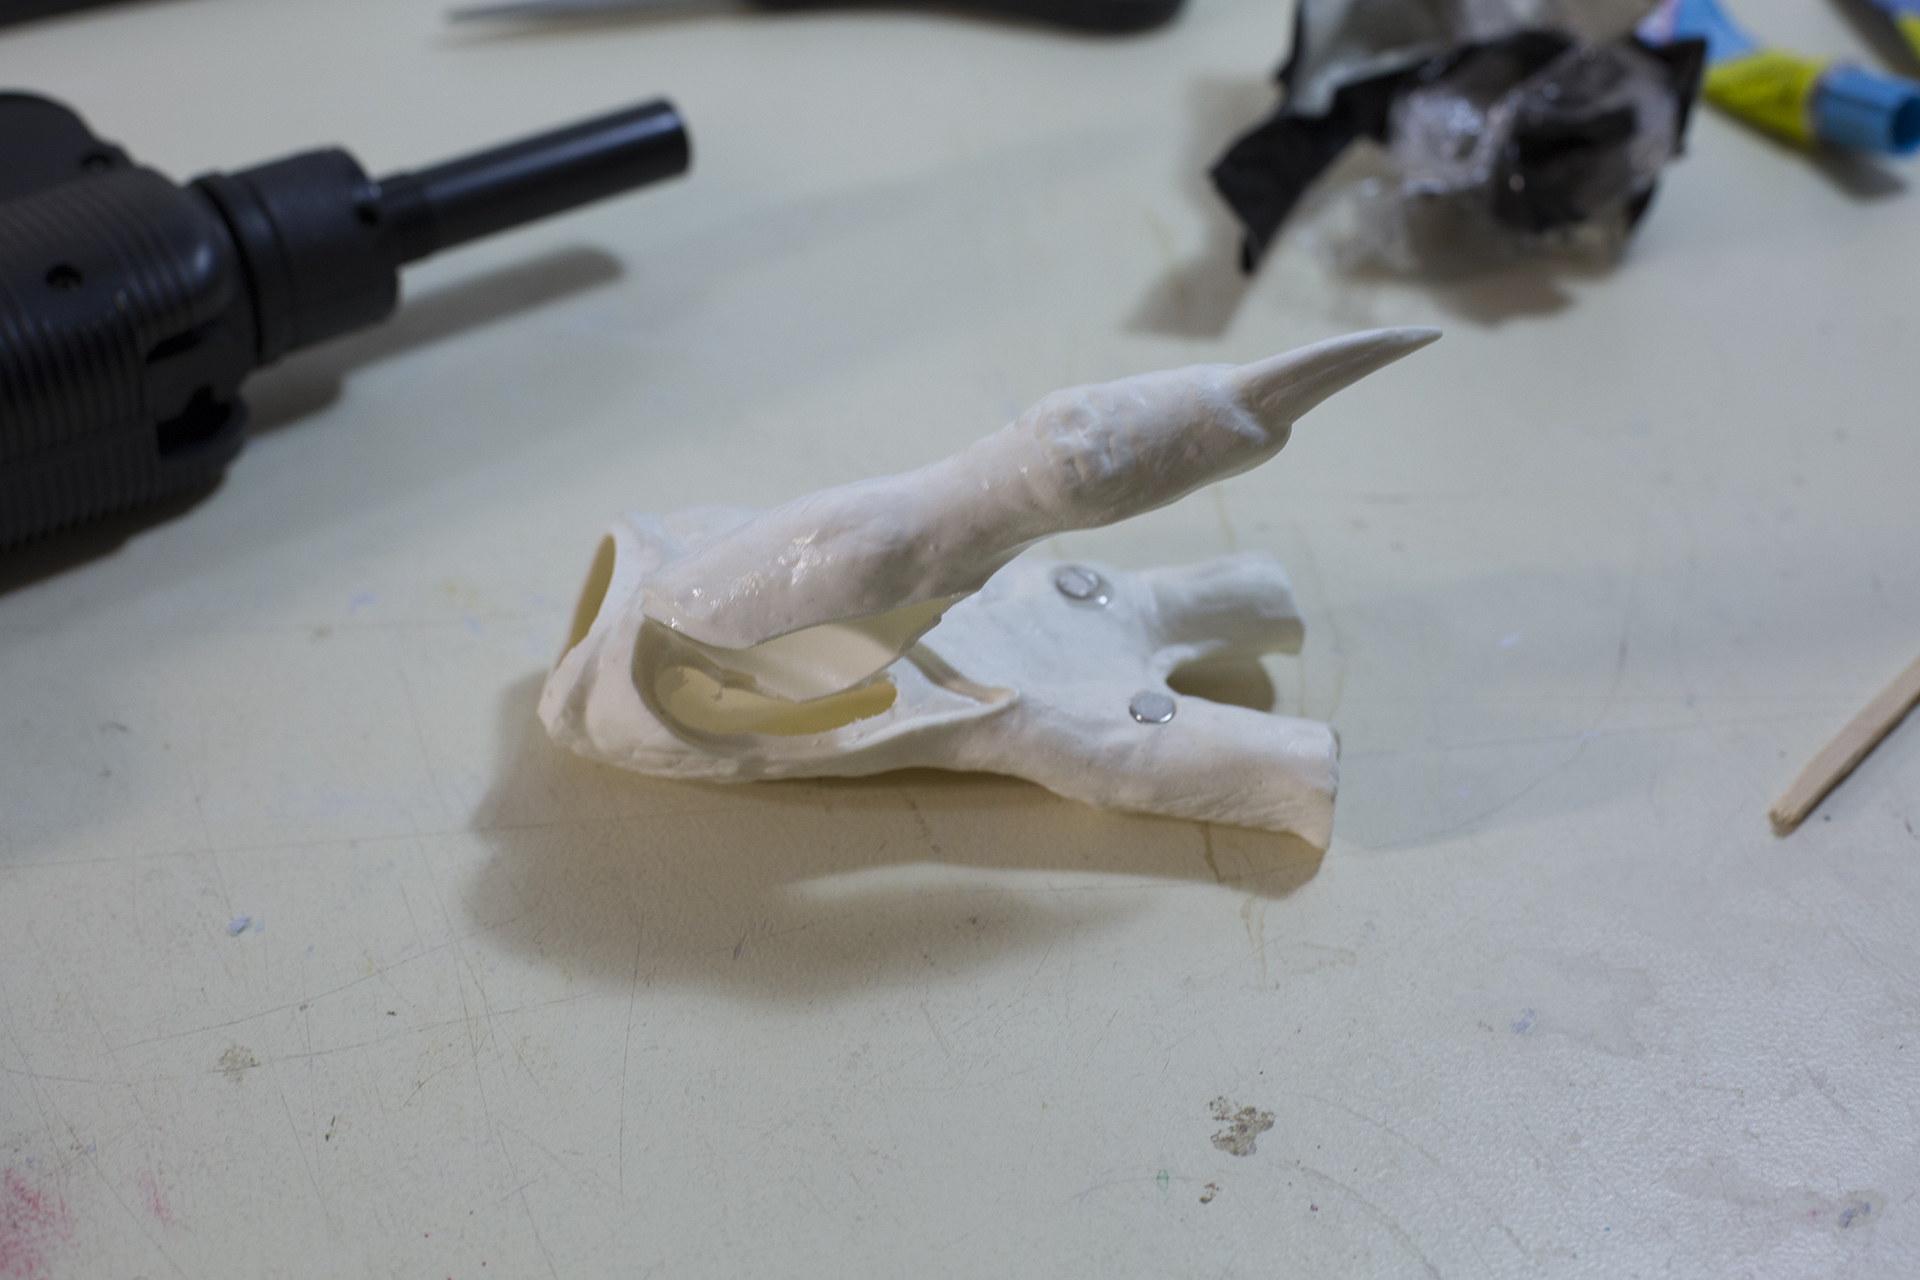
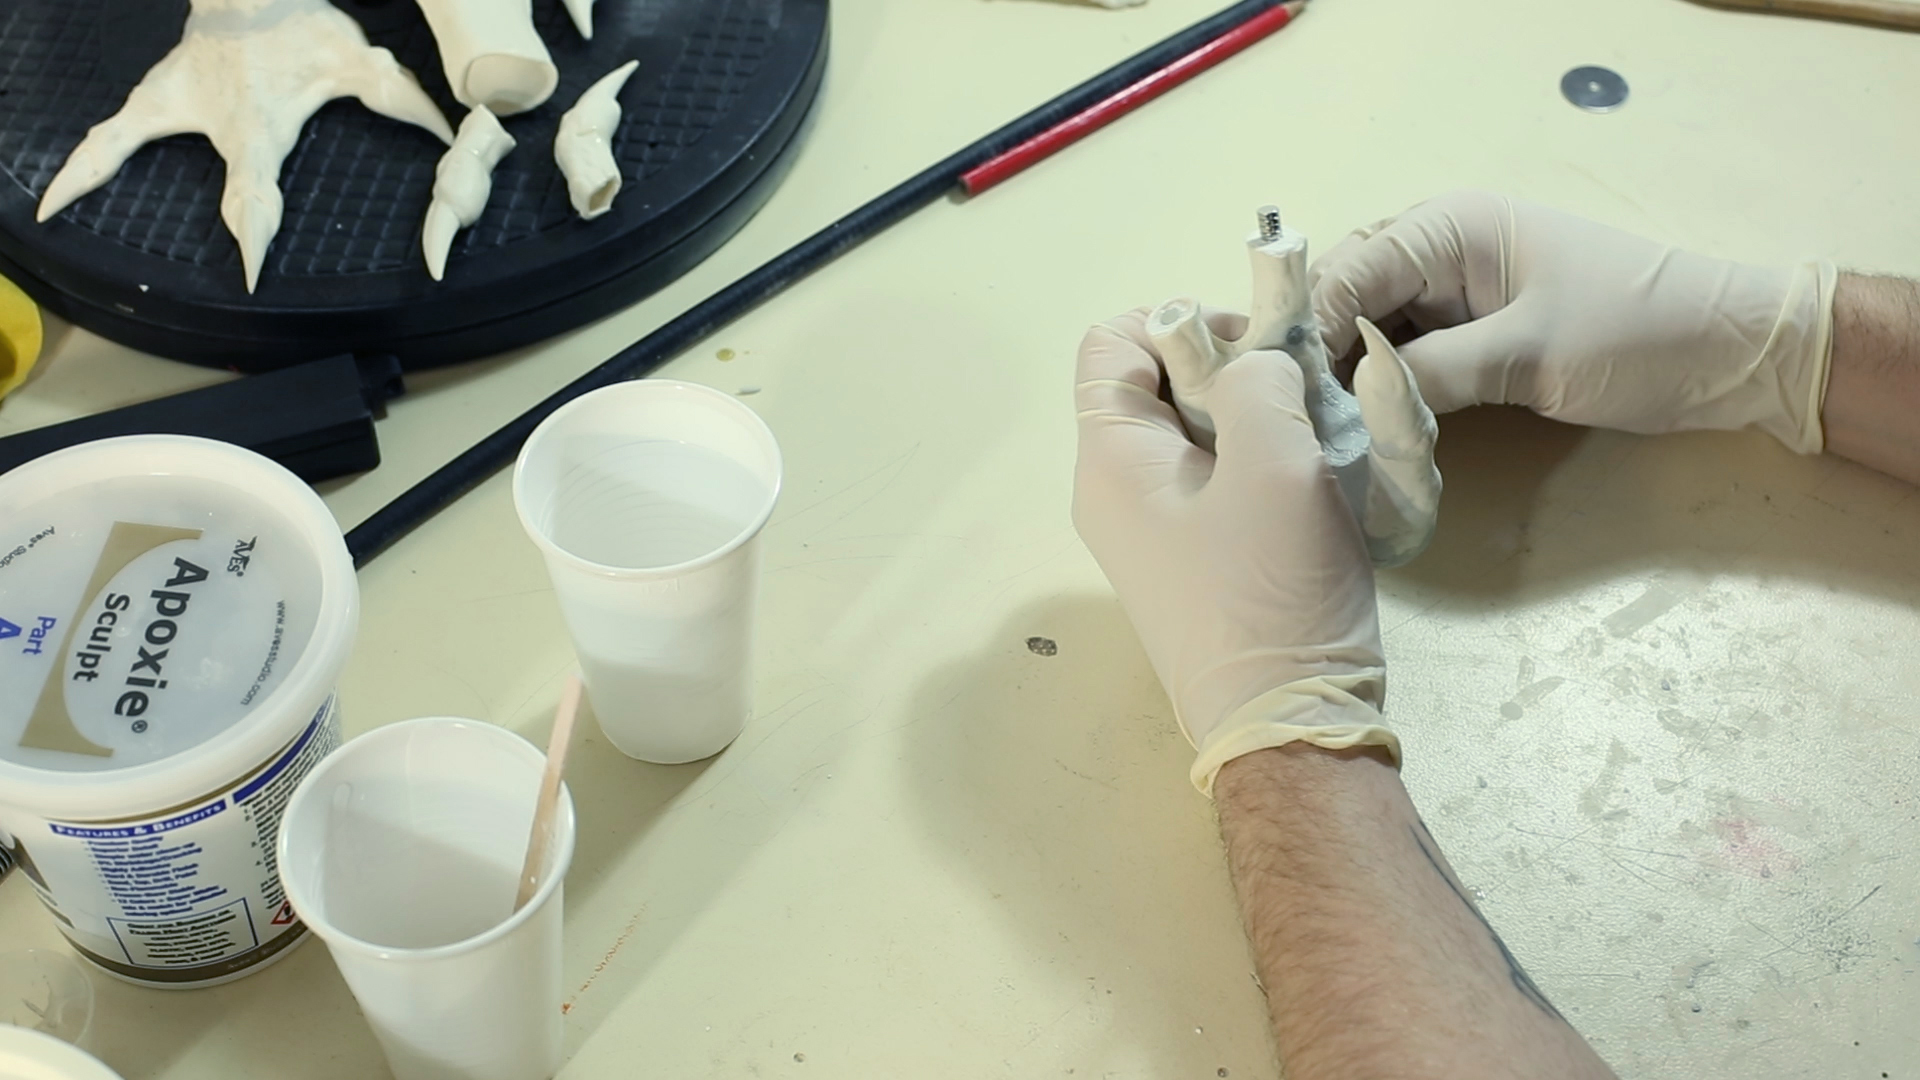
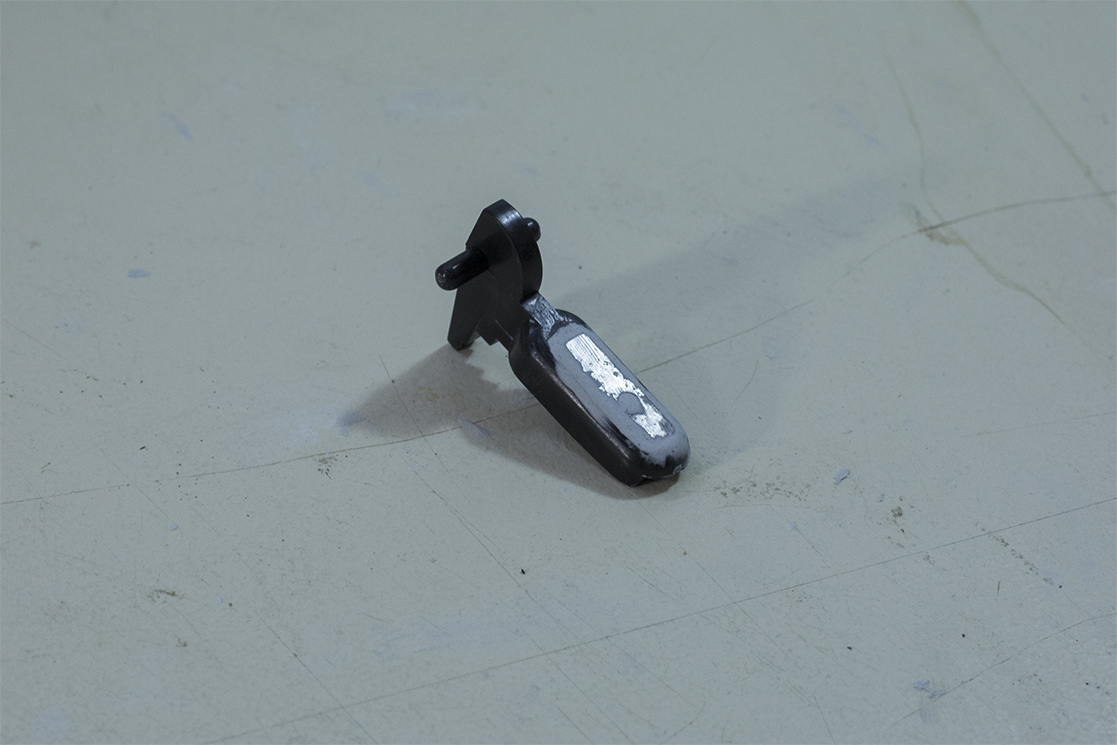
To make the fingers removable, I cut them off, put in magnets into the hand and fingers and remodeled the knuckles to hide the seam.
I used cling wrap to prevent the apoxie to bond with the other part of the hand. This way I get a clean negative and reduce the seam looking like one.
I used the same method for the hand and uzi part.
Superglued thumb to hold it in place for remodeling. The magnets get covered in apoxie sculpt later
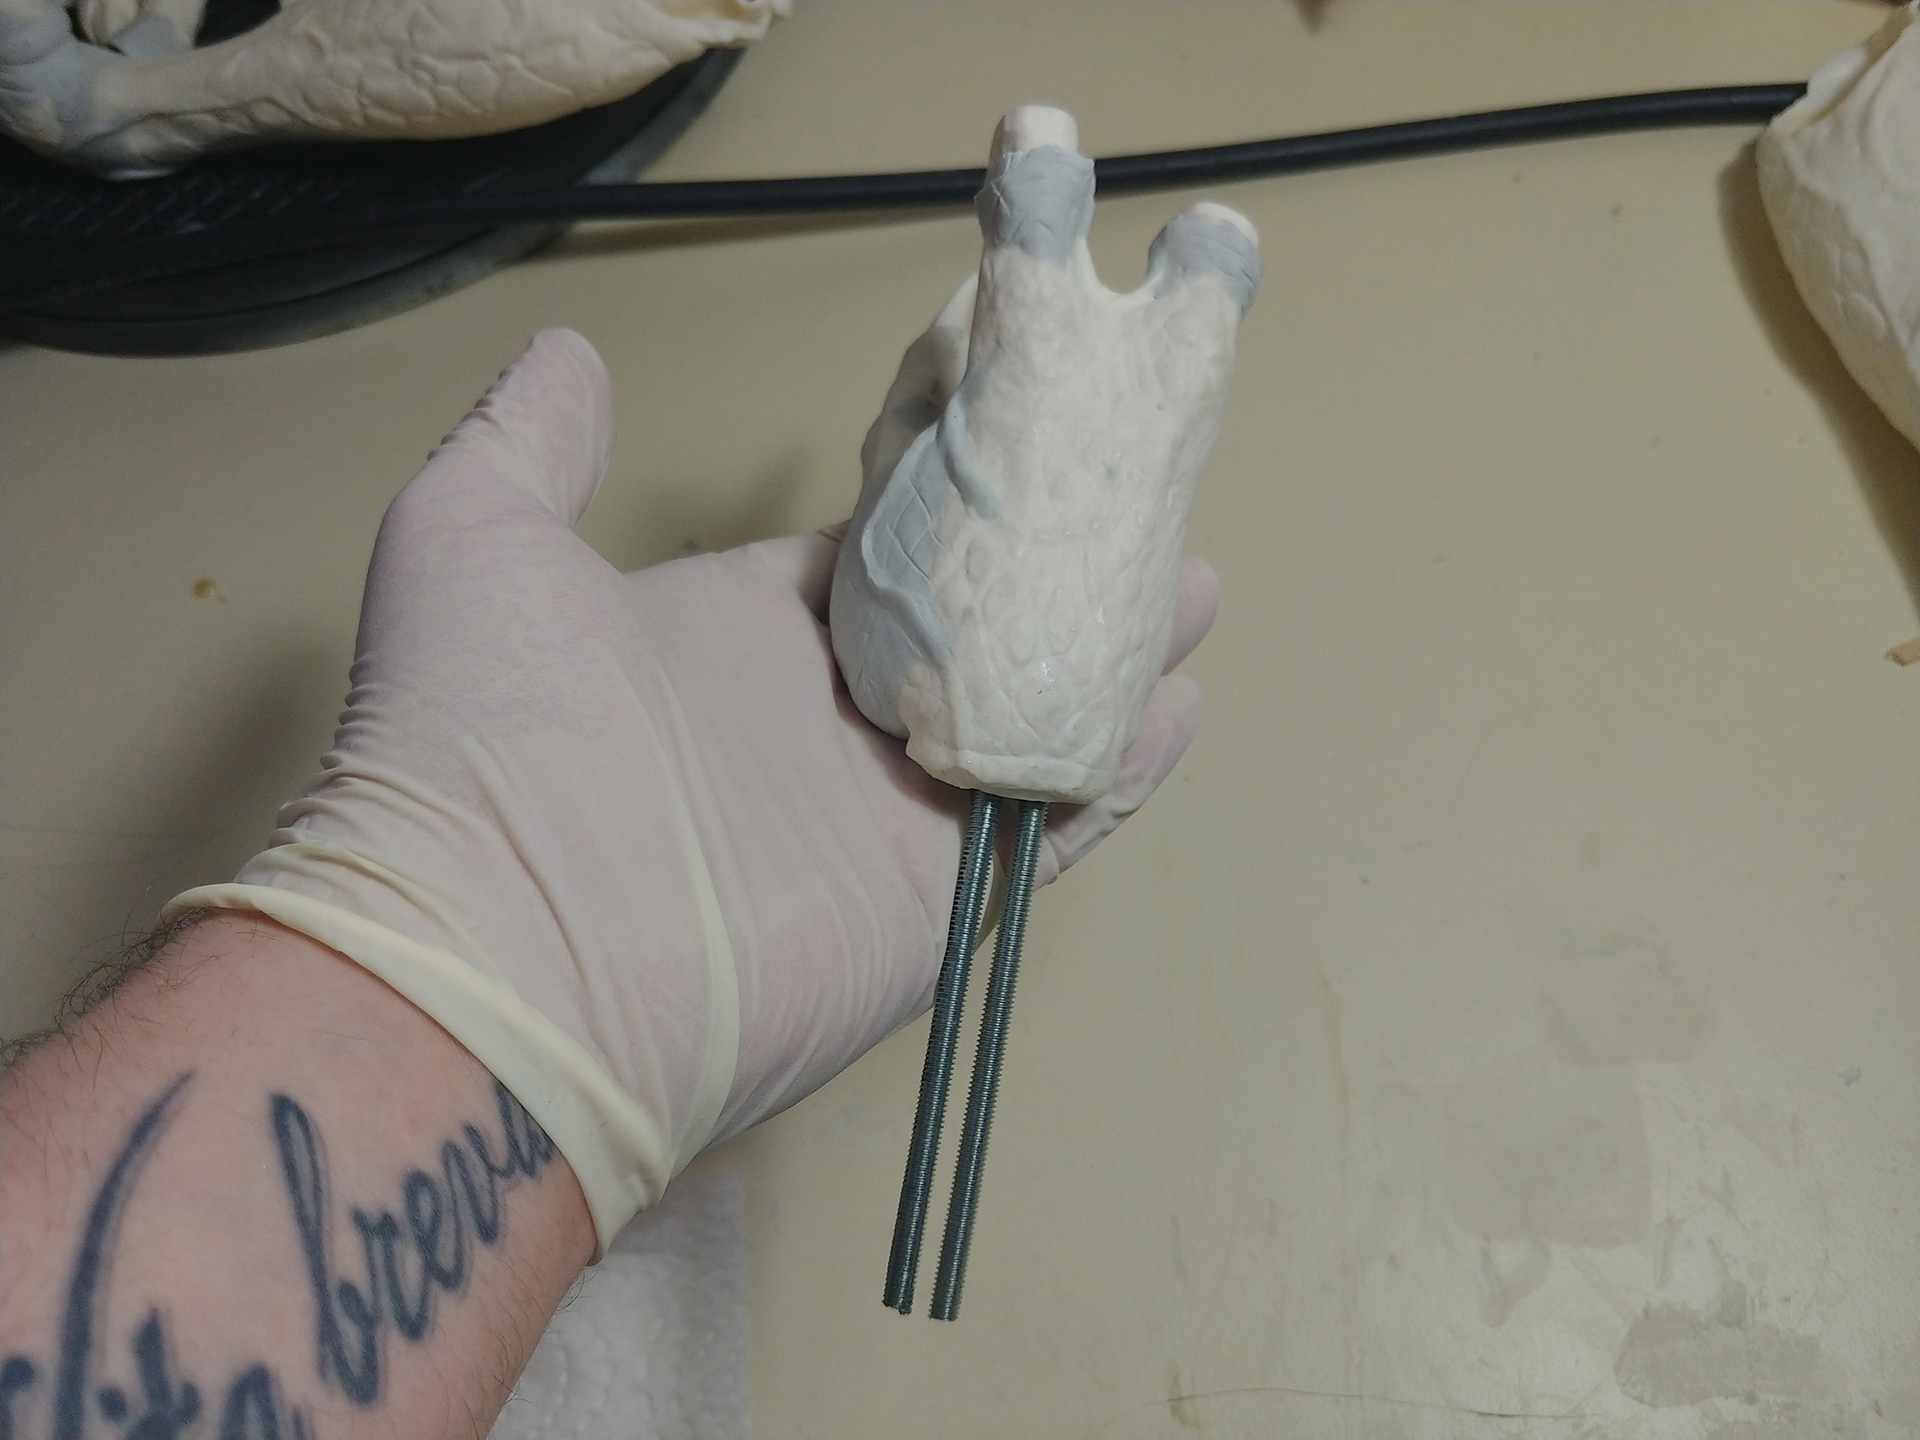
I put steel poles into the connections to strenghten them. This way, the plaster had something to grab on.
I also put 3 magnets into the palm and 1 into the forearm. Those magnets are holding the Uzi. I drilled holes into the Grip and stock of the Uzi and fixed the magnets with apoxie sculpt. I used the strongest and smallest magnets I could find. One alone should hold around 900g.
Drilled holes for the magnets into the grip. One more was added to the side of the stock
Magnet in the back side of the grip
Finished right hand
Since I wanted to fill the whole model with art stone, I had to make sure the plaster has something to grip on between the parts (I hope you understand what I mean).
Metal rods into plaster. The rods go into the forearm and provide extra stability
Top view remodeled hand
When it came to filling the parts, I had to do it ghetto style… But it worked.
Filling the hand with art stone
Important to note is the fact that I didnt fill the hand all the way to the top! This way the plaster will grab the rod and fill the rest of the hand when filling the arm. It will create an extra part and increase stability.
I glued the hand to the arm and remodeled all the seams and details with apoxie sculpt.
Looks way more dynamic!
Left hand attached to the arm
It was tedious and very time consuming to merge the lower and upper arm together. Cut off a lot of material on both parts, finingd a good pose, taping it, marking it, rearrange, tape again, cut, and so on. When I finally found the position I liked, I marked both pieces so I would know how to rotate and place it exactly. I bent steel rods and filled it partially with art stone.
Filling arm with art stone
Posed arm, superglued on the edge to hold it in place
To get the arms fillable, I posed them, glued them (for temporarily fix) and remodeled the gaps with apoxie sculpt. This way I would have a hard and seamless shell for the art stone. Art stone gets pretty warm when curing, so I dont know if there were small warps in the pose, since the vinyl is flexible when warm.
Testing poses and mark the connections
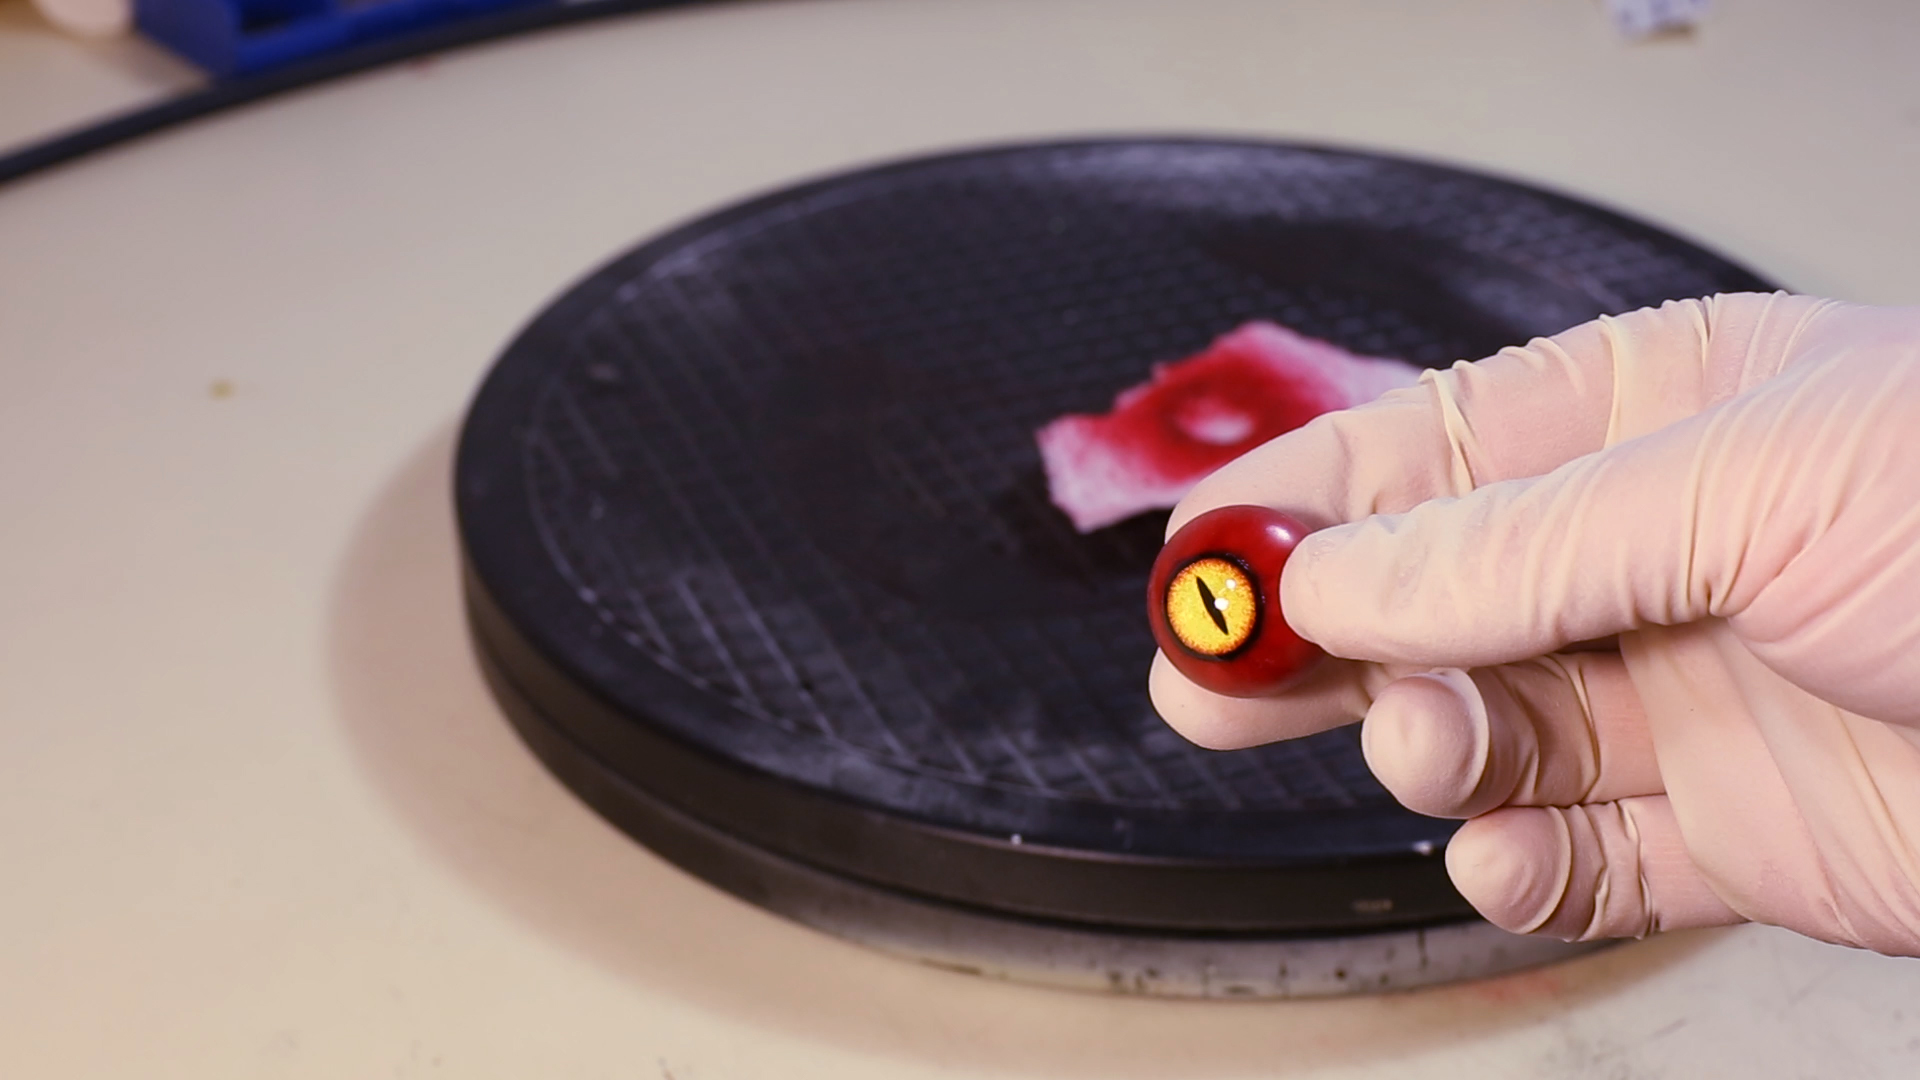
Making the eyes
For the eyes itself I used the base idea of Fairysnmypond . I used Glass marbles (I think I used 25mm) and dremeled out the iris part. Instead of painting it, I designed the Iris in Photoshop, printed it out and glued it in place. To blend in, I painted the edge of it black, so the paper would not show a white line. After that I filled it with resin to reshape a nice dome.
Dremeled out the shape for the iris
I painted the rest of the eye and fnished up with a high gloss coat. (not shown in this picture). I used Damien canderles design of the eyes as a reference. I always loved those eyes more than the ones in the movie.
Painted eye without gloss coat
Damien canderles Design of a Gremlin
Since I wanted the eyes to be movable, I came up with a strange solution. I would be interested if you have any better ideas. If so, let me know. It works but I for future projects I would like to have a better one.
I made a cup style socket out of super sculpey and glued some padding in. this way I can push the eye a little bit in and turn it, without it getting scratched at the edges of the eyelids.
A nerve racking moment was filling the head with art stone. If those sockets would leak, it would destroy the eyes.
Eyesocket with padding
Glued in eyes and sockets and closed with apoxie sculpt. Poured in water to see it had a leak.
Movable eyes
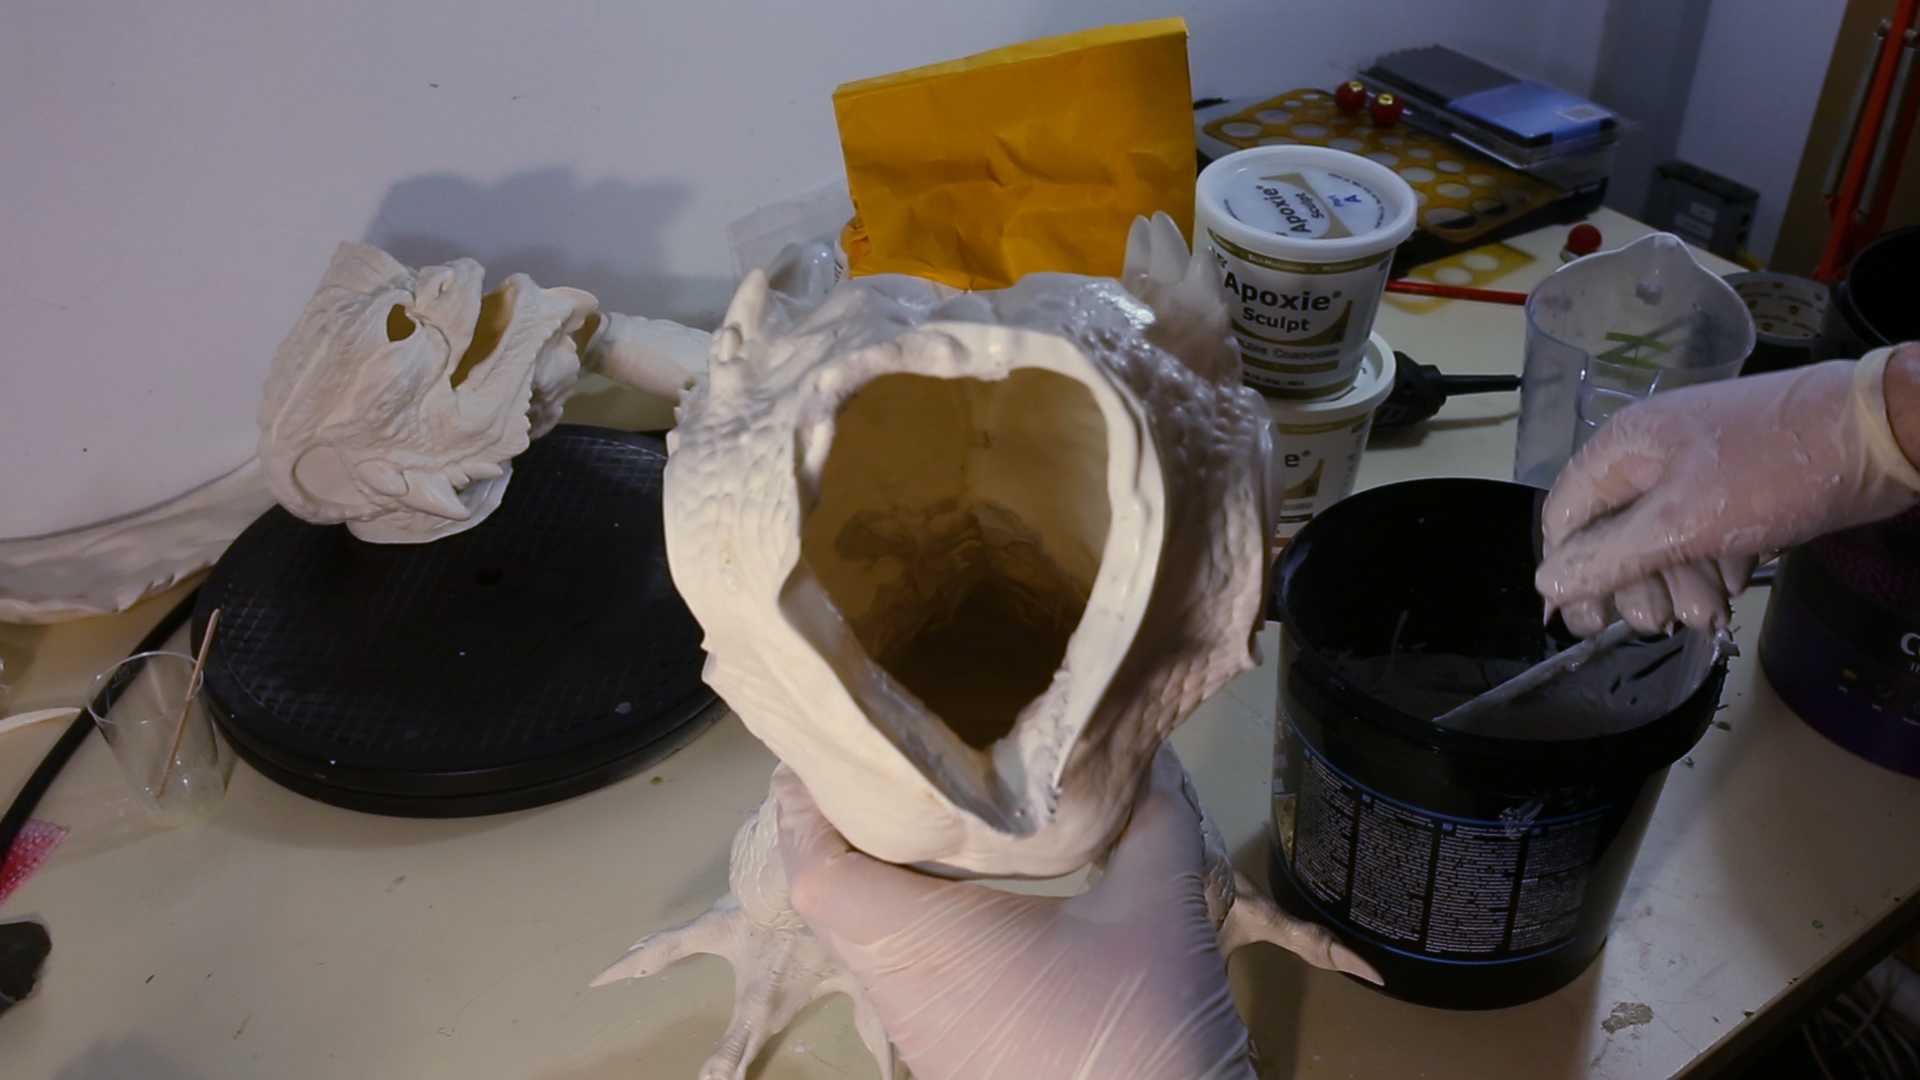
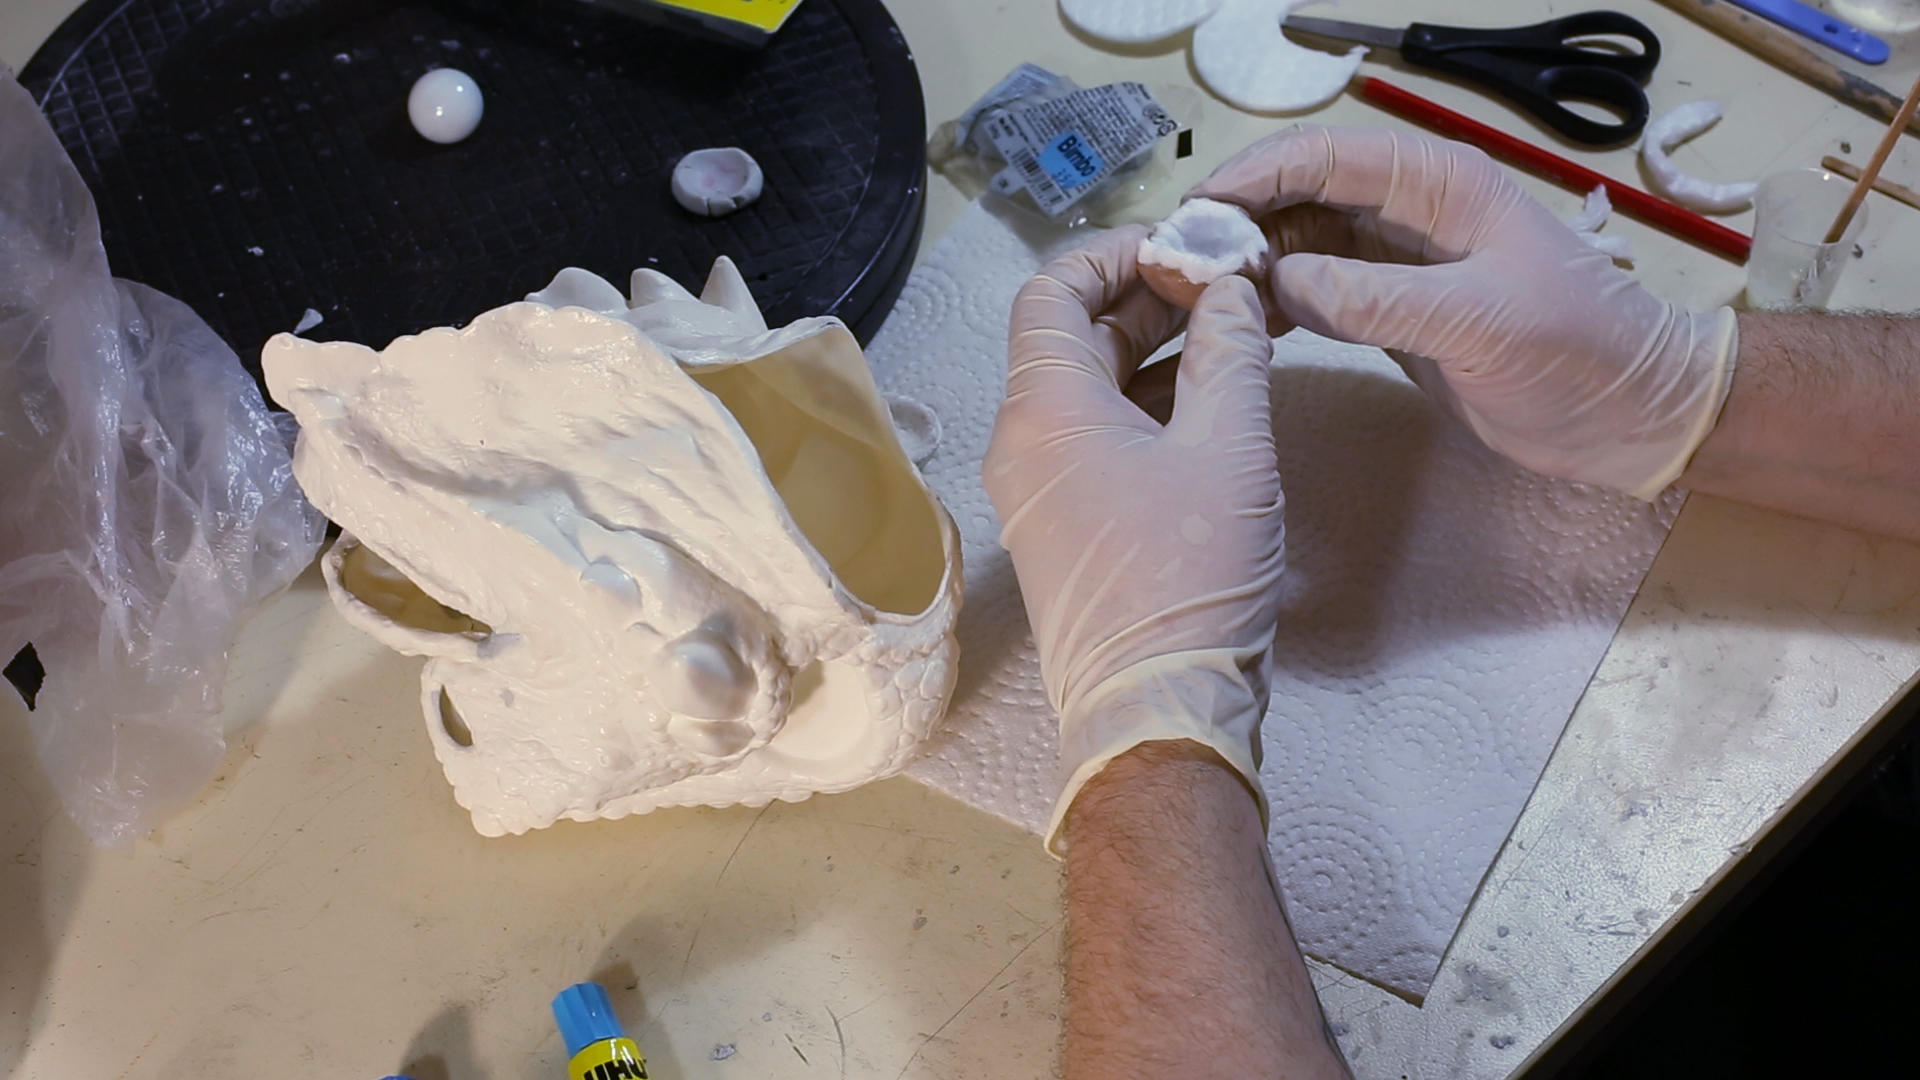
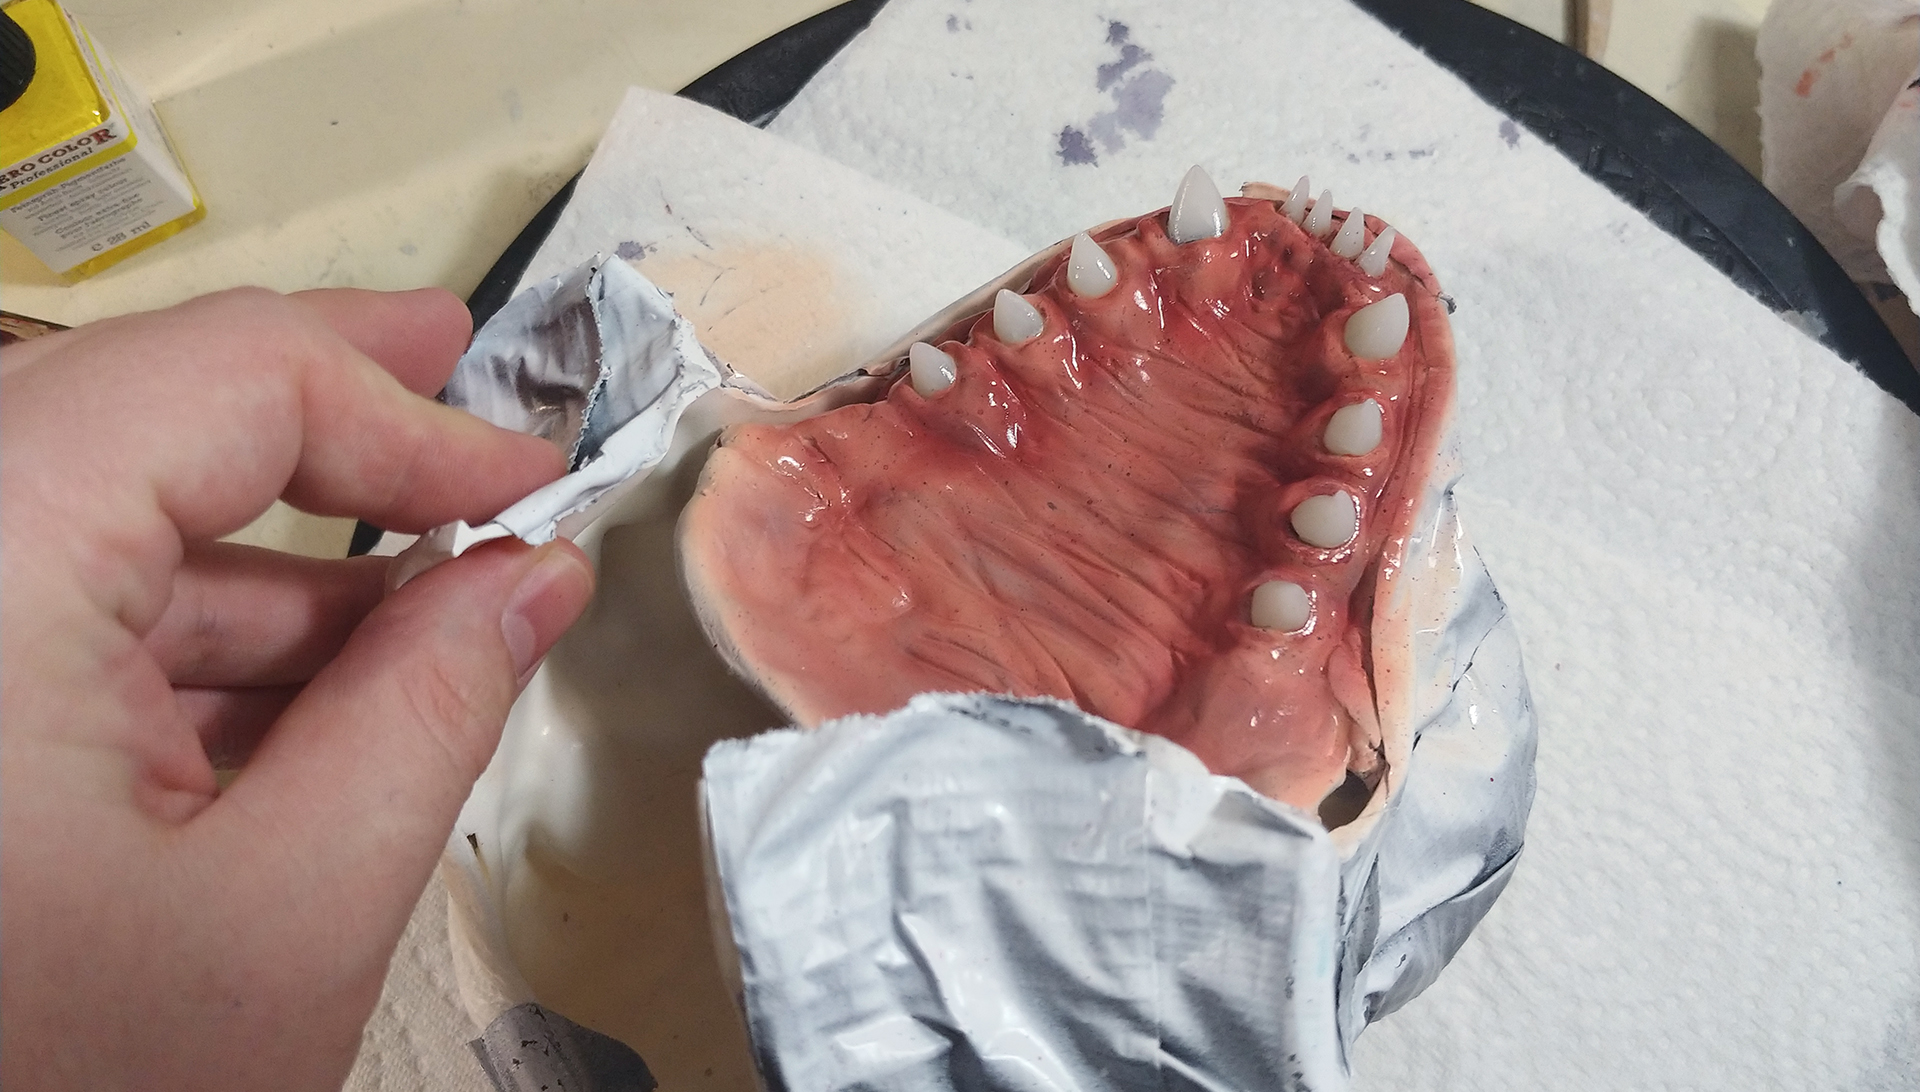
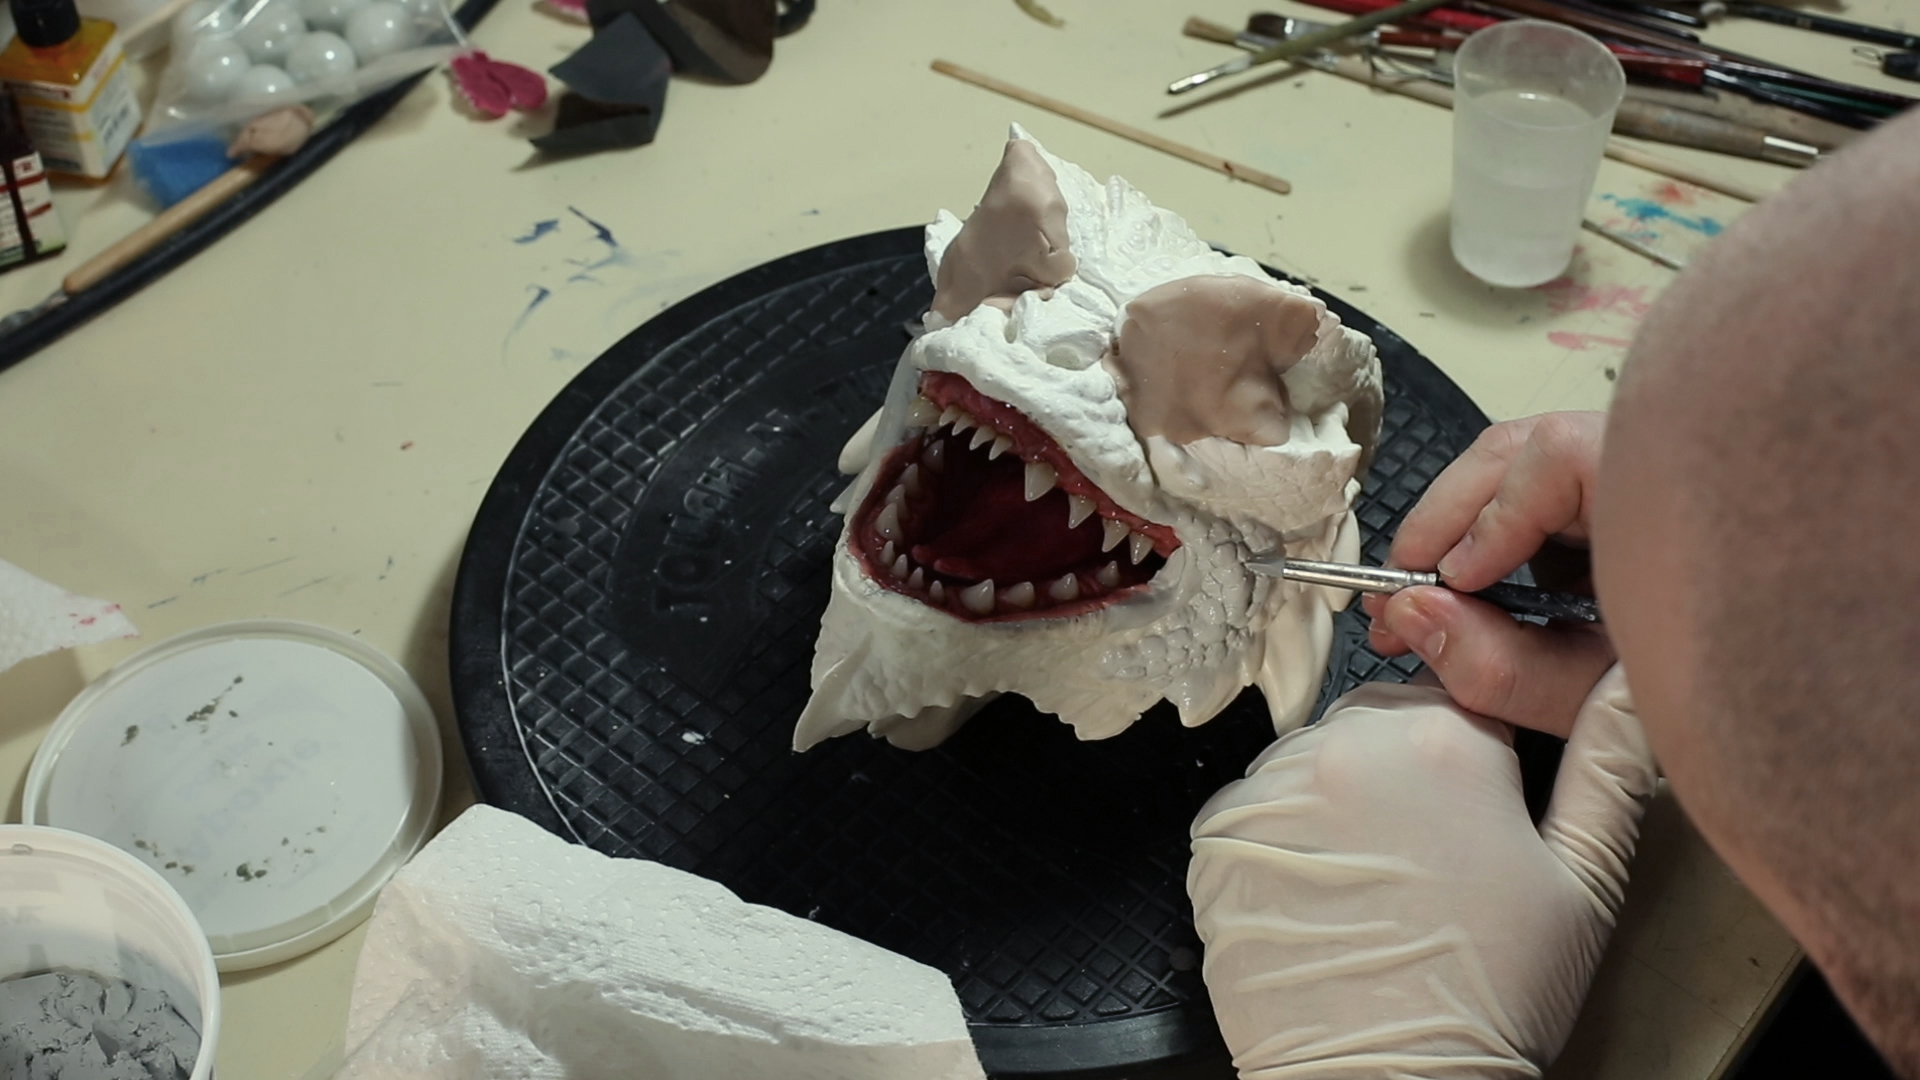
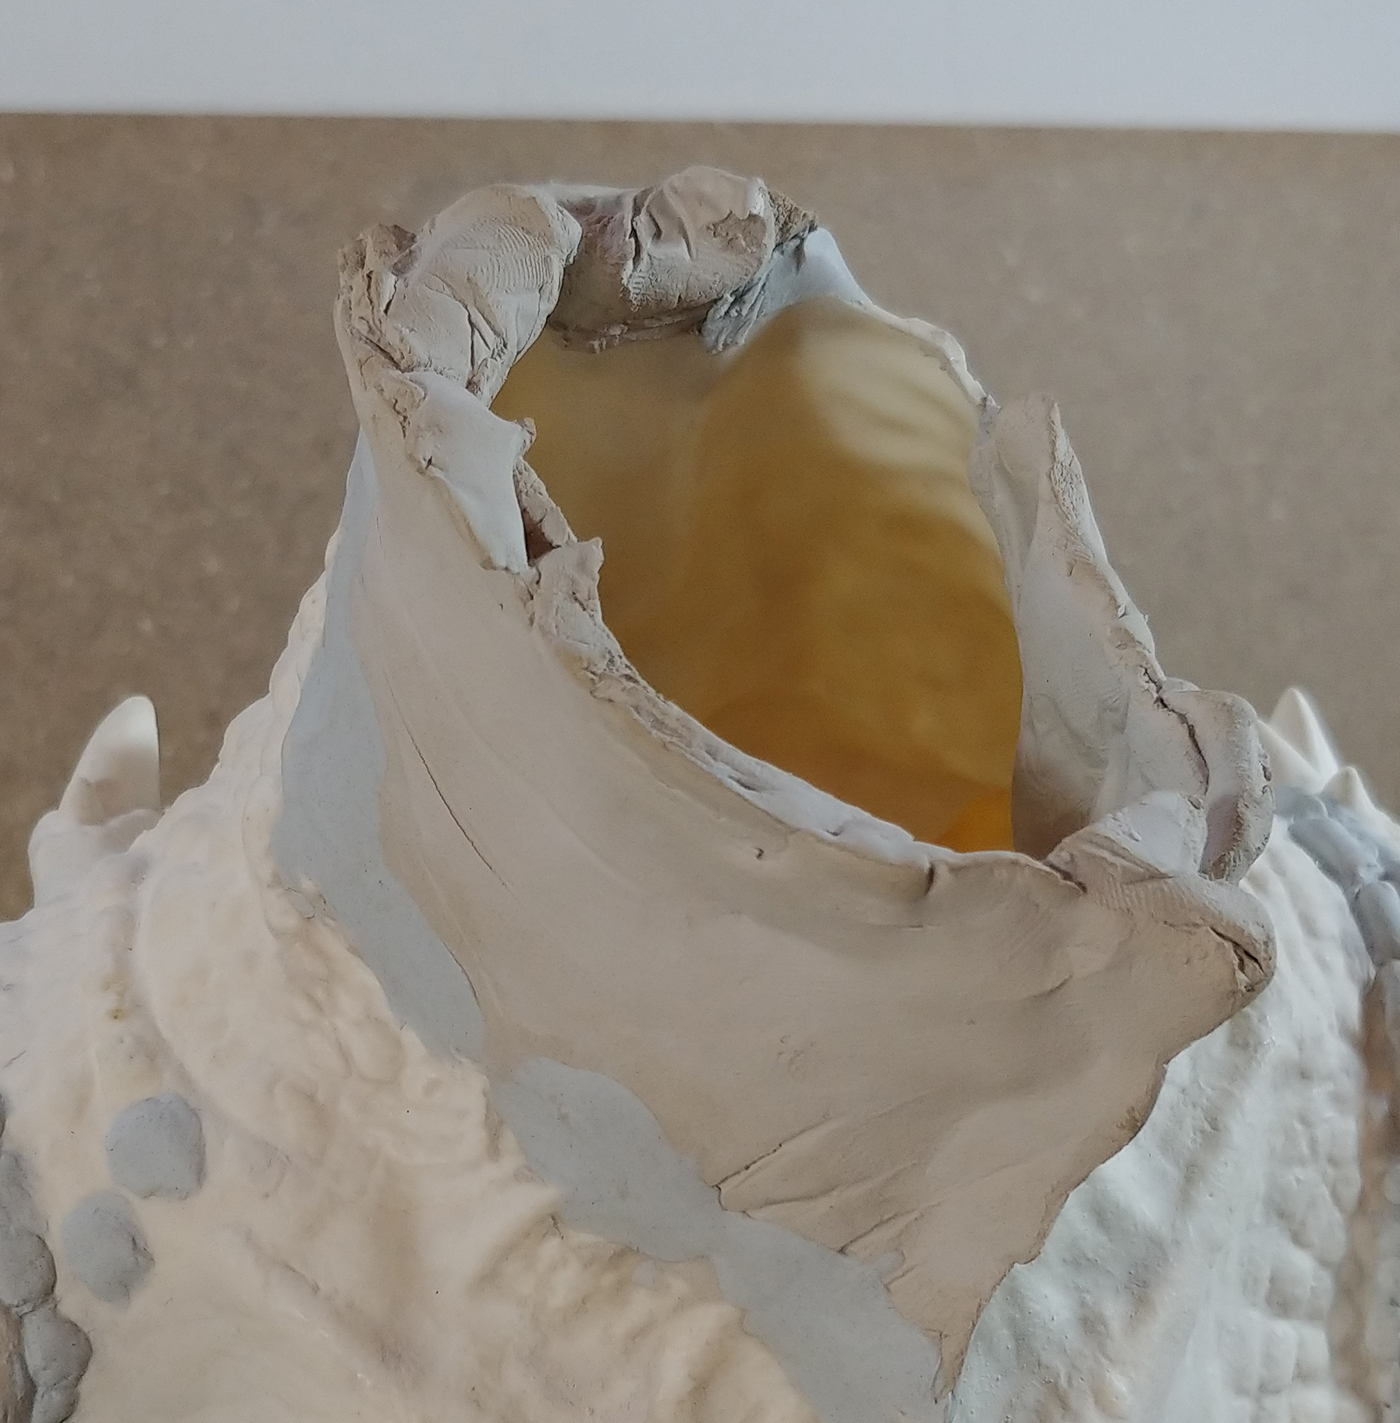
The mouth
I had to cut off the lower jaw in order to open the mouth I wanted to. Also a good portion of the surrounding.
Cut off jaw in order to remodel the mouth
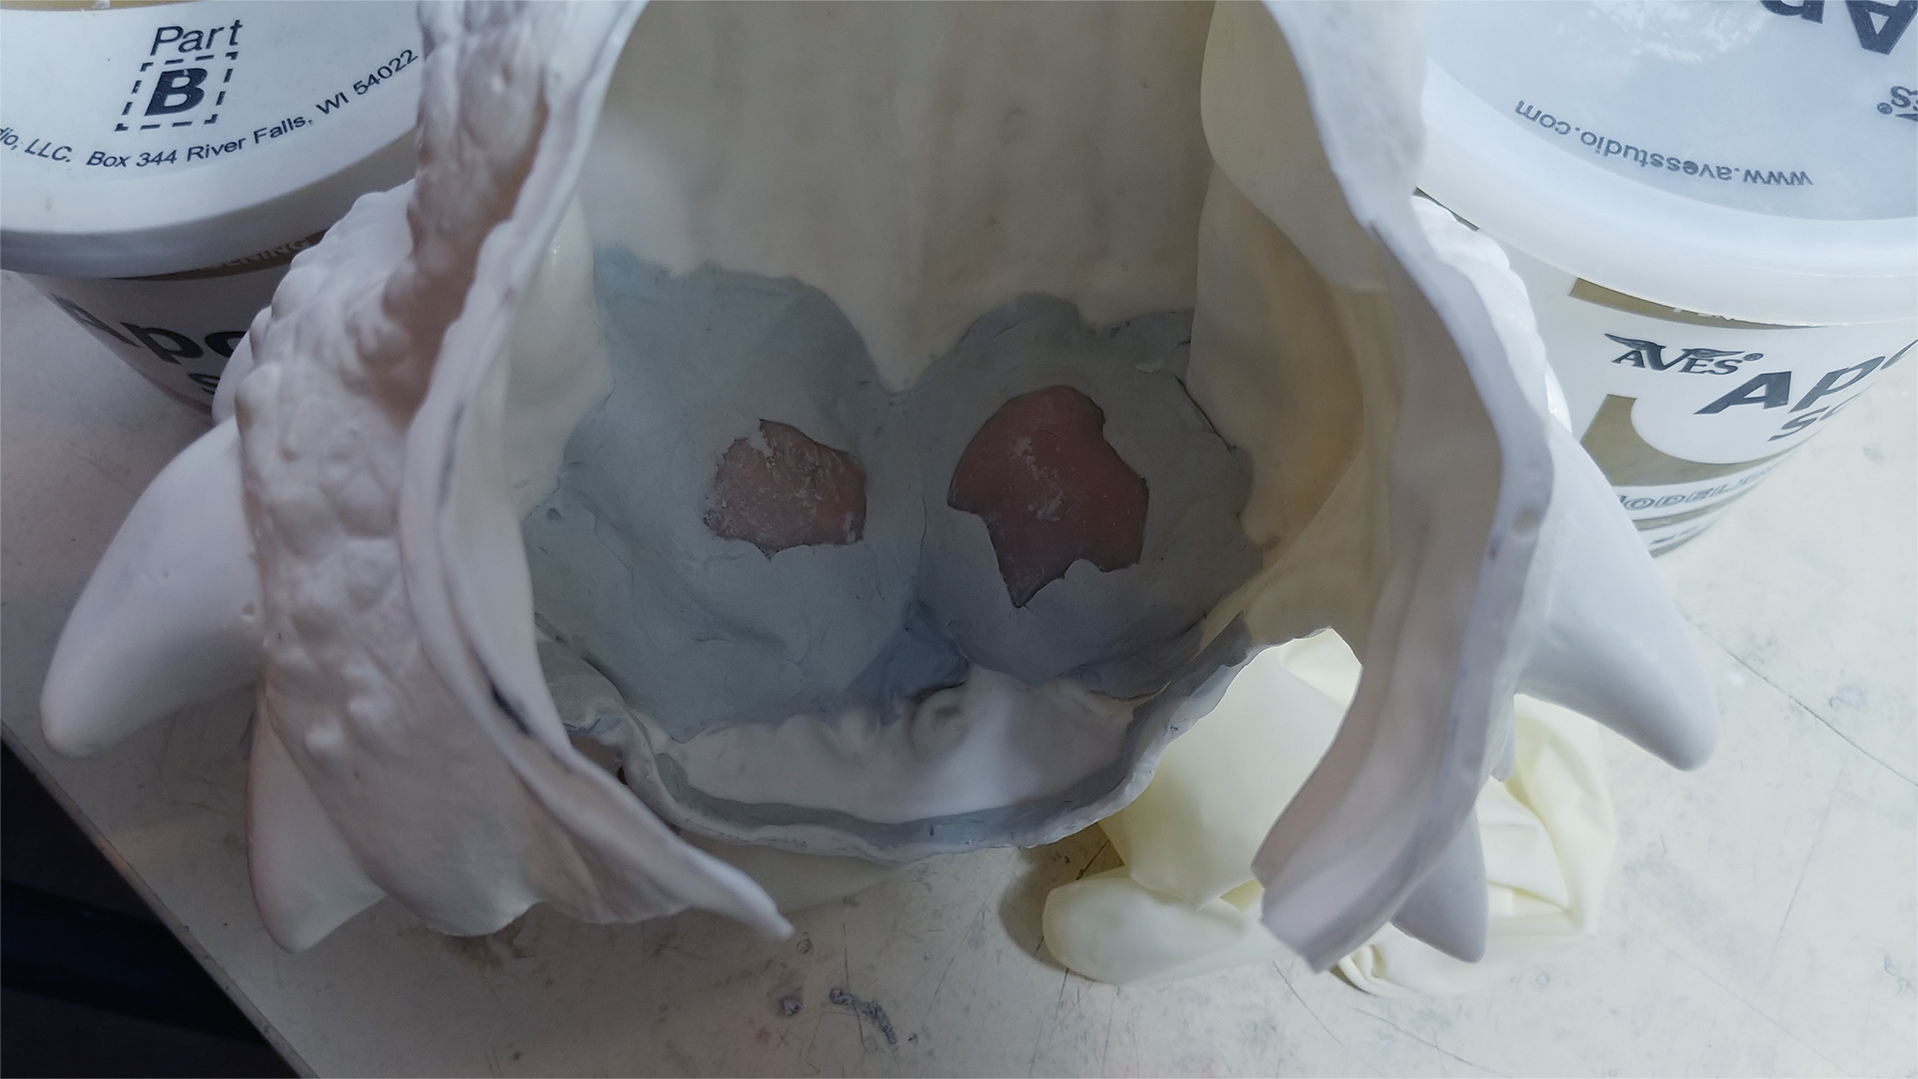
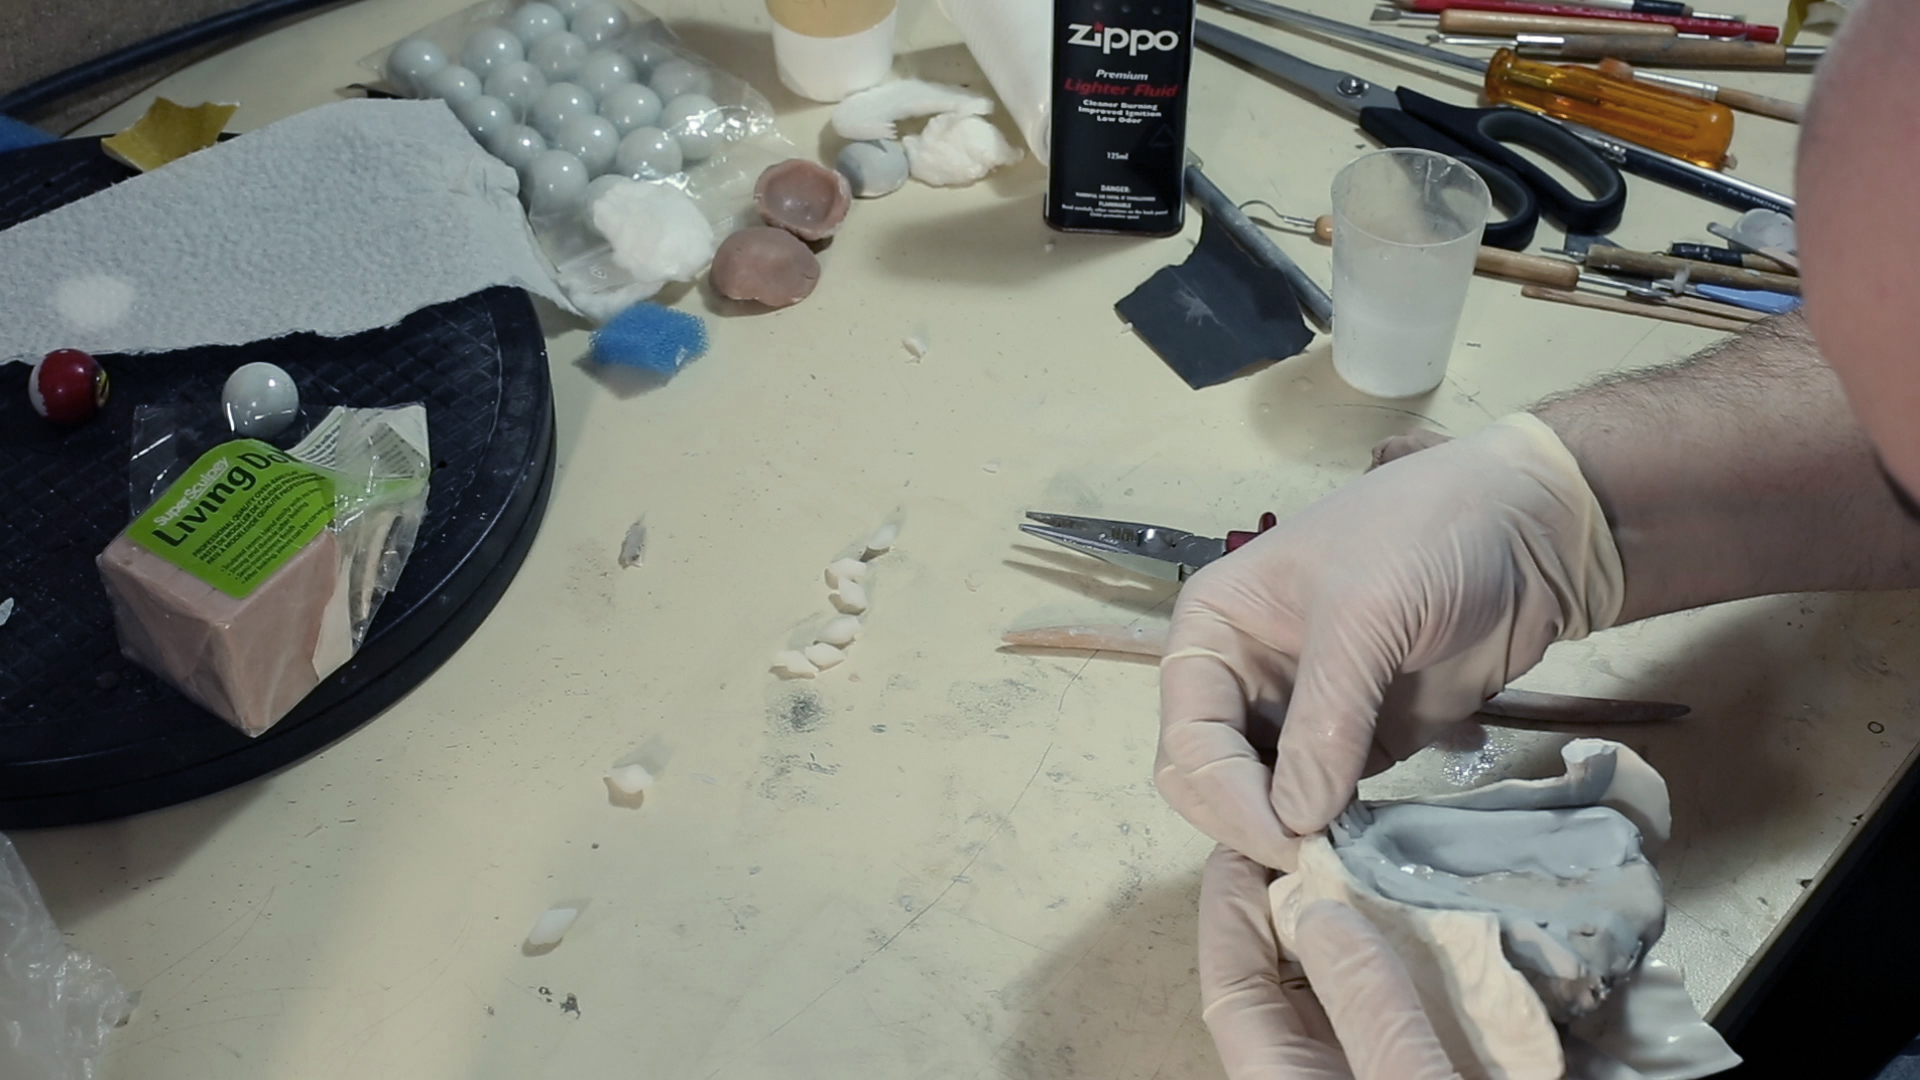
For the Gums I made a a base out of wire, wrapped it in aluminum foil and blocked in the shape with water-based clay so I wouldn’t waste apoxie sculpt or super sculpey. While modeling, I pressed it into the jaws to get a perfect fit with the jaw.
Base for the gums
For the teeth I used fimo translucent. I simply didn’t want to spend so much money on acrylic, make molds and so on. Just to make acrylic teeth it would have cost me around 250$ for the material alone. Art stuff is expensive here (Switzerland). The fimo I used looks like real teeth after the clear coat. And it cost me around 4 bucks.
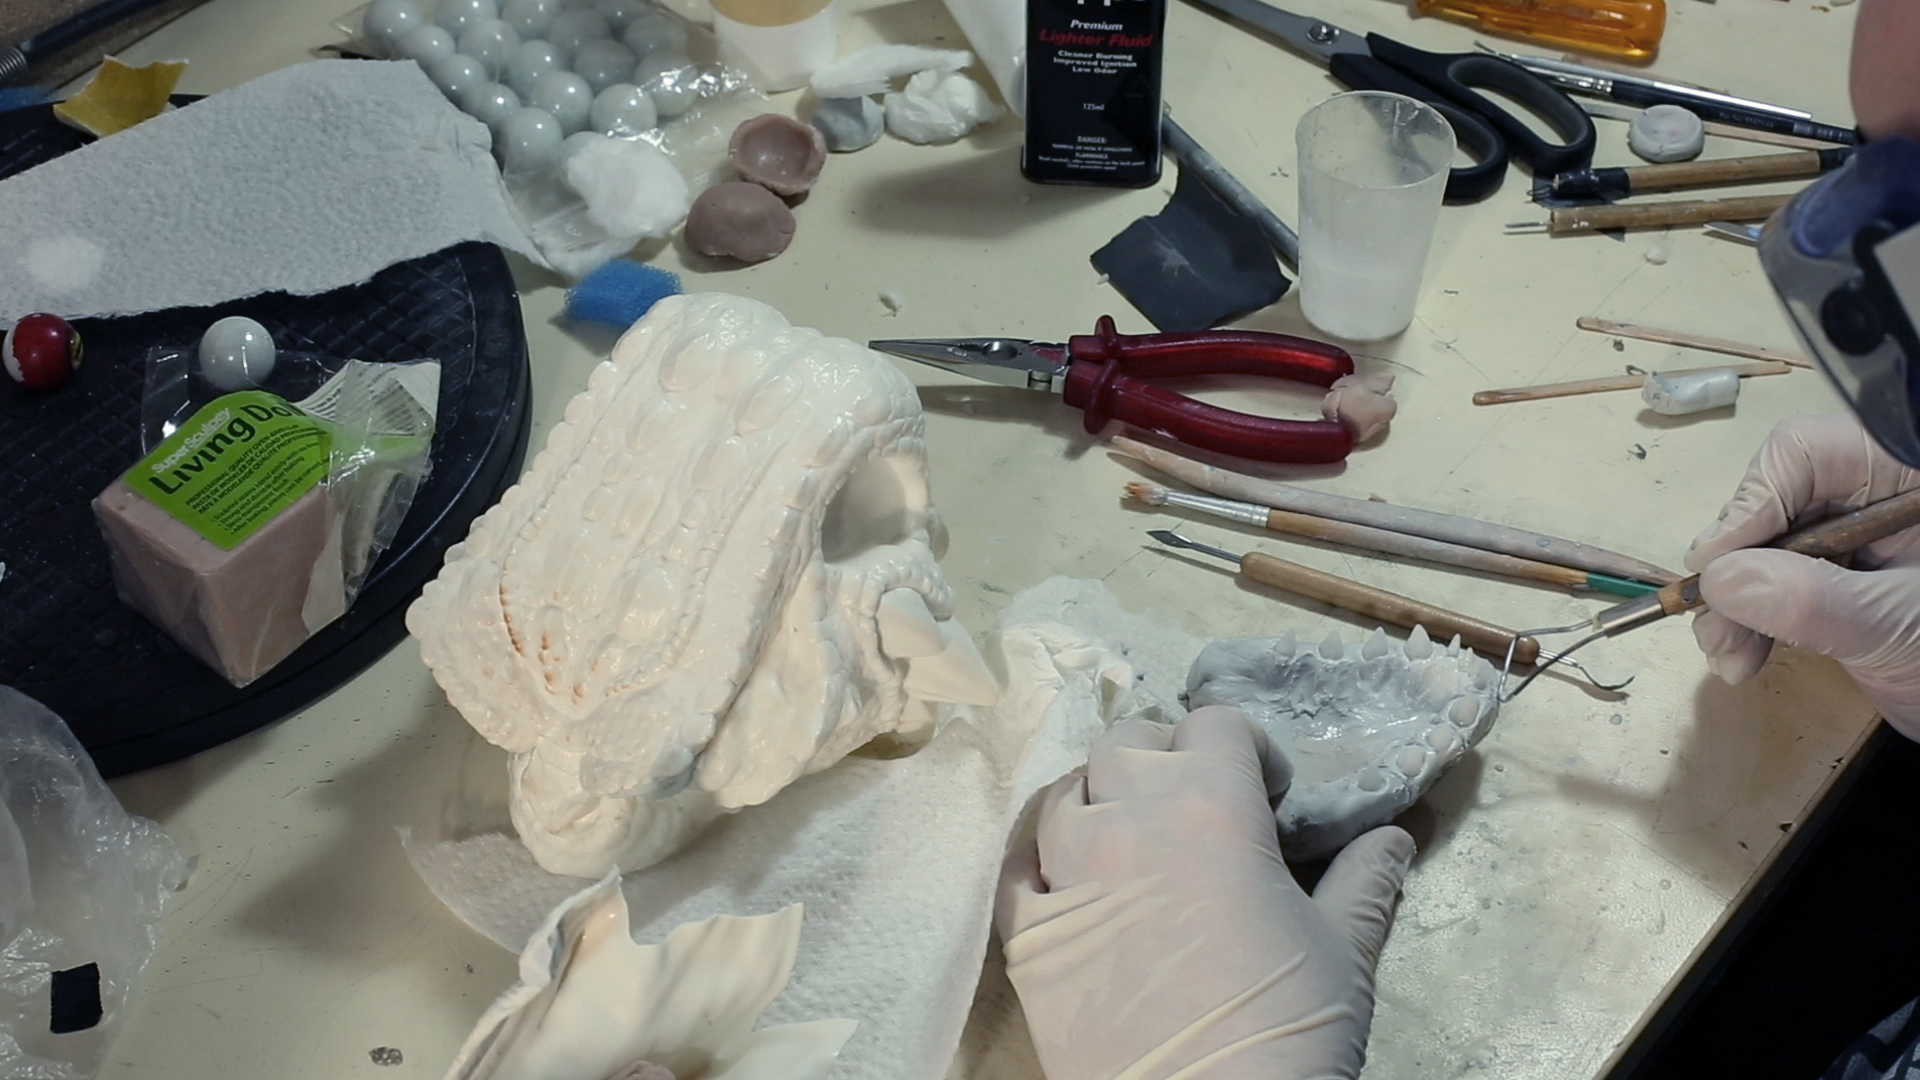
I sculpted all the teeth and finished the gums.
Sculpted tooth RAW after curing
Adding teeth to the jaws. Apoxie Sculpt was used for the gums
Sculpting the details of the gums with Apoxie Sculpt
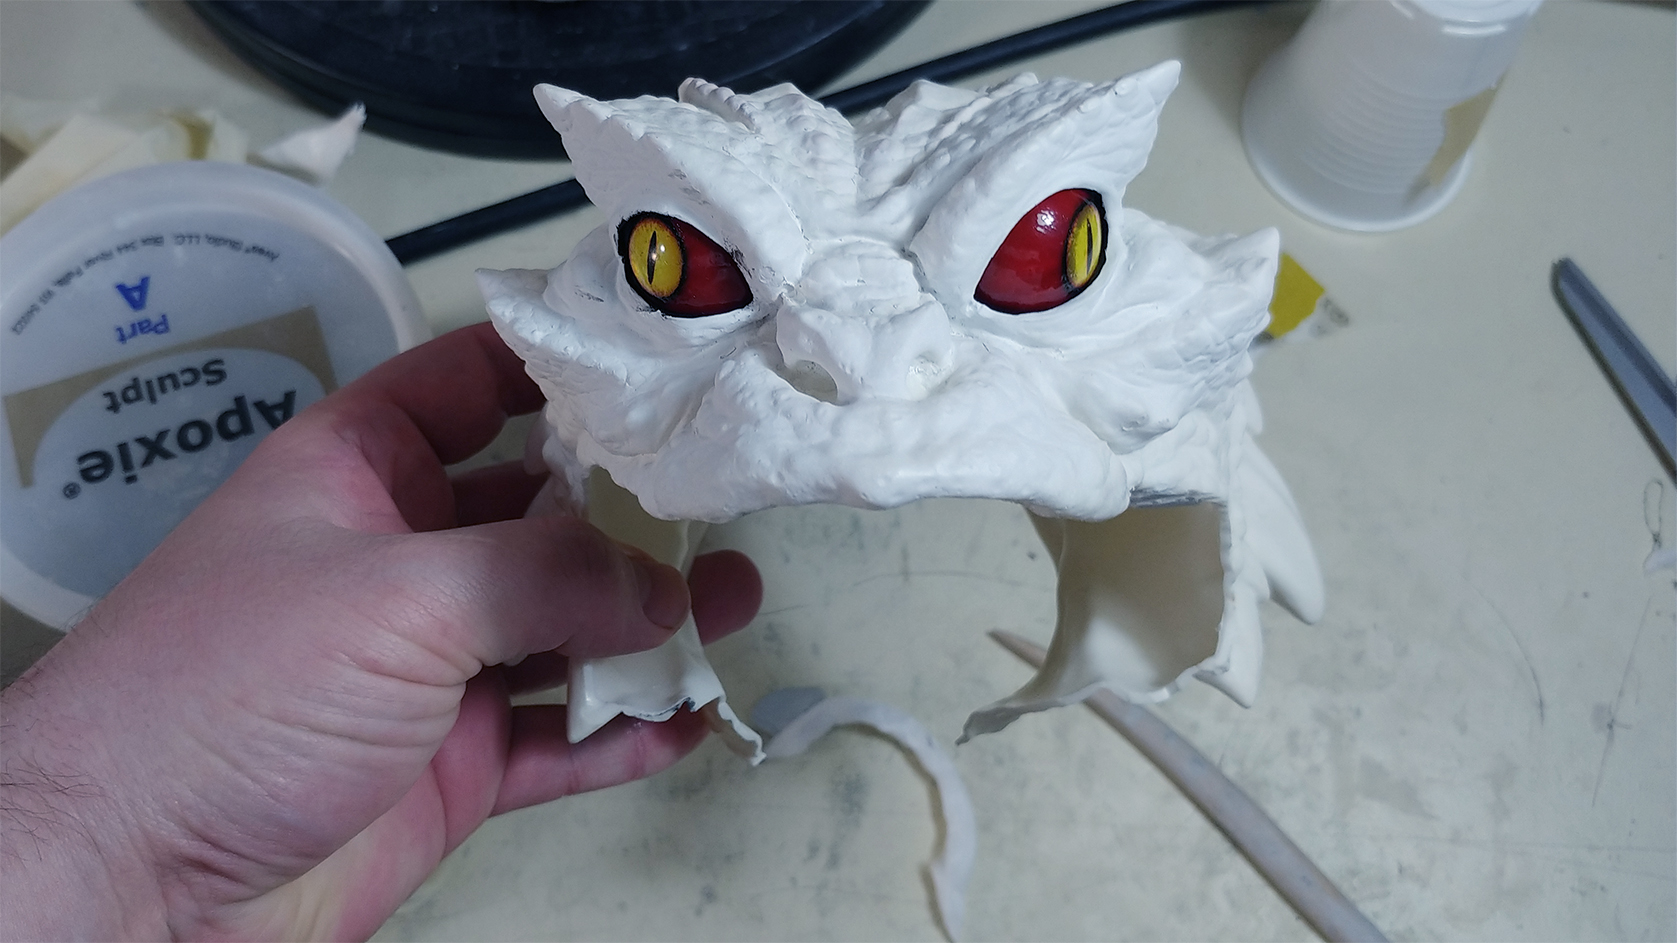
I painted the gums and teeth before the rest due to the fact I wouldn’t be able after assembling everything. I made the tongue out of translucent fimo too.
I used transparent colors so I can mix it on the model itself too. The teeth got a yellow/brownish tone at the base on the final paintjob.
Work in Progress painting the gums and teeth
Work in Progress painting the gums and teeth
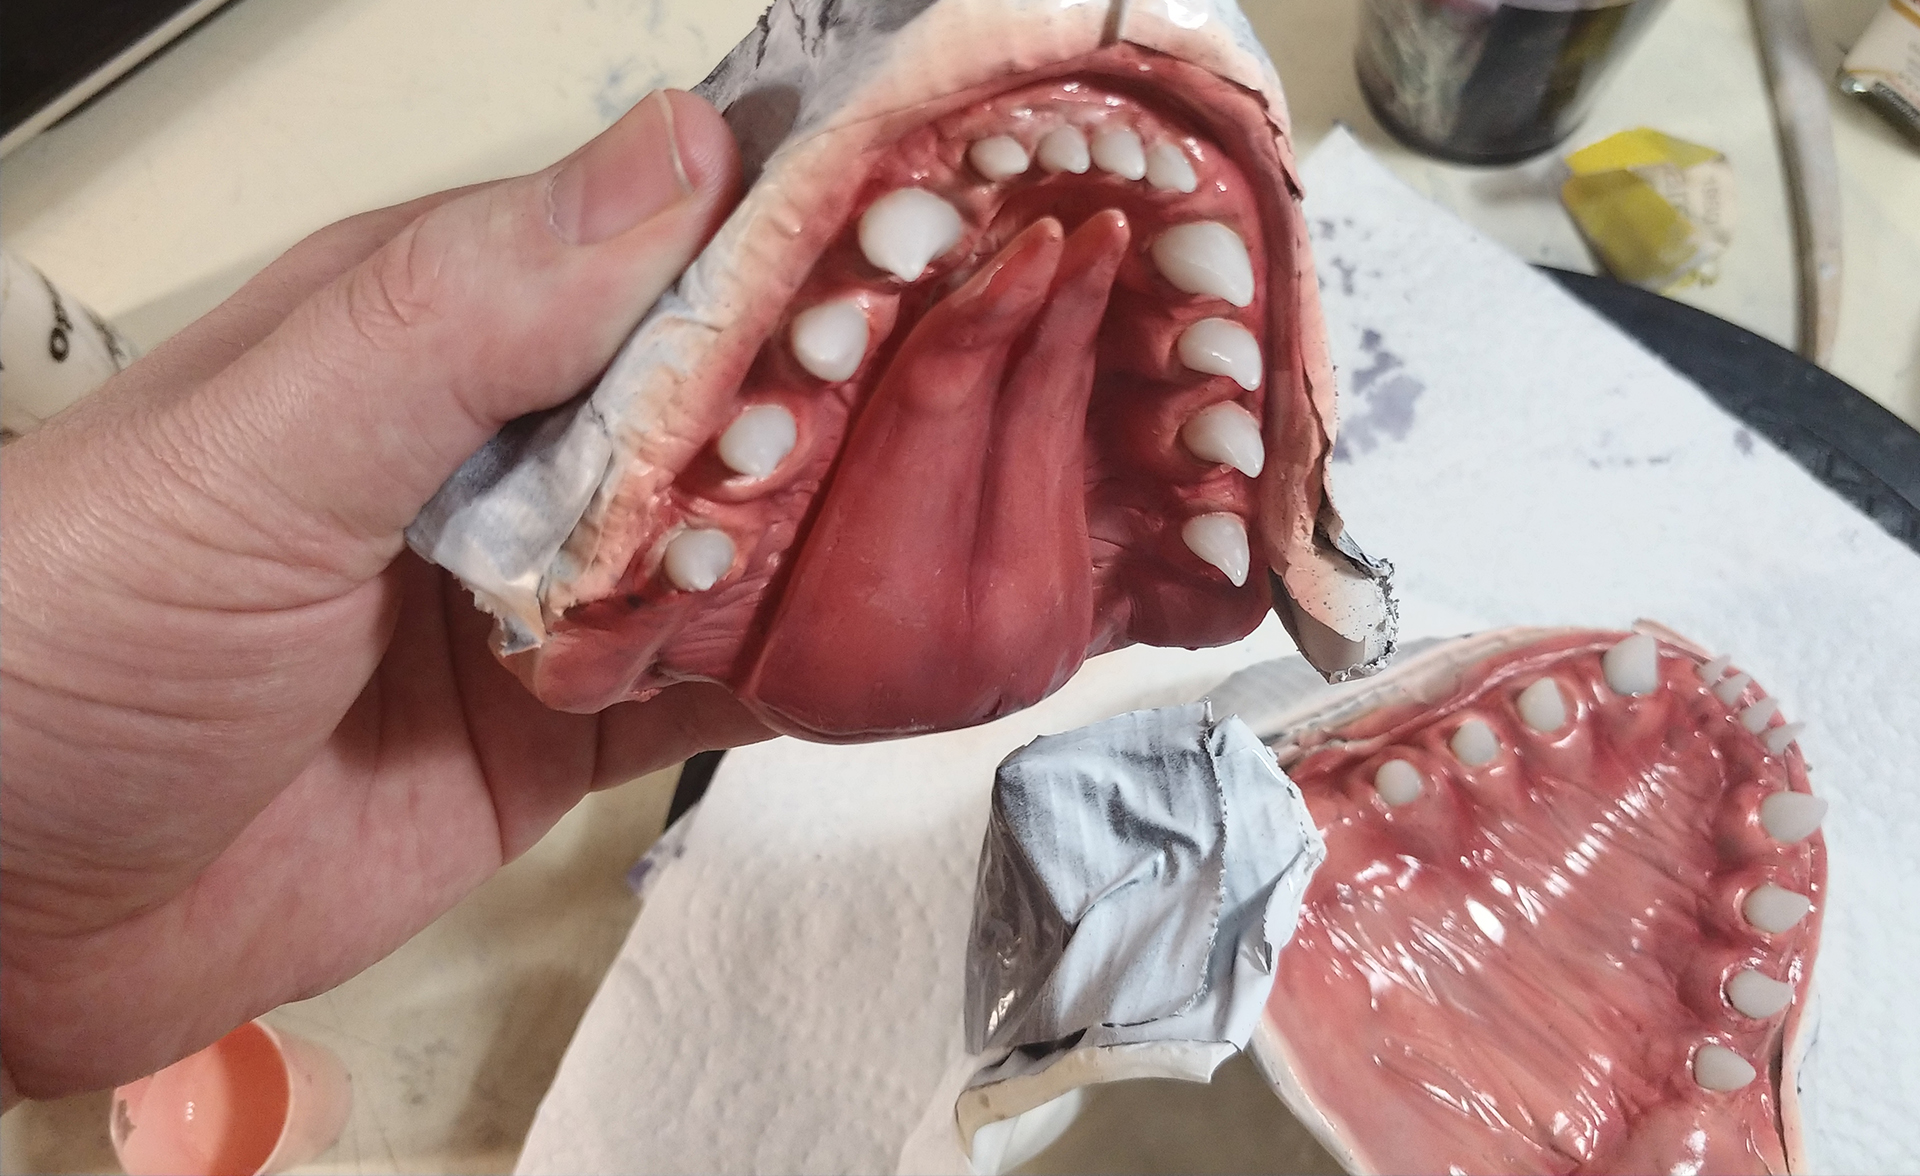
Next I found the position for the mouth and glued it with 5 min. epoxy (superglue would not have held the weight) in place, after I heated the outer part of the vinyl to get a fit as close as possible.
Again, just temporarily. You can see how big the gaps and missing material was.
Jaw glued in place
A look at the gaps that have to be filled and resculpted with details
I remodeled the inner and outer part of the mouth/jaws with…you guesst it, apoxie sculpt!
I covered the eyes for the rest of the build to protect them, since they are already painted.
Resculpting the face
Bringing all together
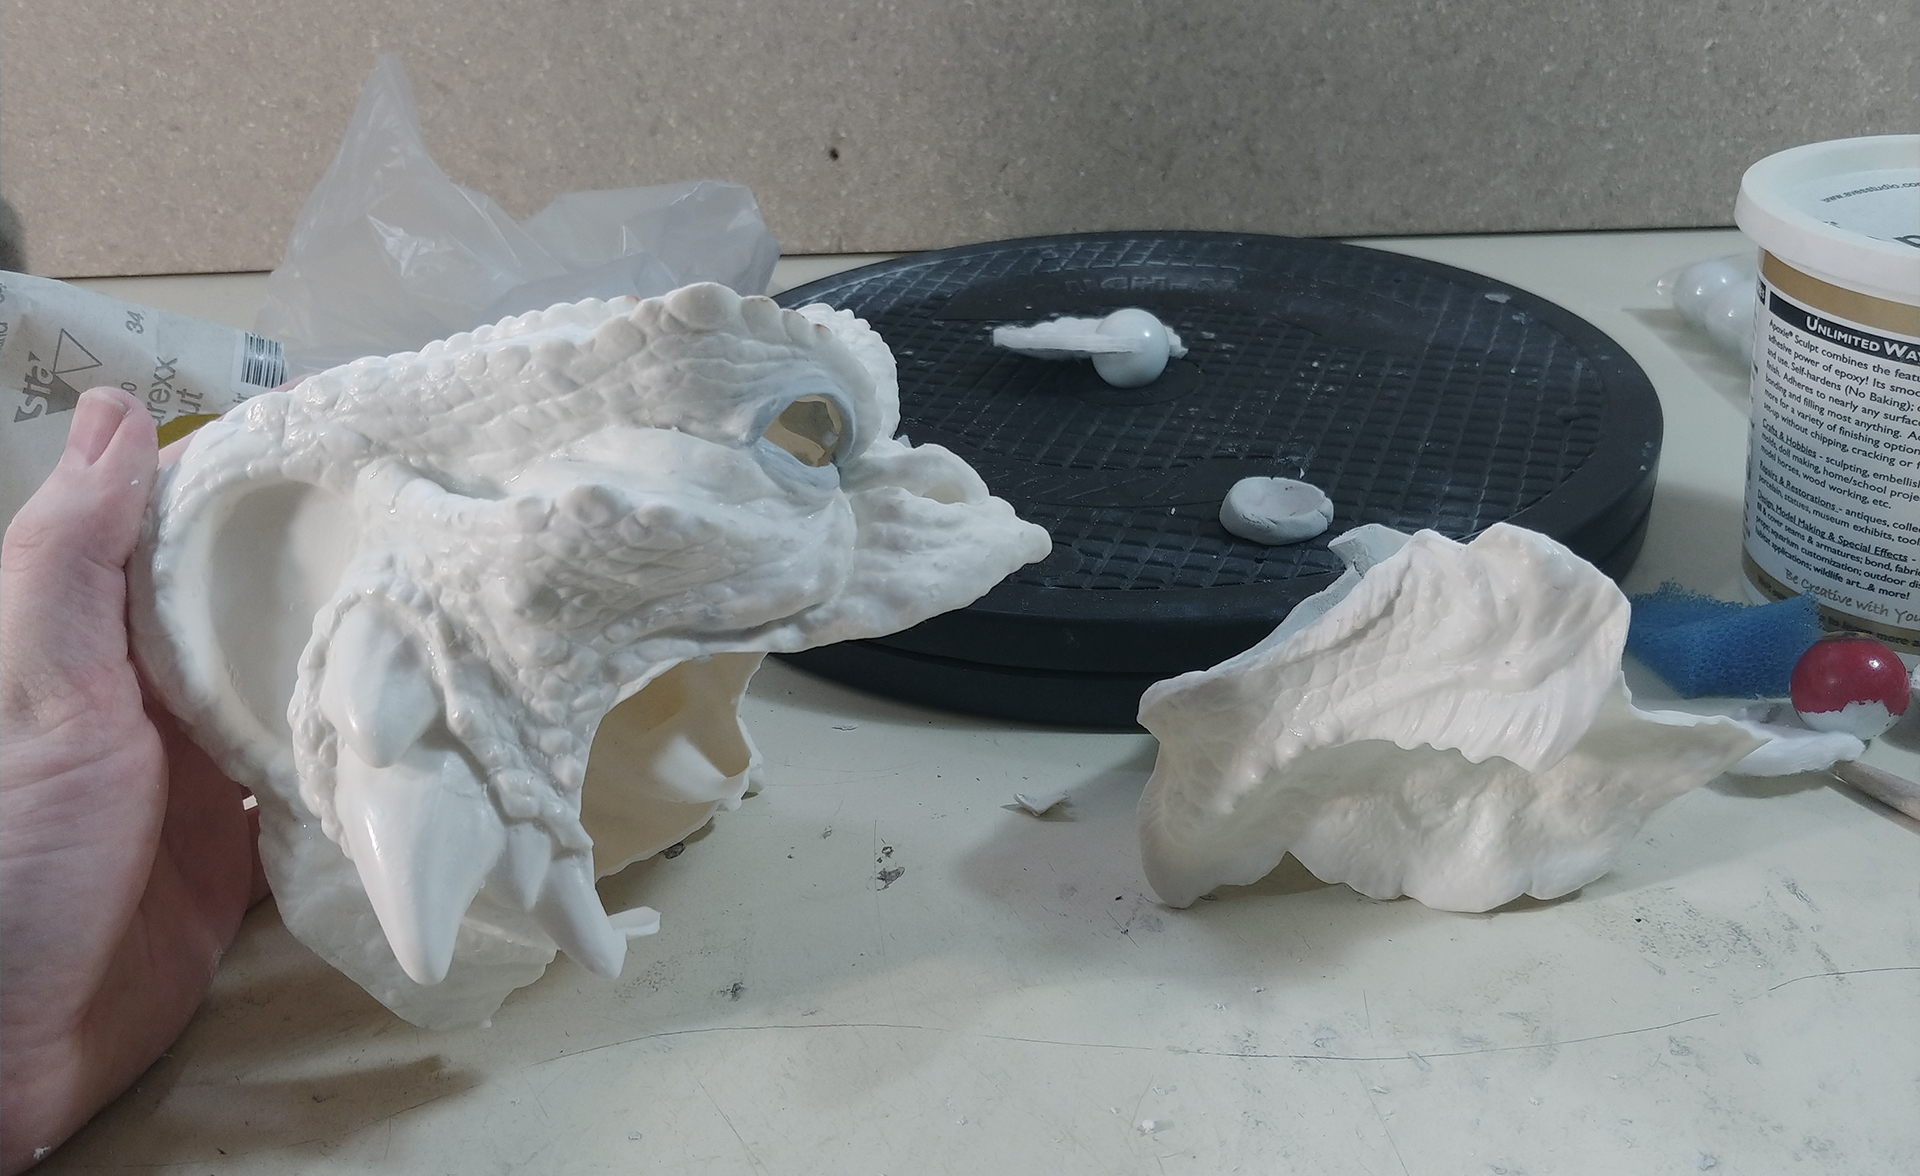
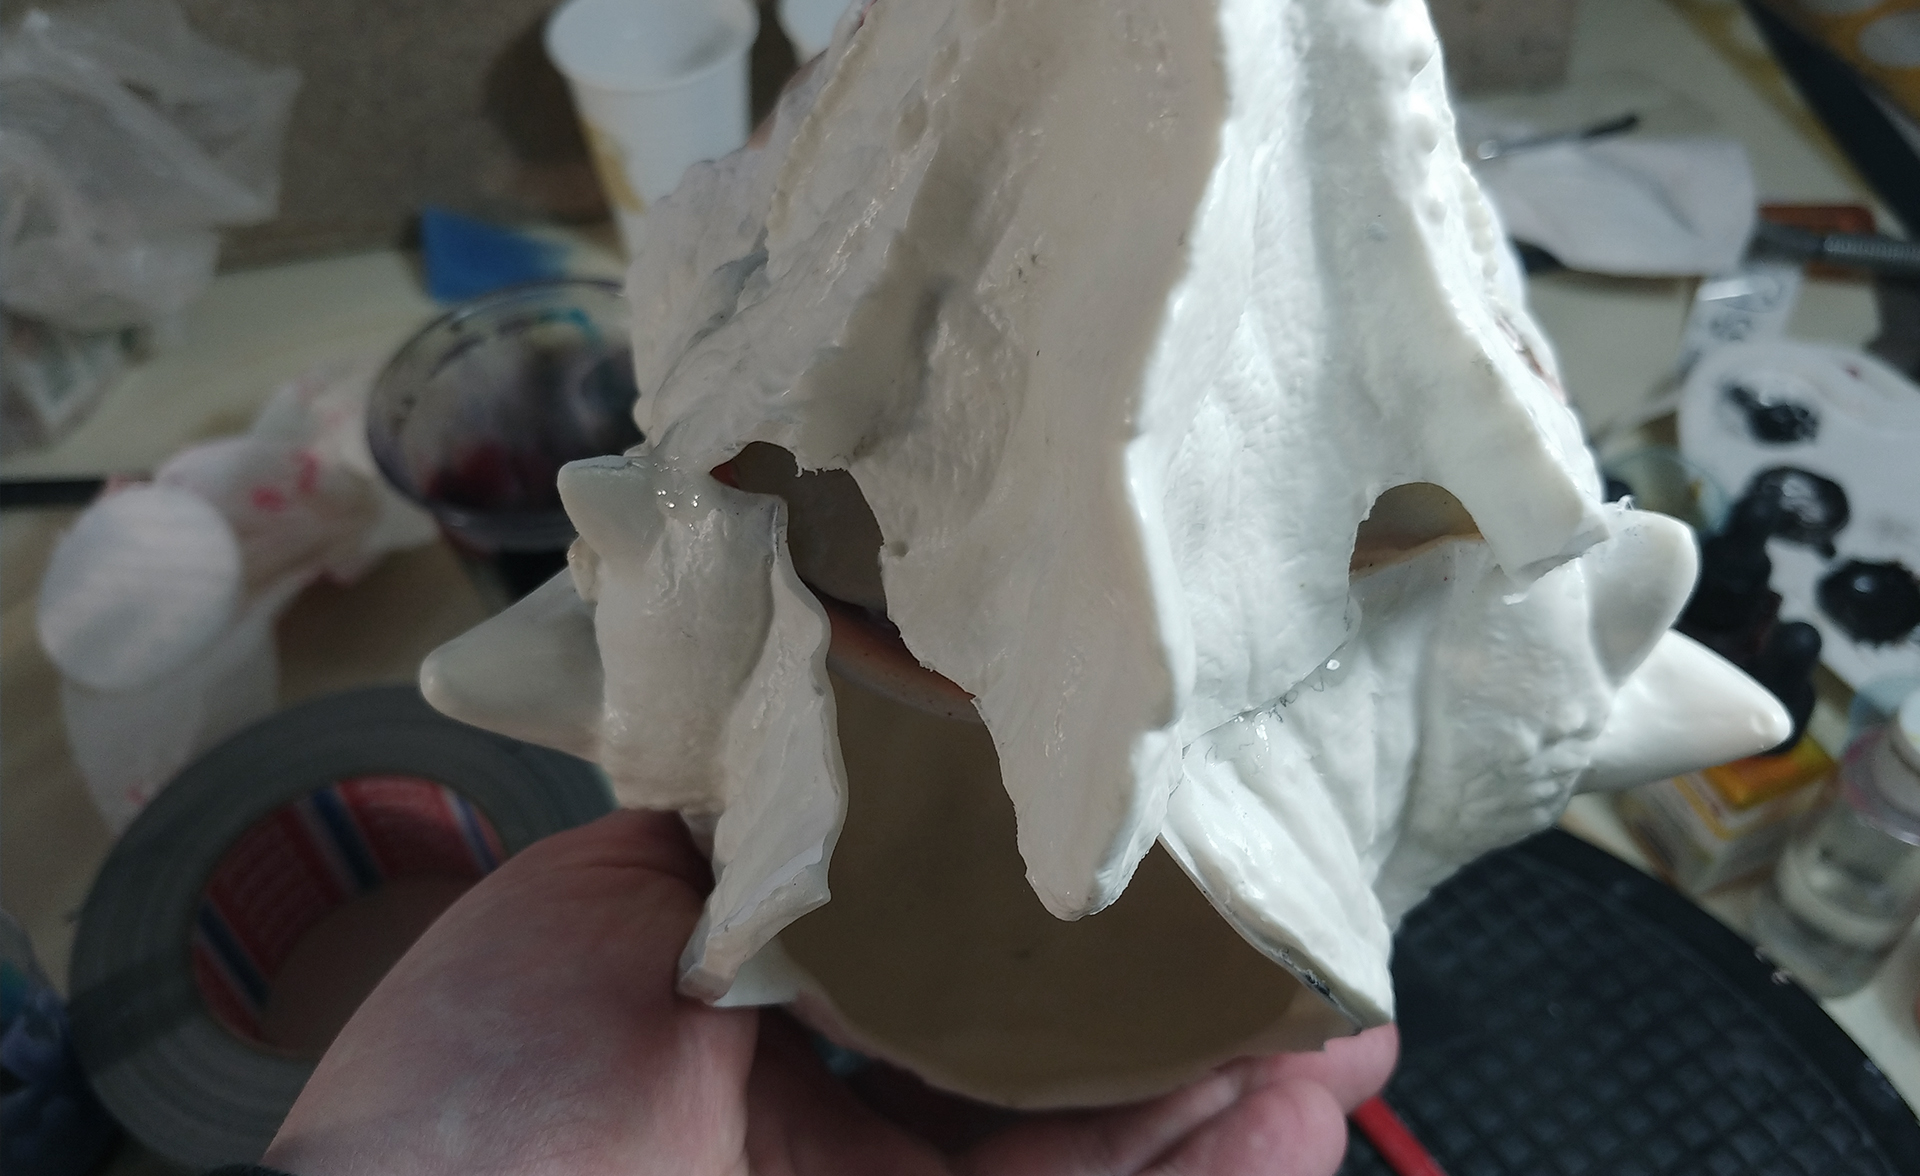
After the face was done, I took care of the ears. Unfortunately, I don’t have any pictures of the process.
I flattened and bent them the way I wanted, cut off material to get the shape I wanted and filled them with art stone. I used metal rods that would go into the head, so the art stone could grab something.
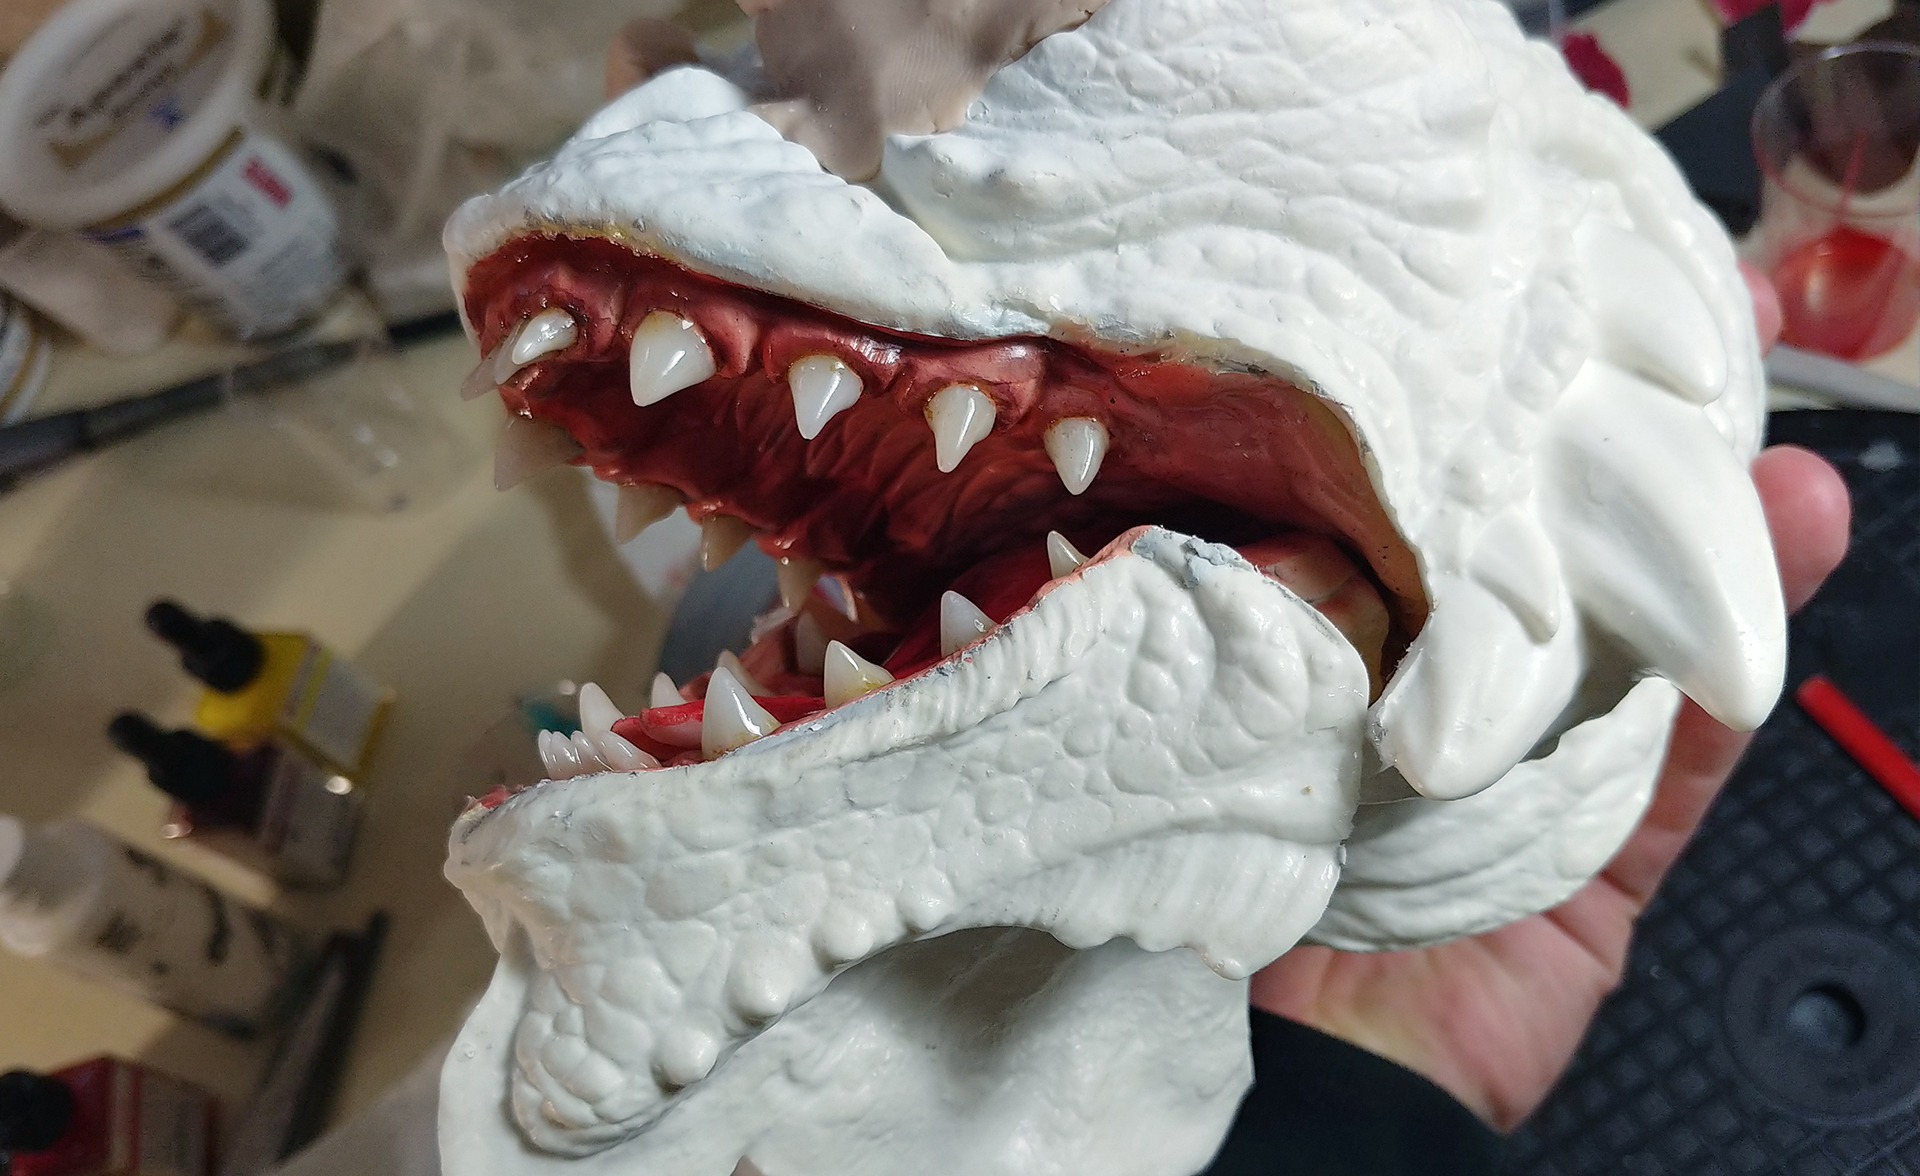
At the same time I closed the mouth on the inner side. That way no art stone would come out while pouring the head and ruin the painted mouth.
Fitting the ears to the head
I wanted the Gremlin to have a more upwards position. The original kit has a monkey like neck that goes to the front. Also I wanted to tilt the head a little bit, creating a more dynamic pose.
I filled the hole with paper and modeled a basic shell out of water-based clay. When dry, I sculpted the seams and details on the outside with apoxie sculpt. This way I got a strong outside bond. (The paper got removed when dried)
Fixing the Head to fill in the gaps and resculpt the details
Fixing the Head to fill in the gaps and resculpt the details
Outer shell of the neck
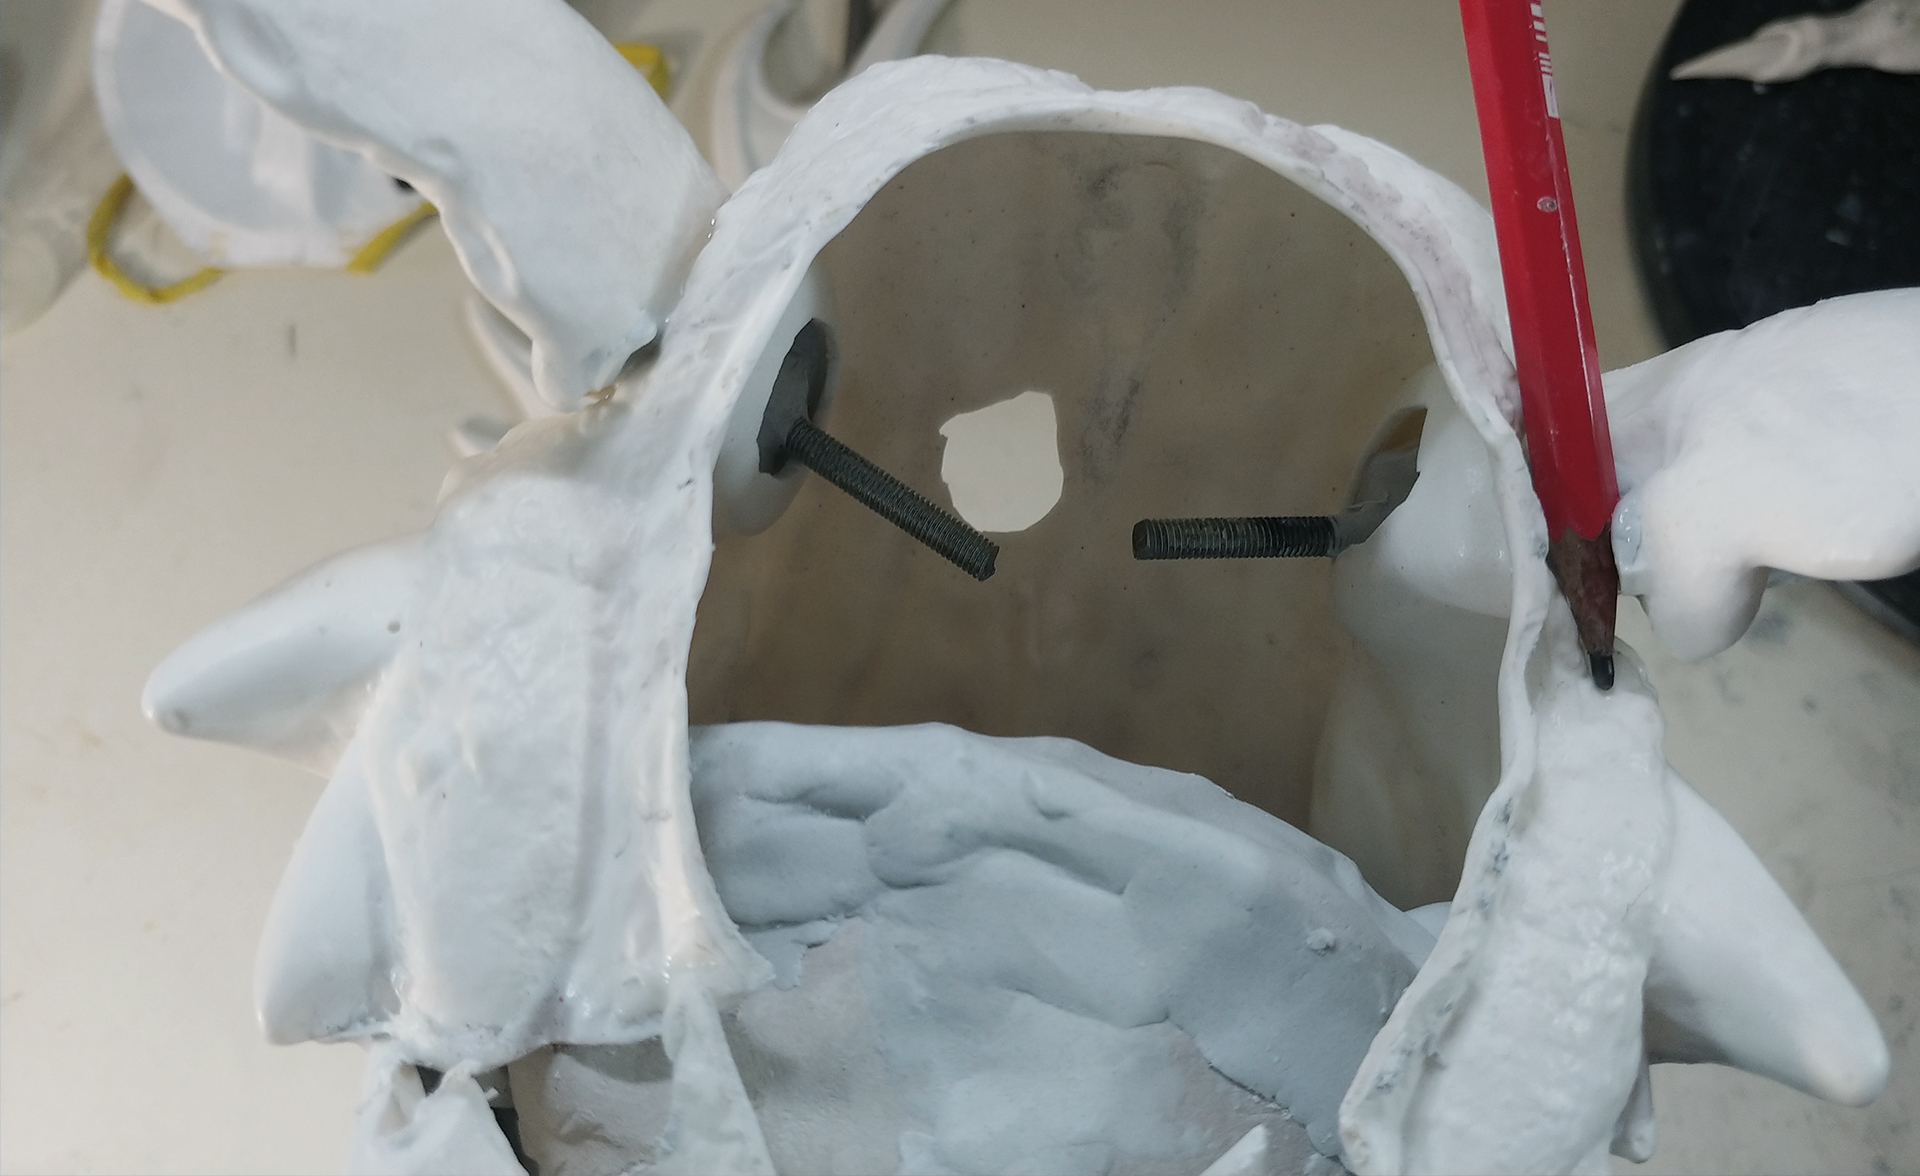
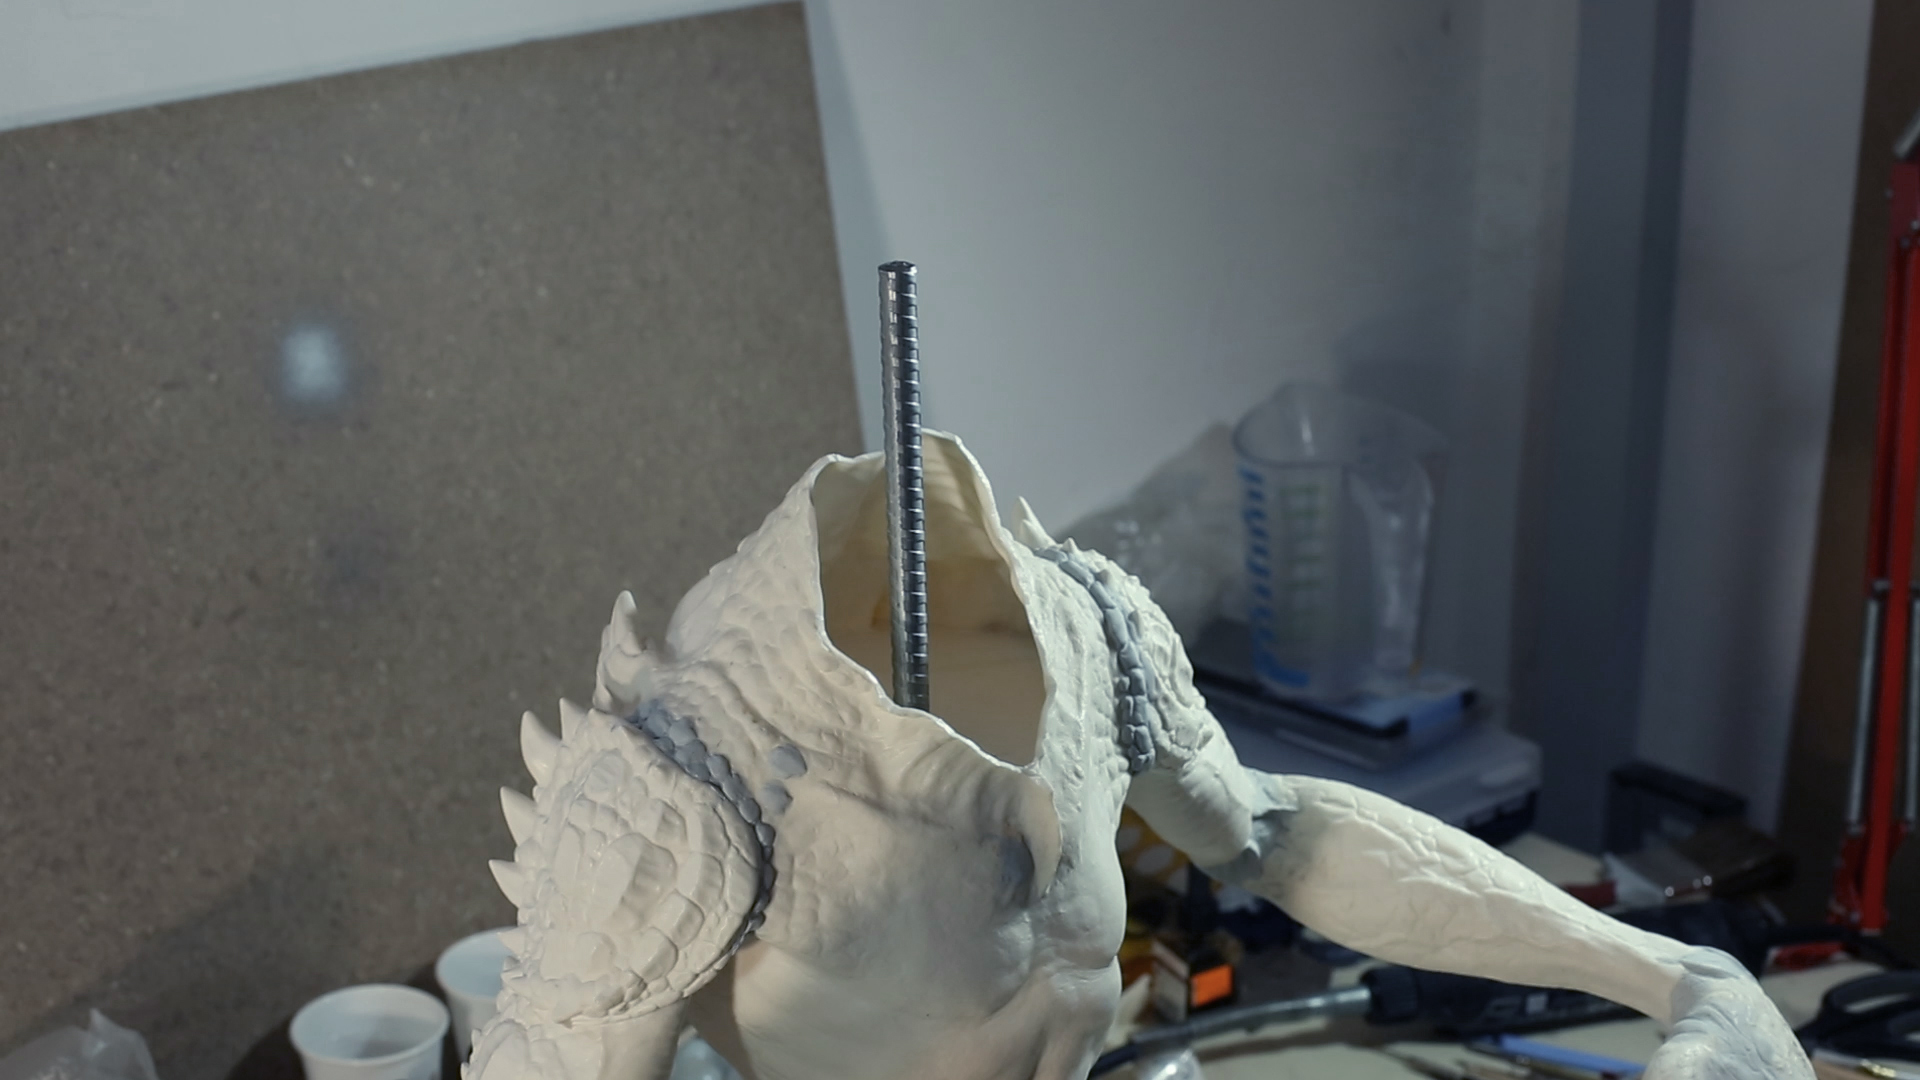
To secure the head even more, I added a steel rod.
Steel rod to help supporting the head
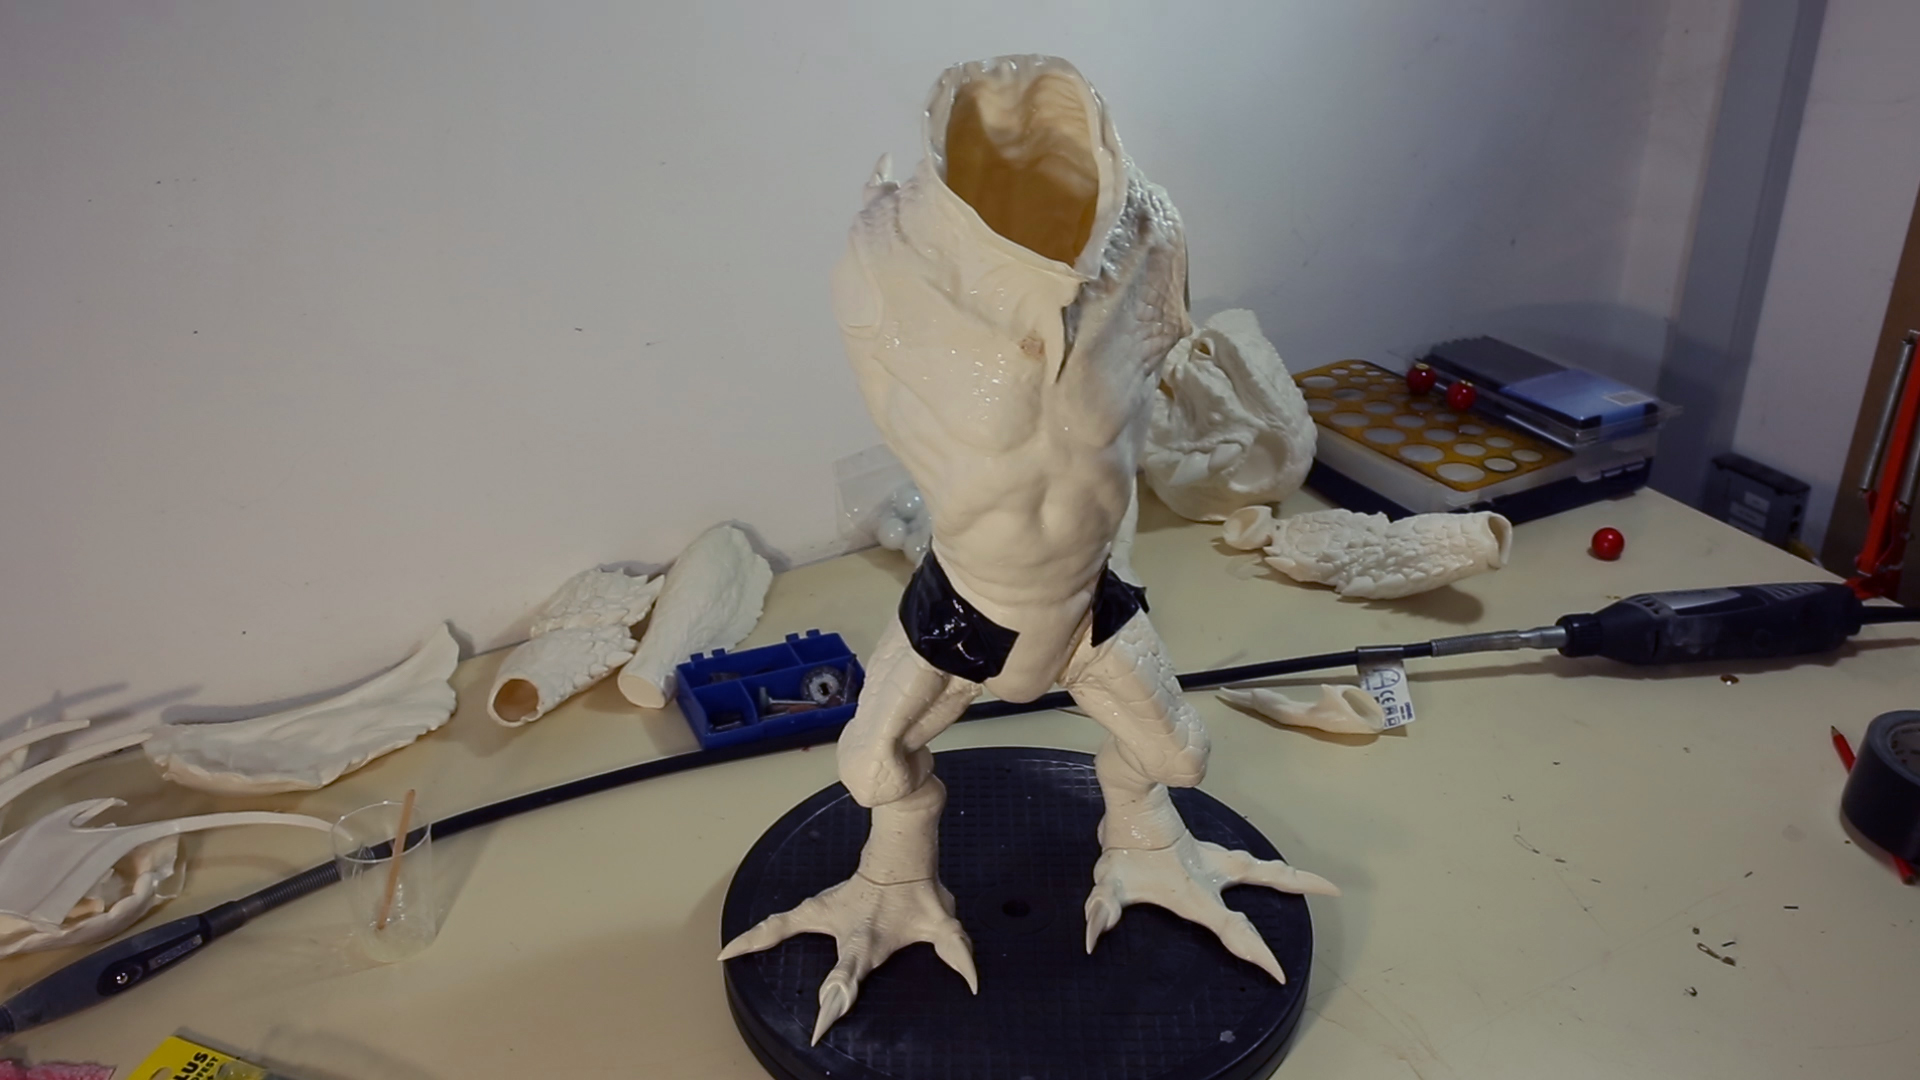
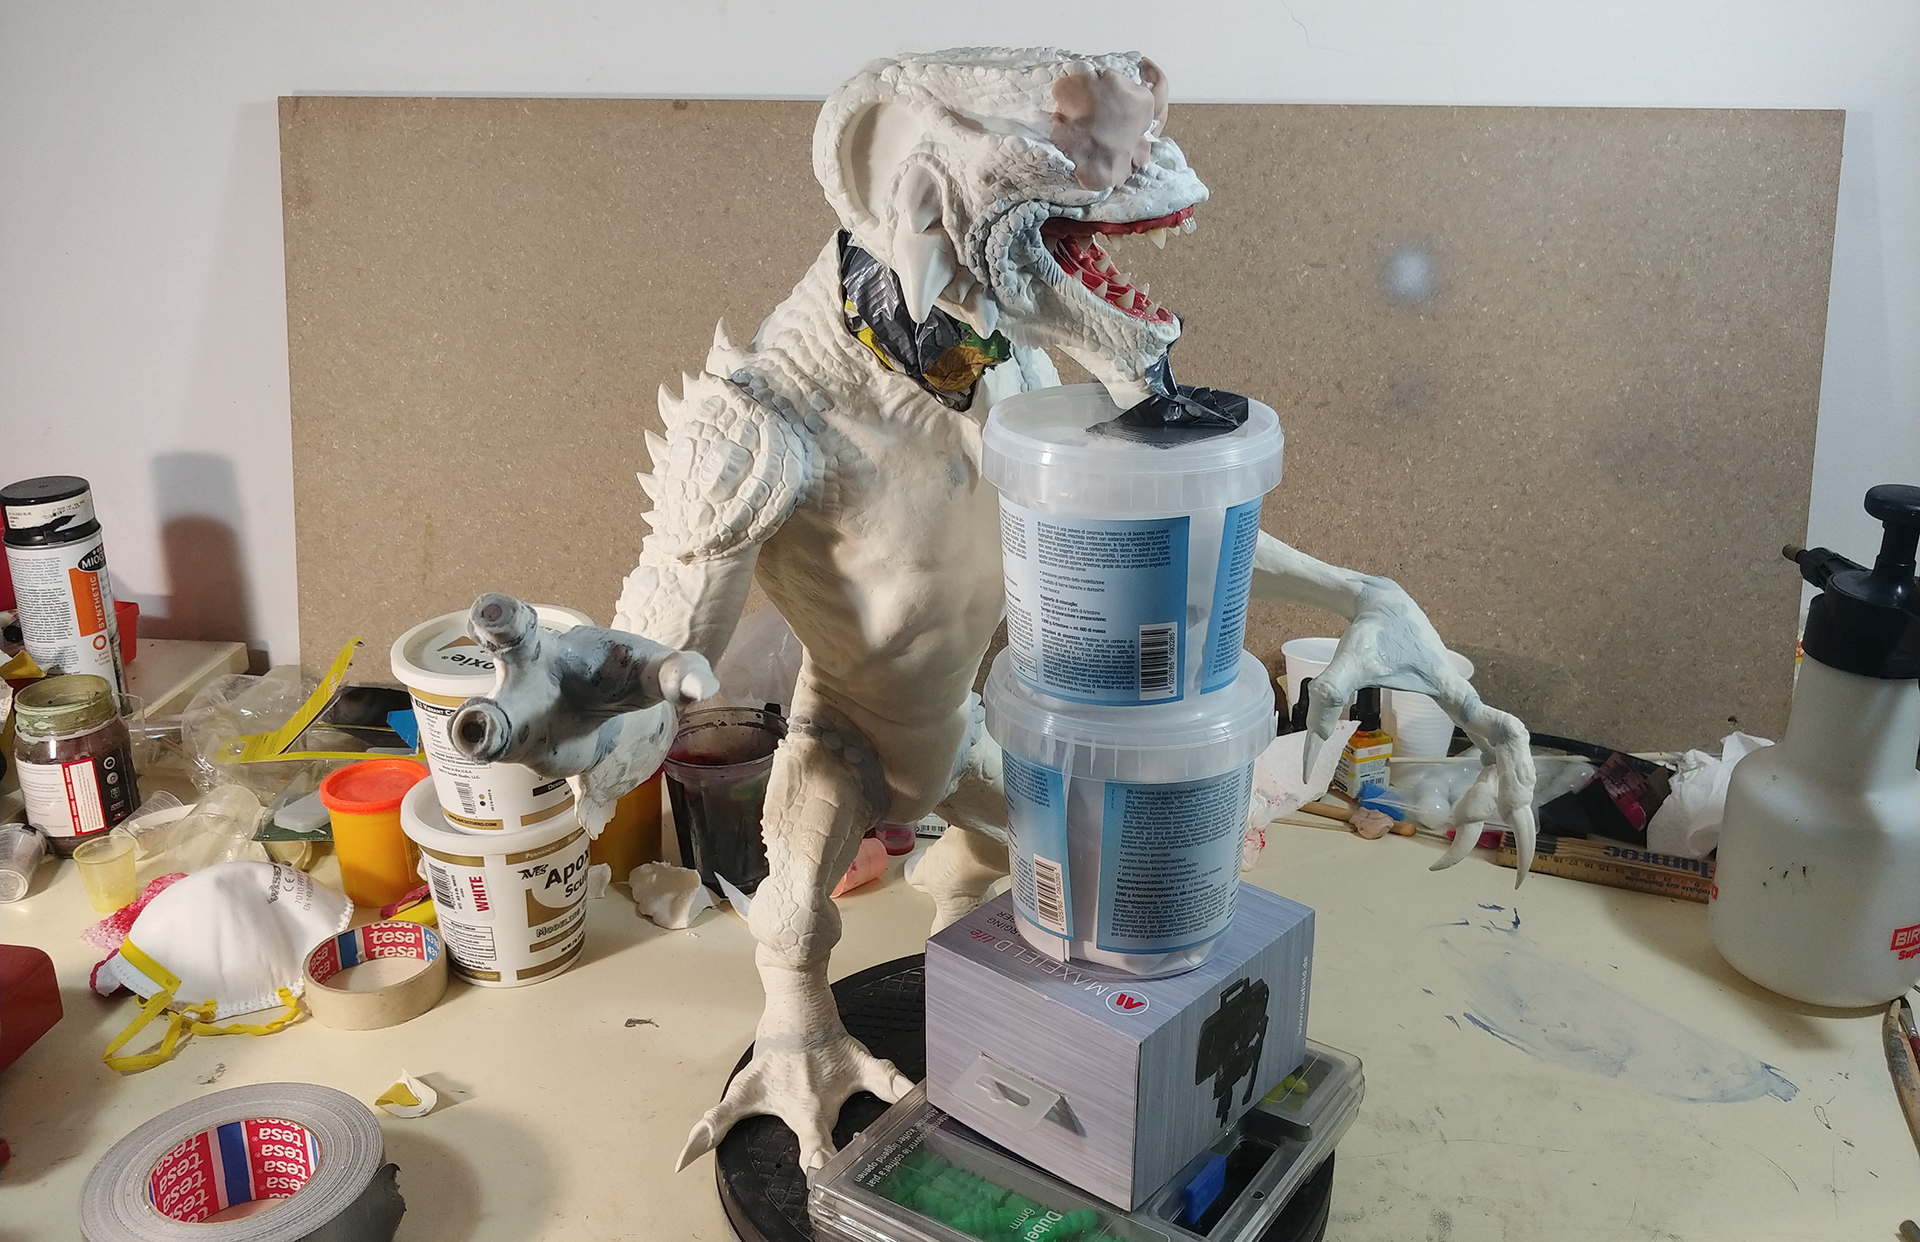
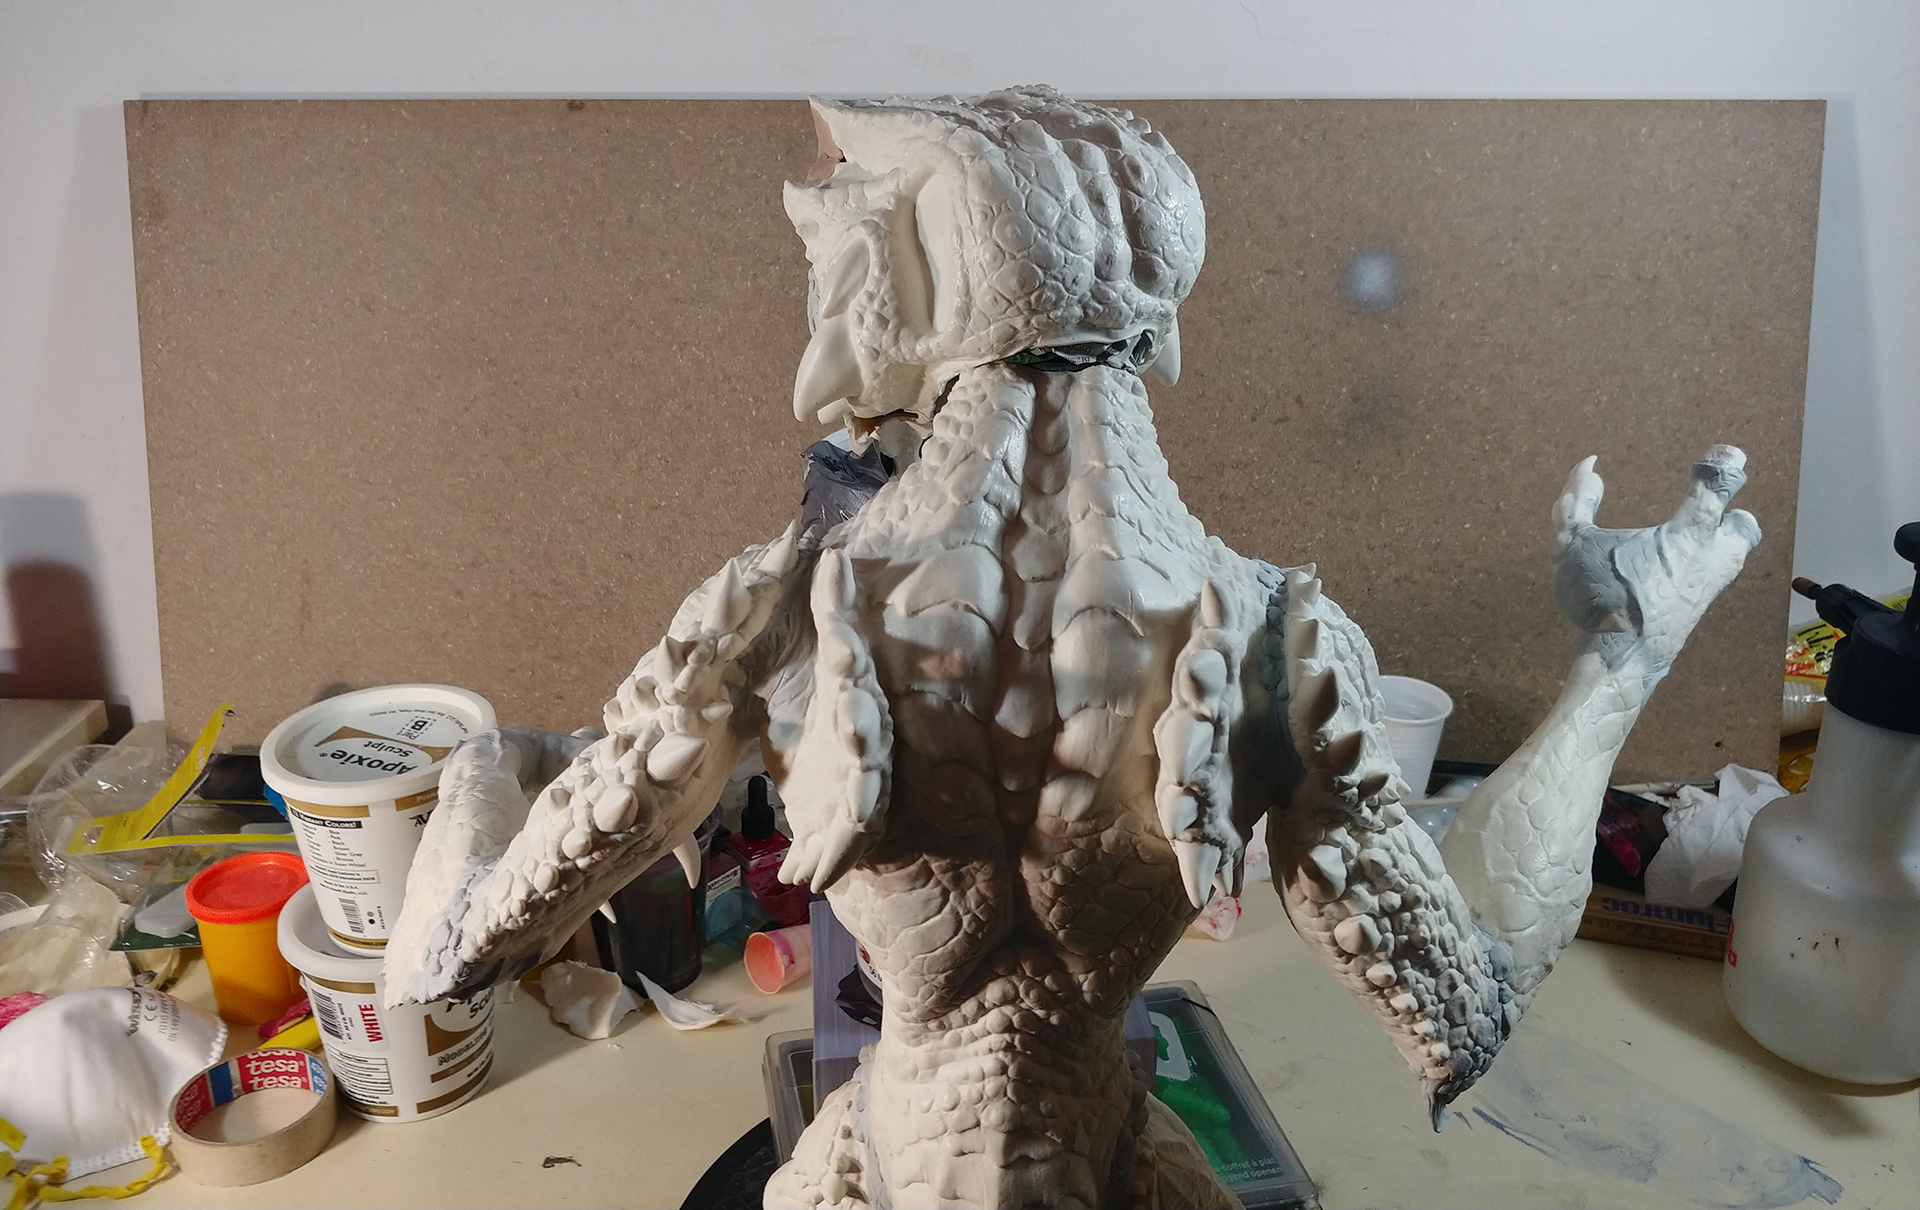
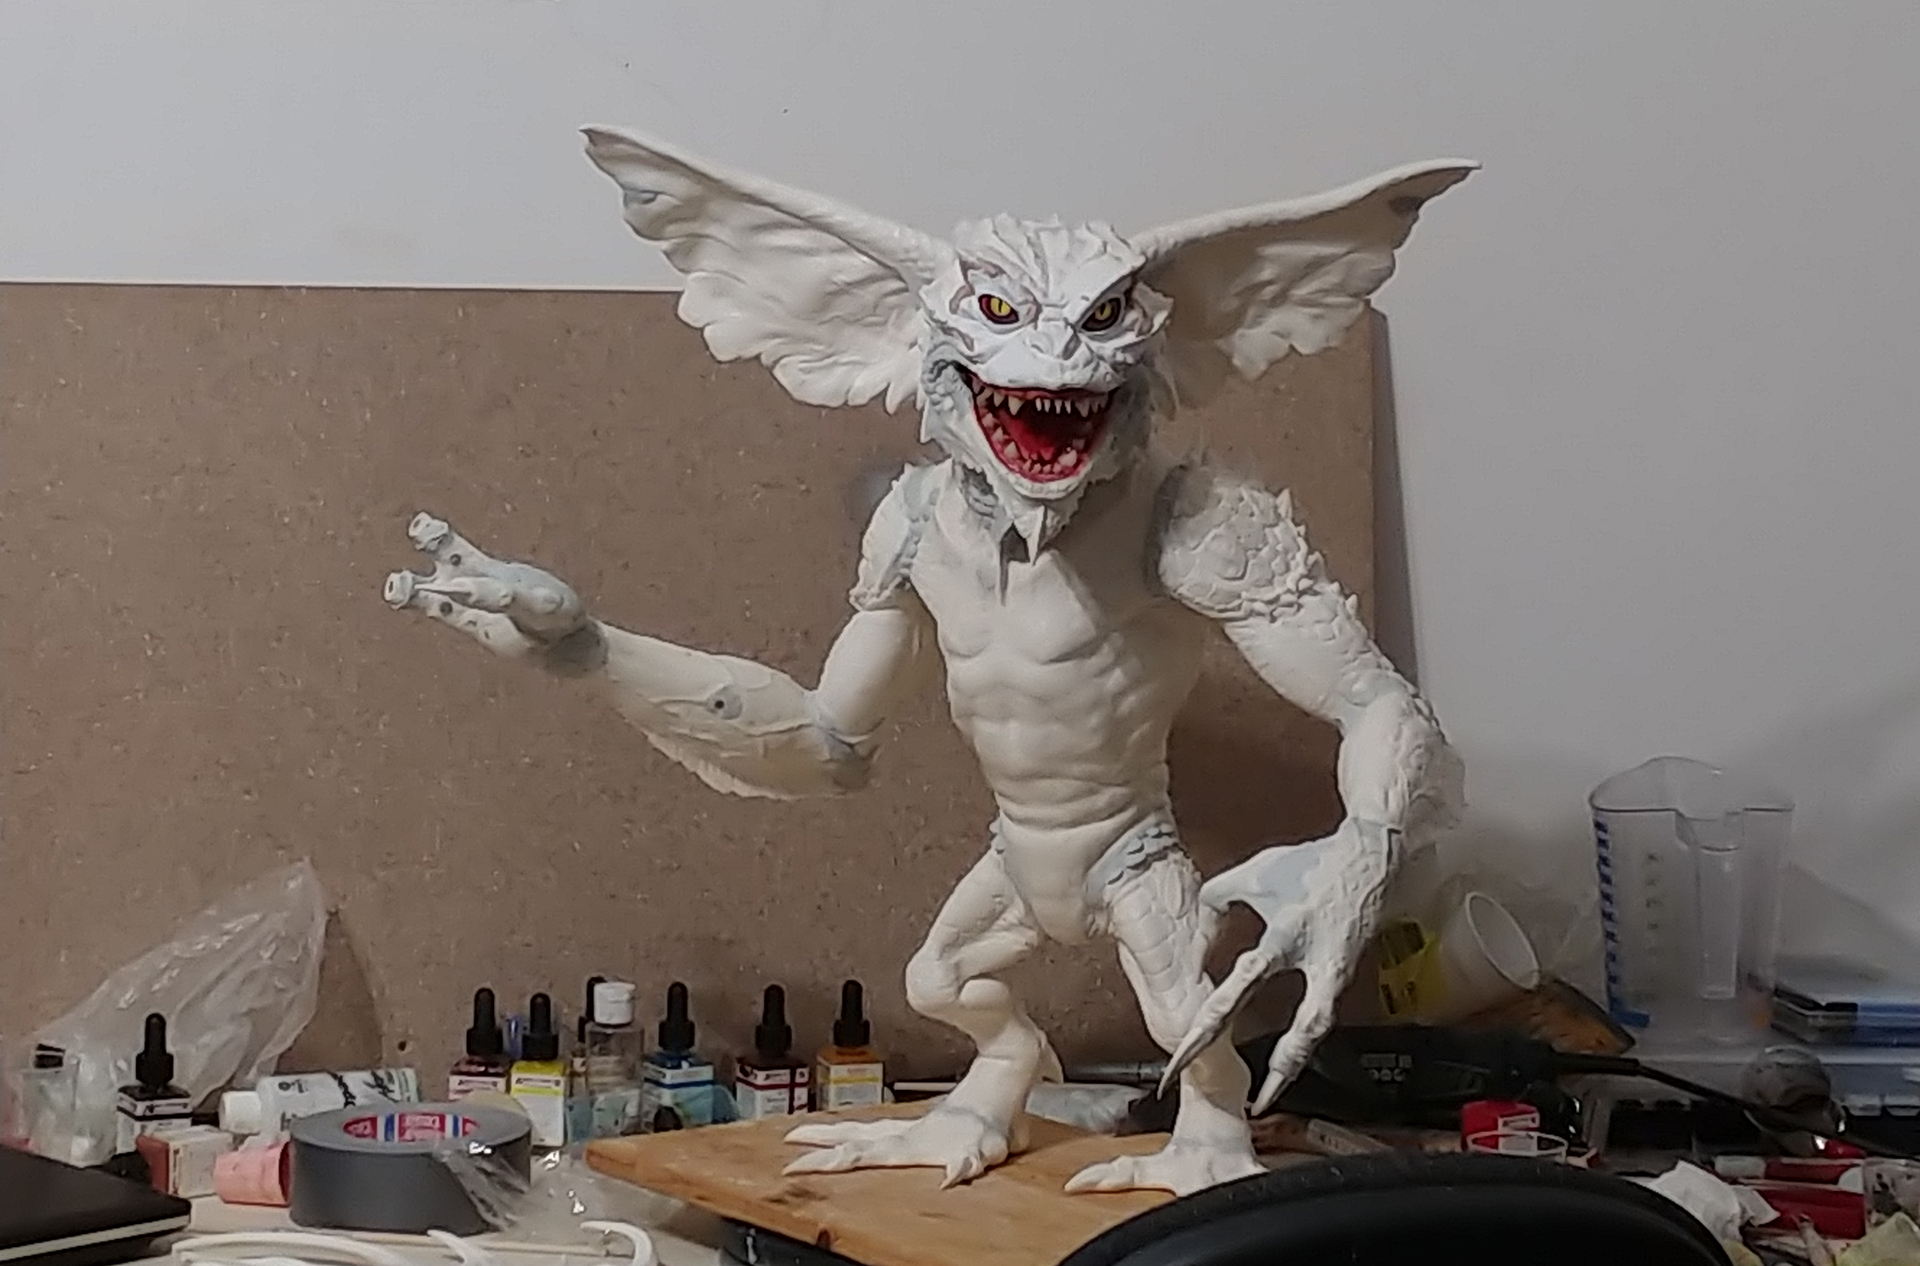
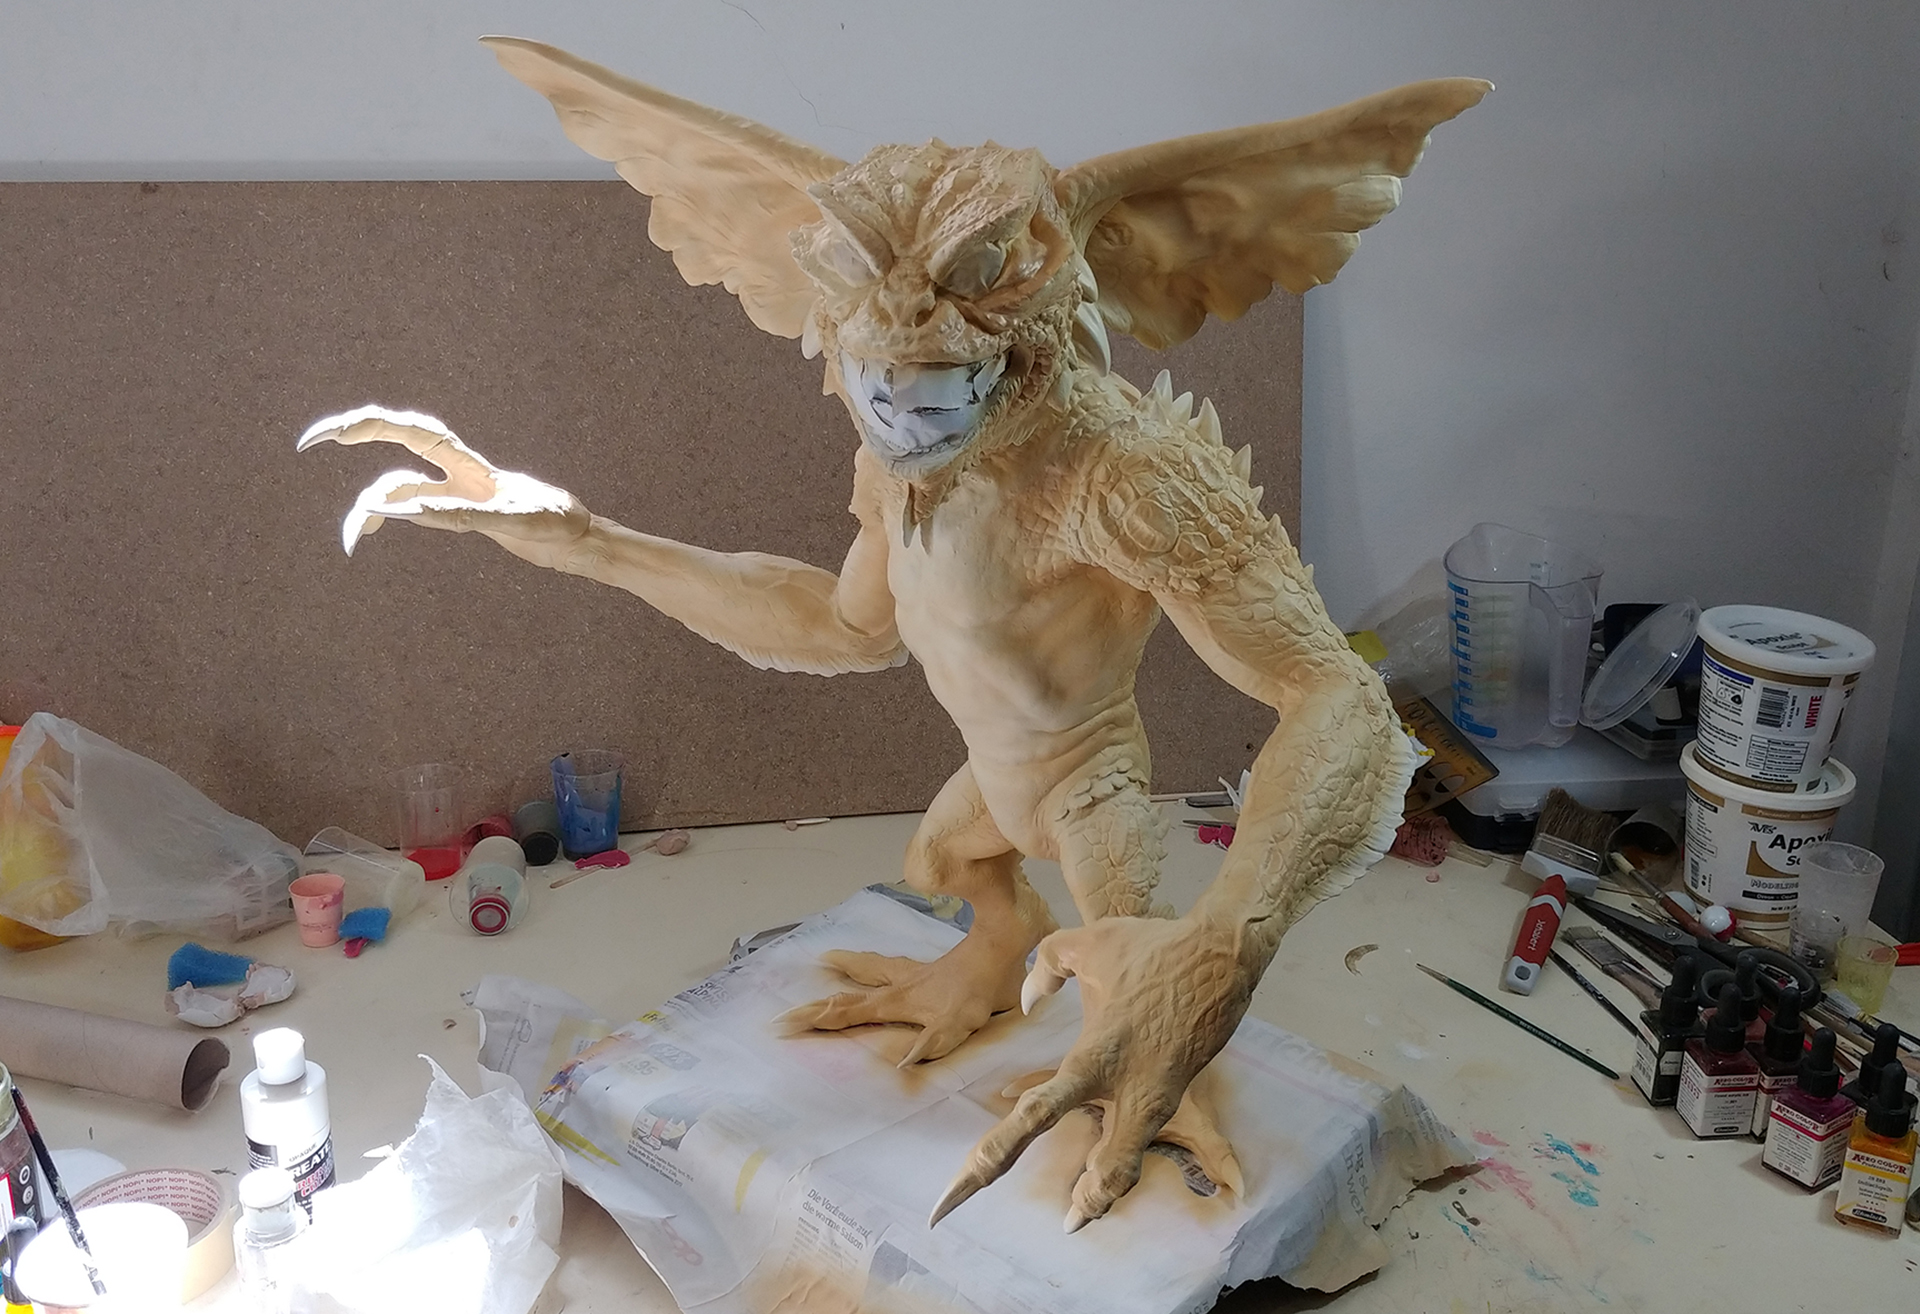
After remodeling all the seams and blending the parts together the building process was finished. Or was it?
Finished building process?
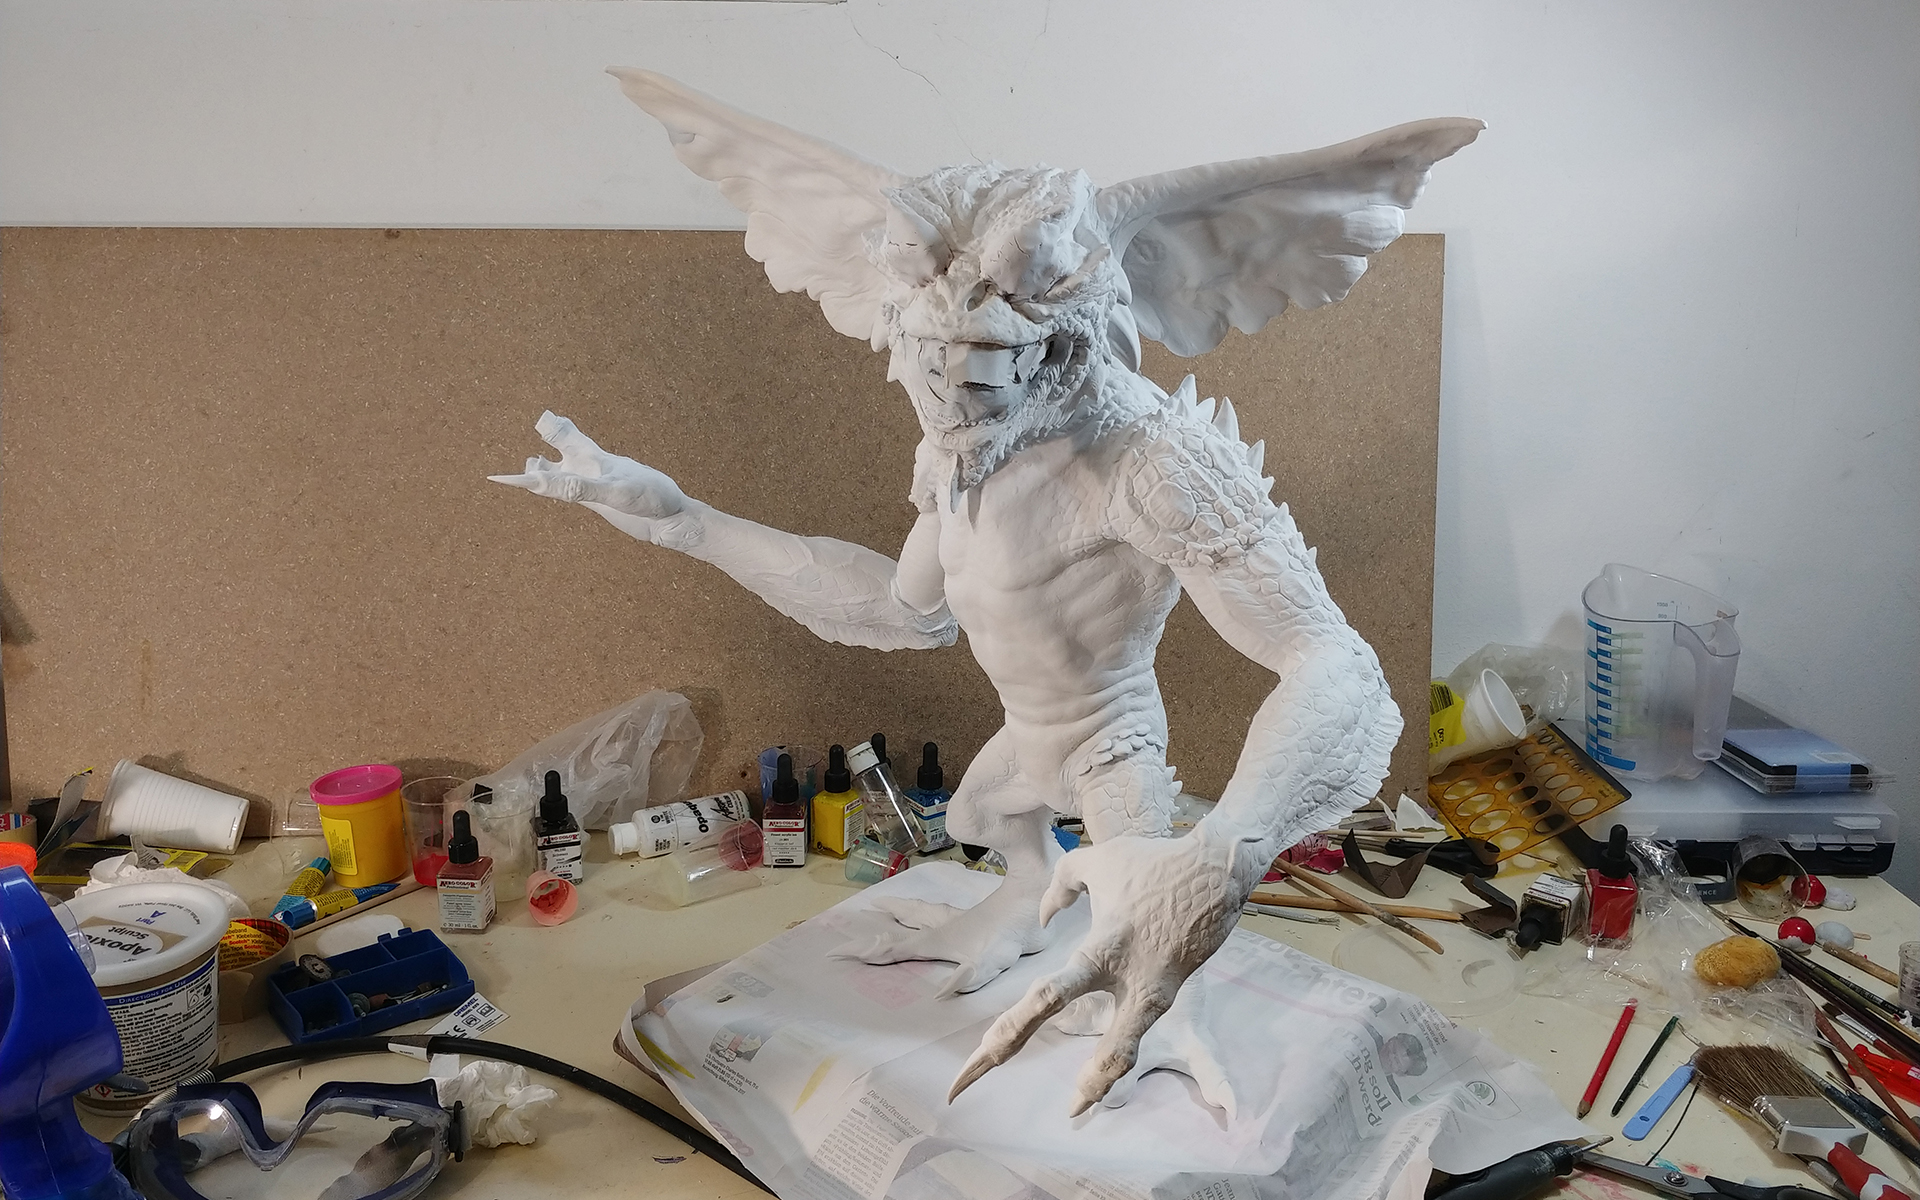
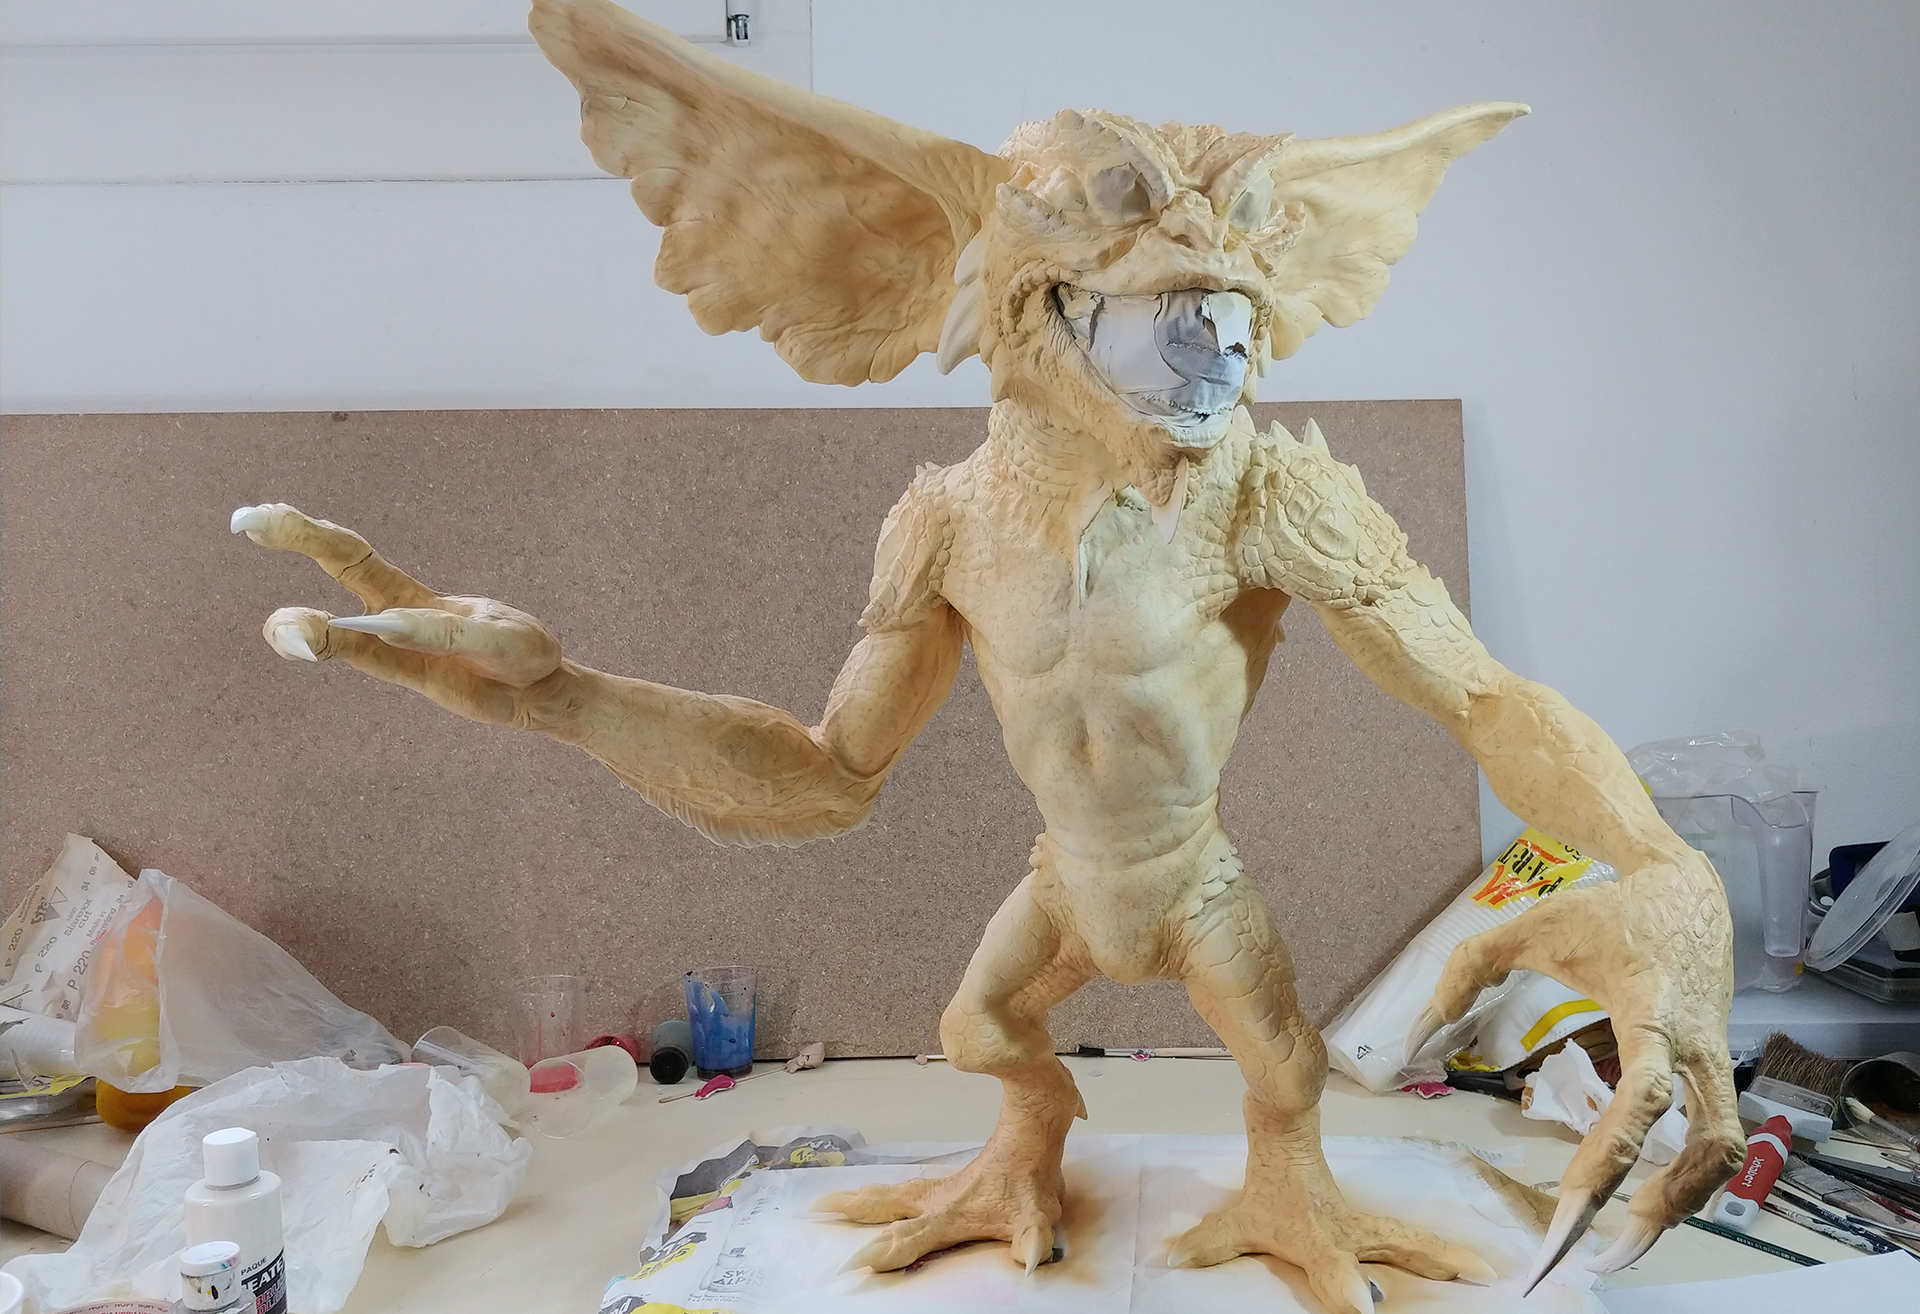
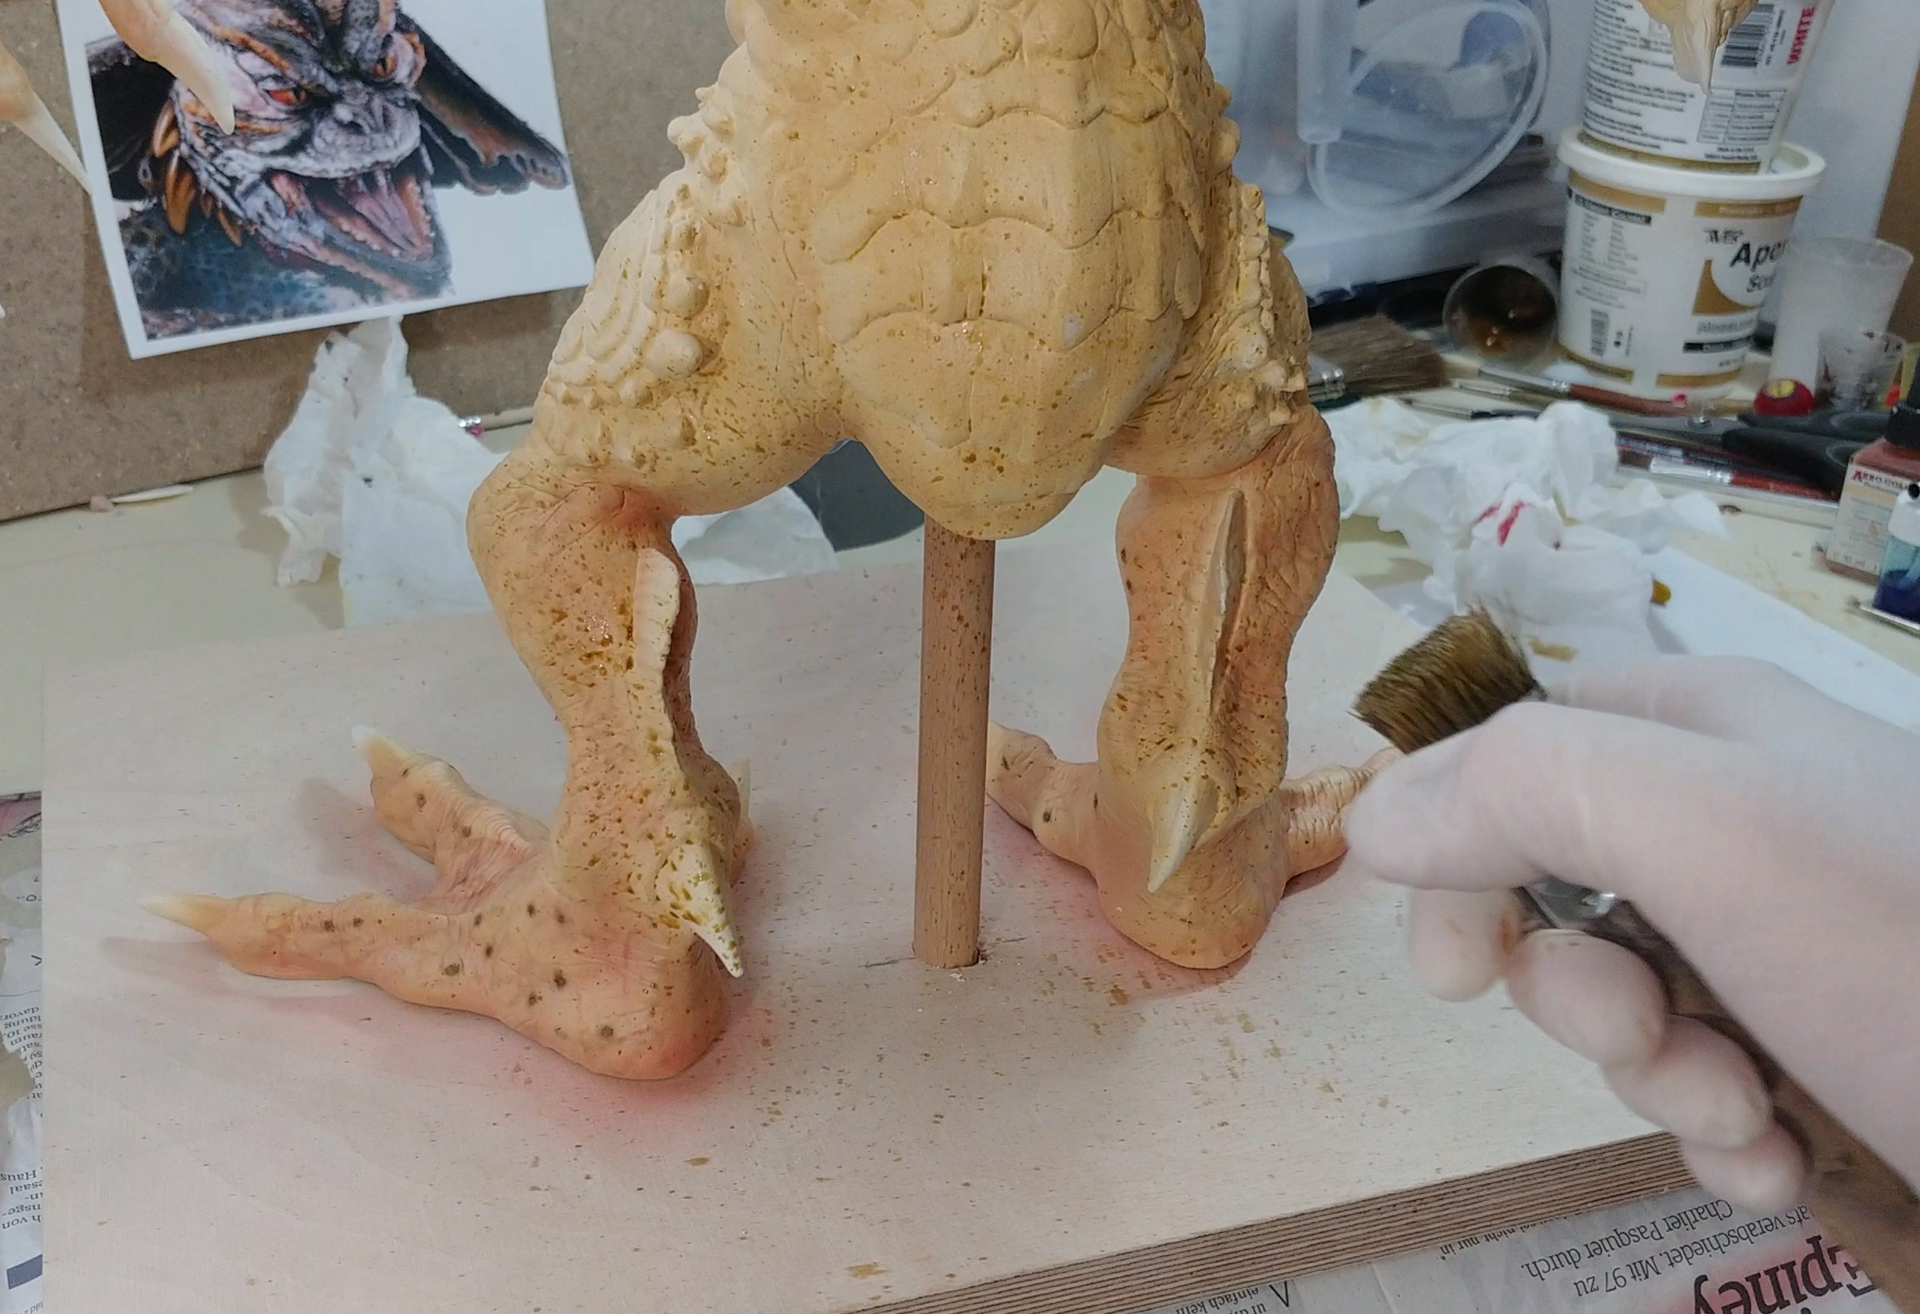
No it wasn’t! I noticed some stability problems in his legs. Over time he woud bend slights forward, because of 2 problems.
The upper and lower legs had no stabilization in them
Since everything is filled with art stone, the arms are pulling a liiiiiiittle bit forward.
To fix those problems I made the toes slightly angled to the back and drilled holes through the legs and added steel rods to prevent them from bending.
Drilled holes and added steel rods
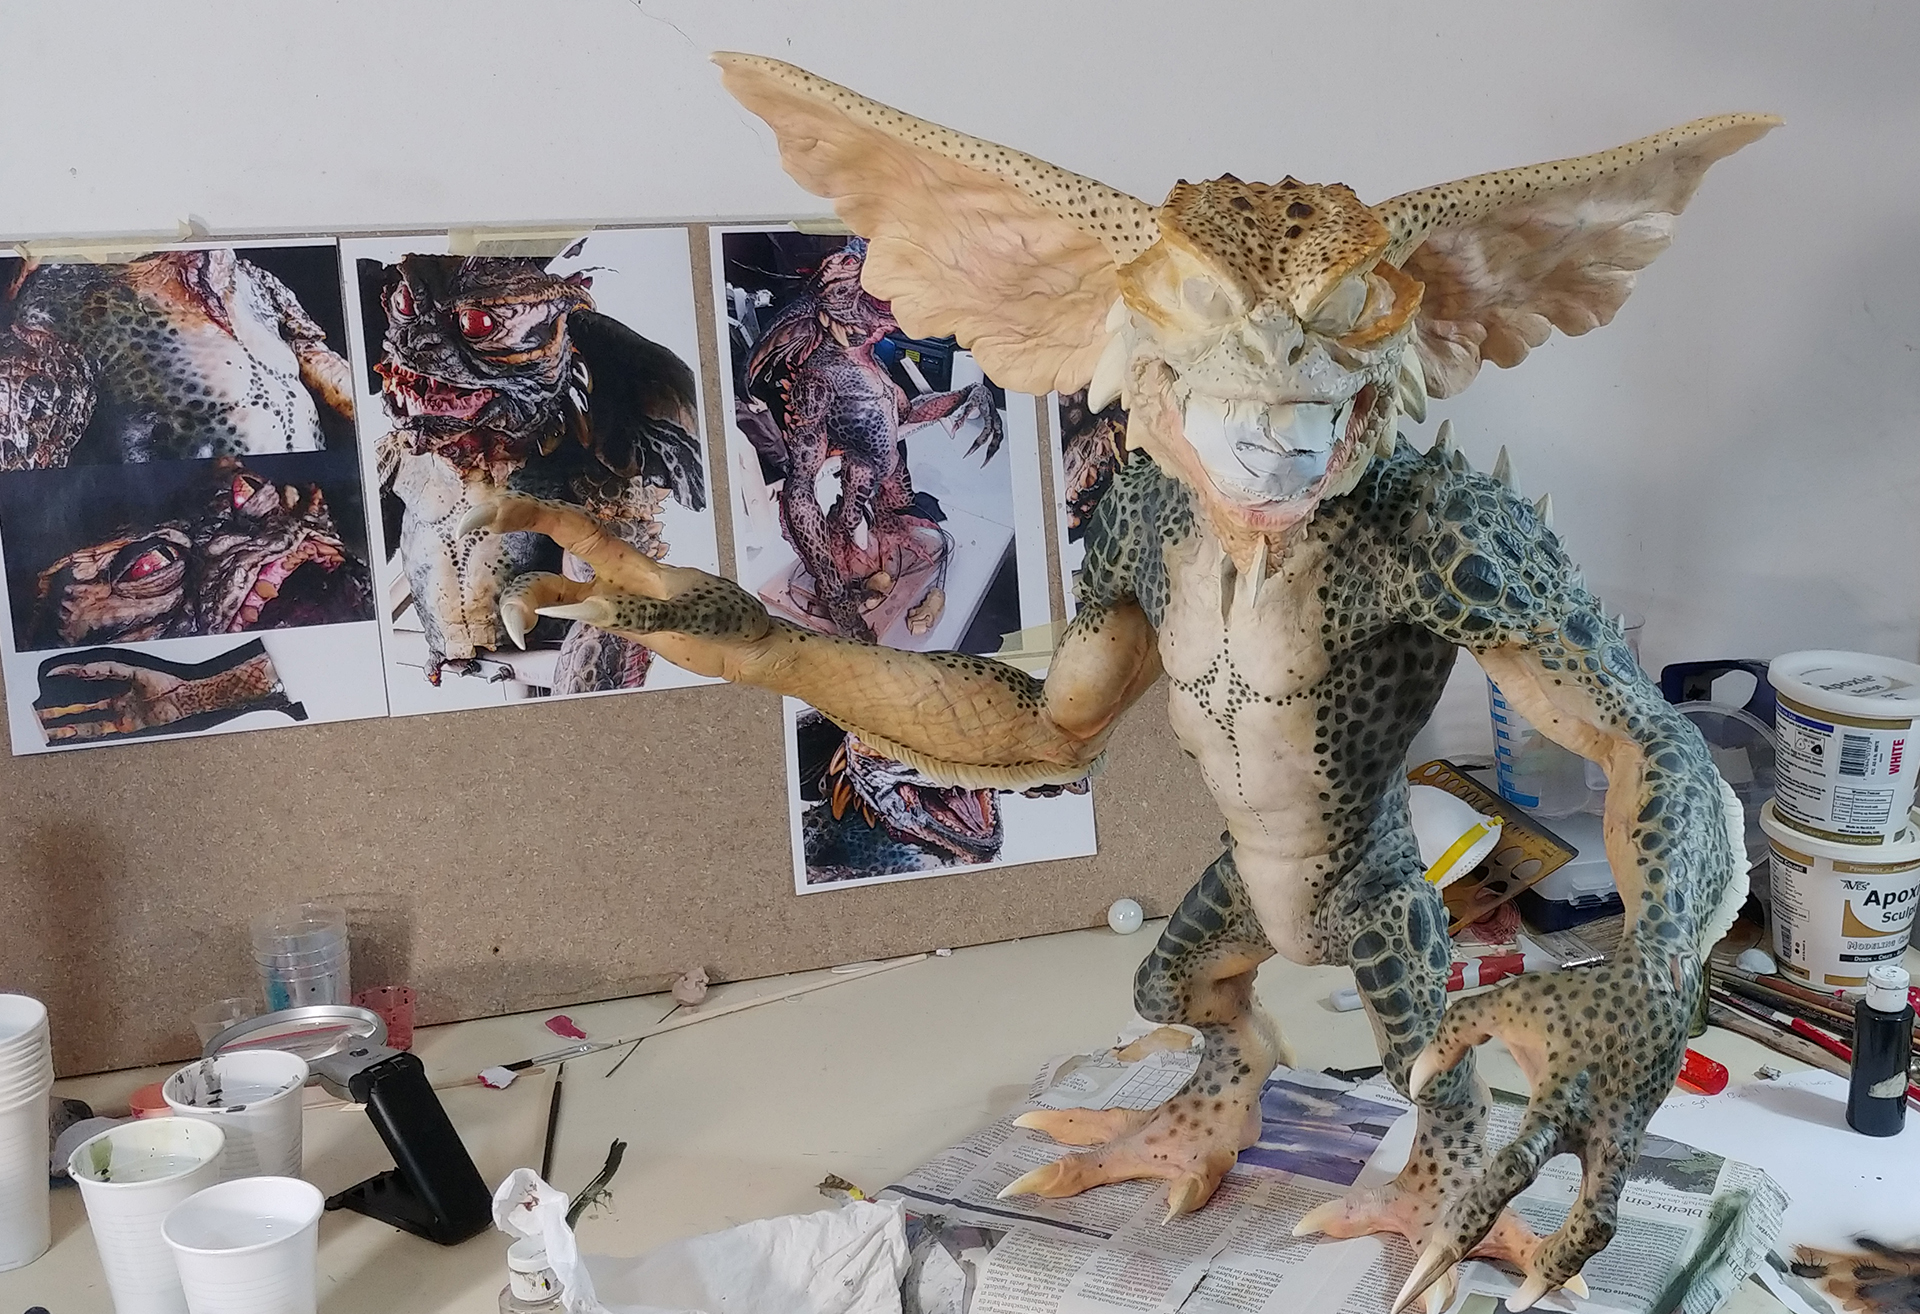
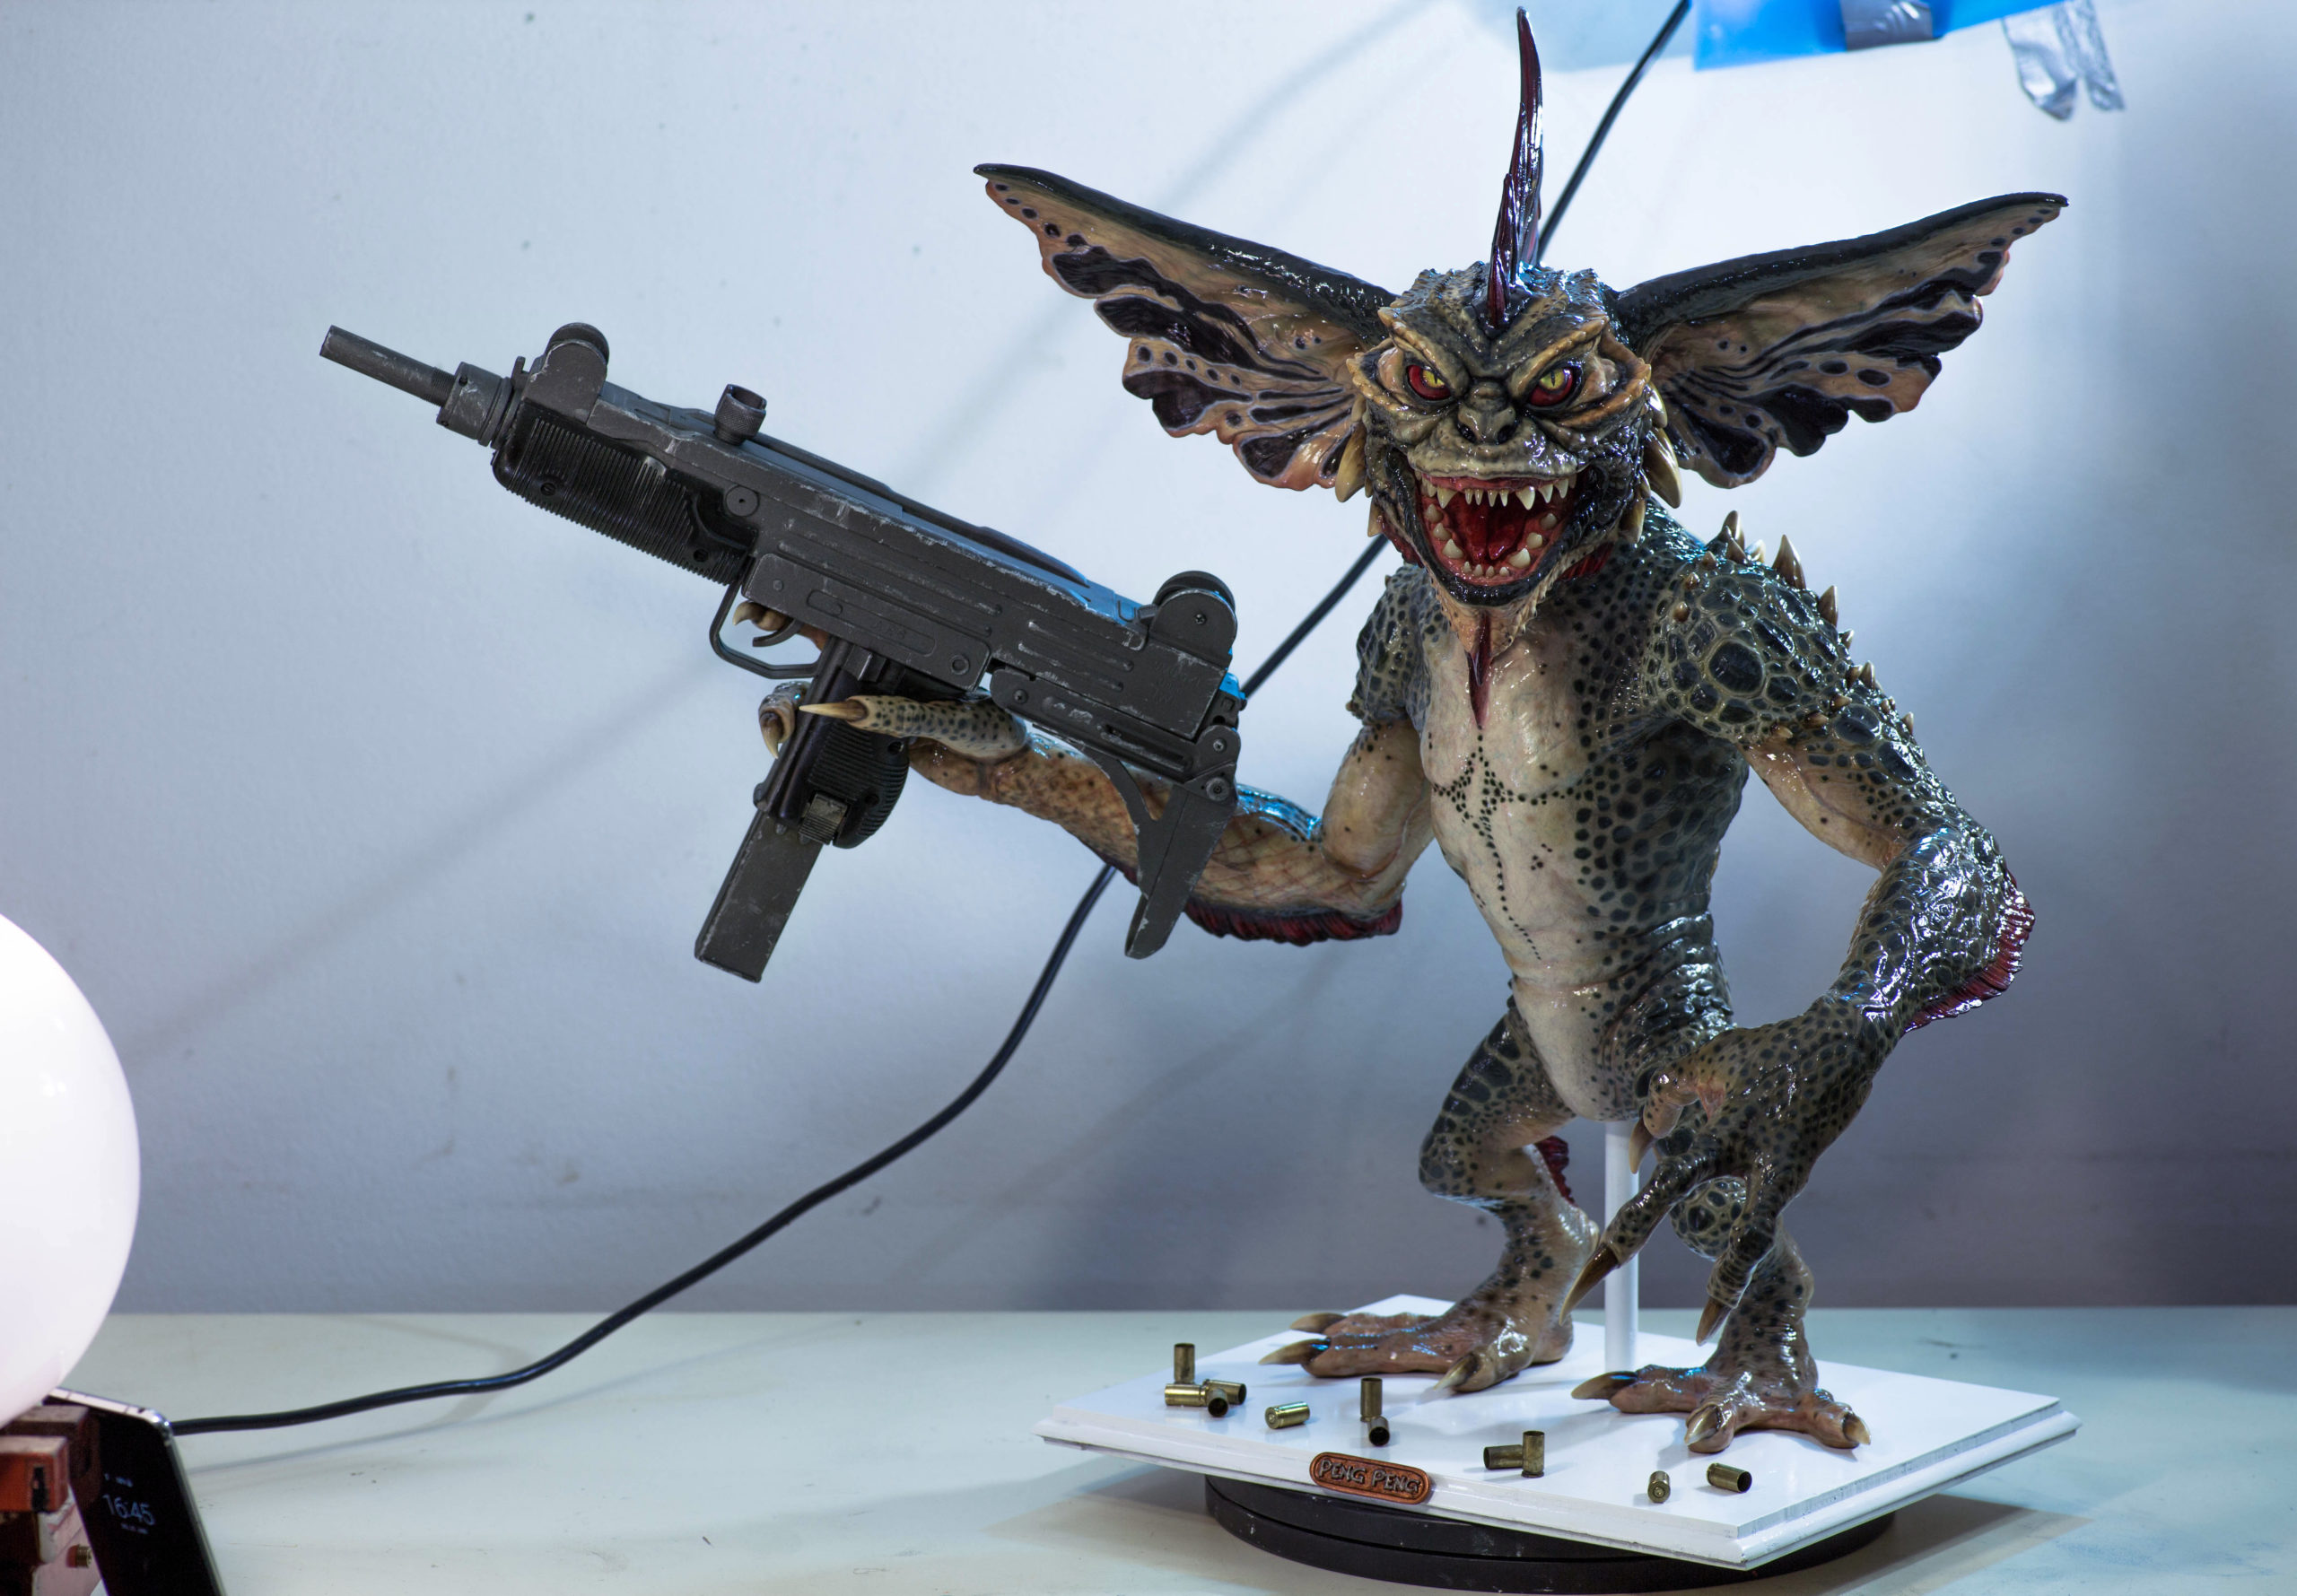
After 3 months of building, it was finally time for priming and painting! Yey!
Painting
Primed the whole Gremlin
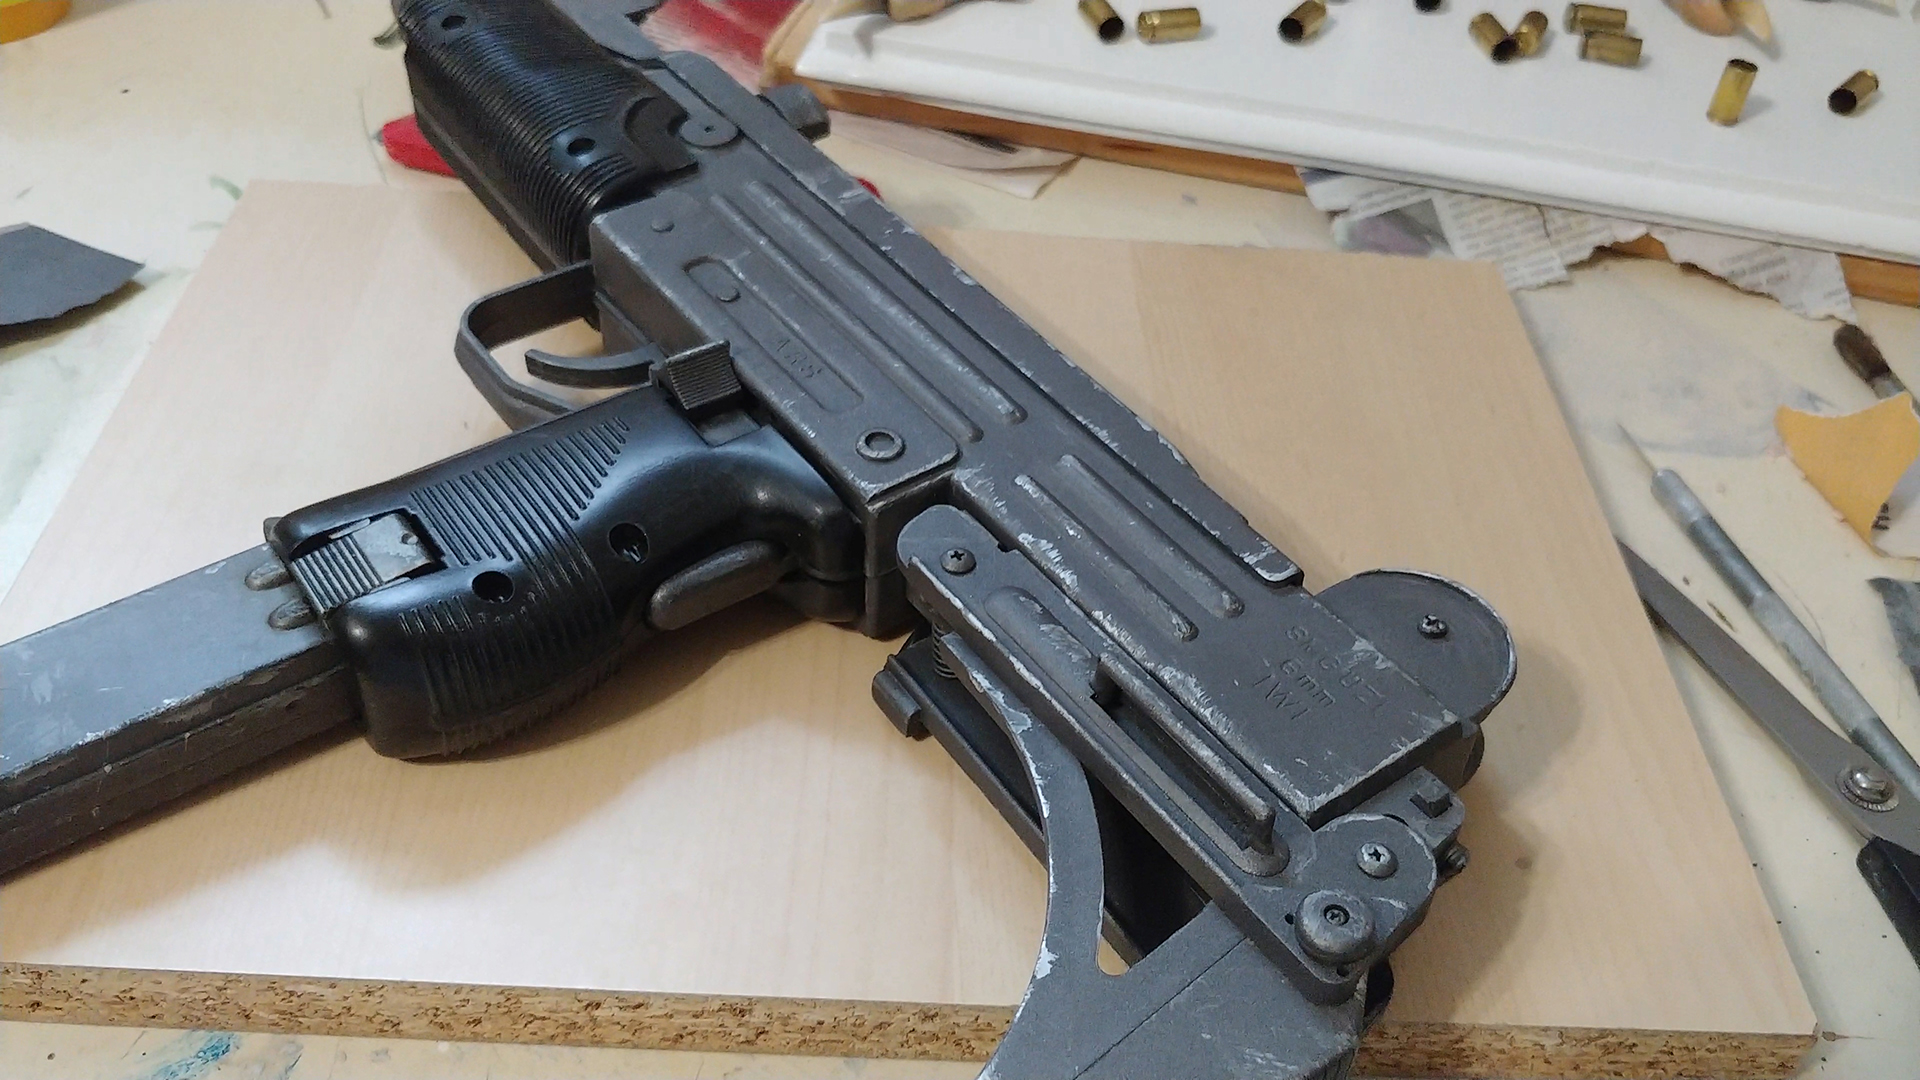
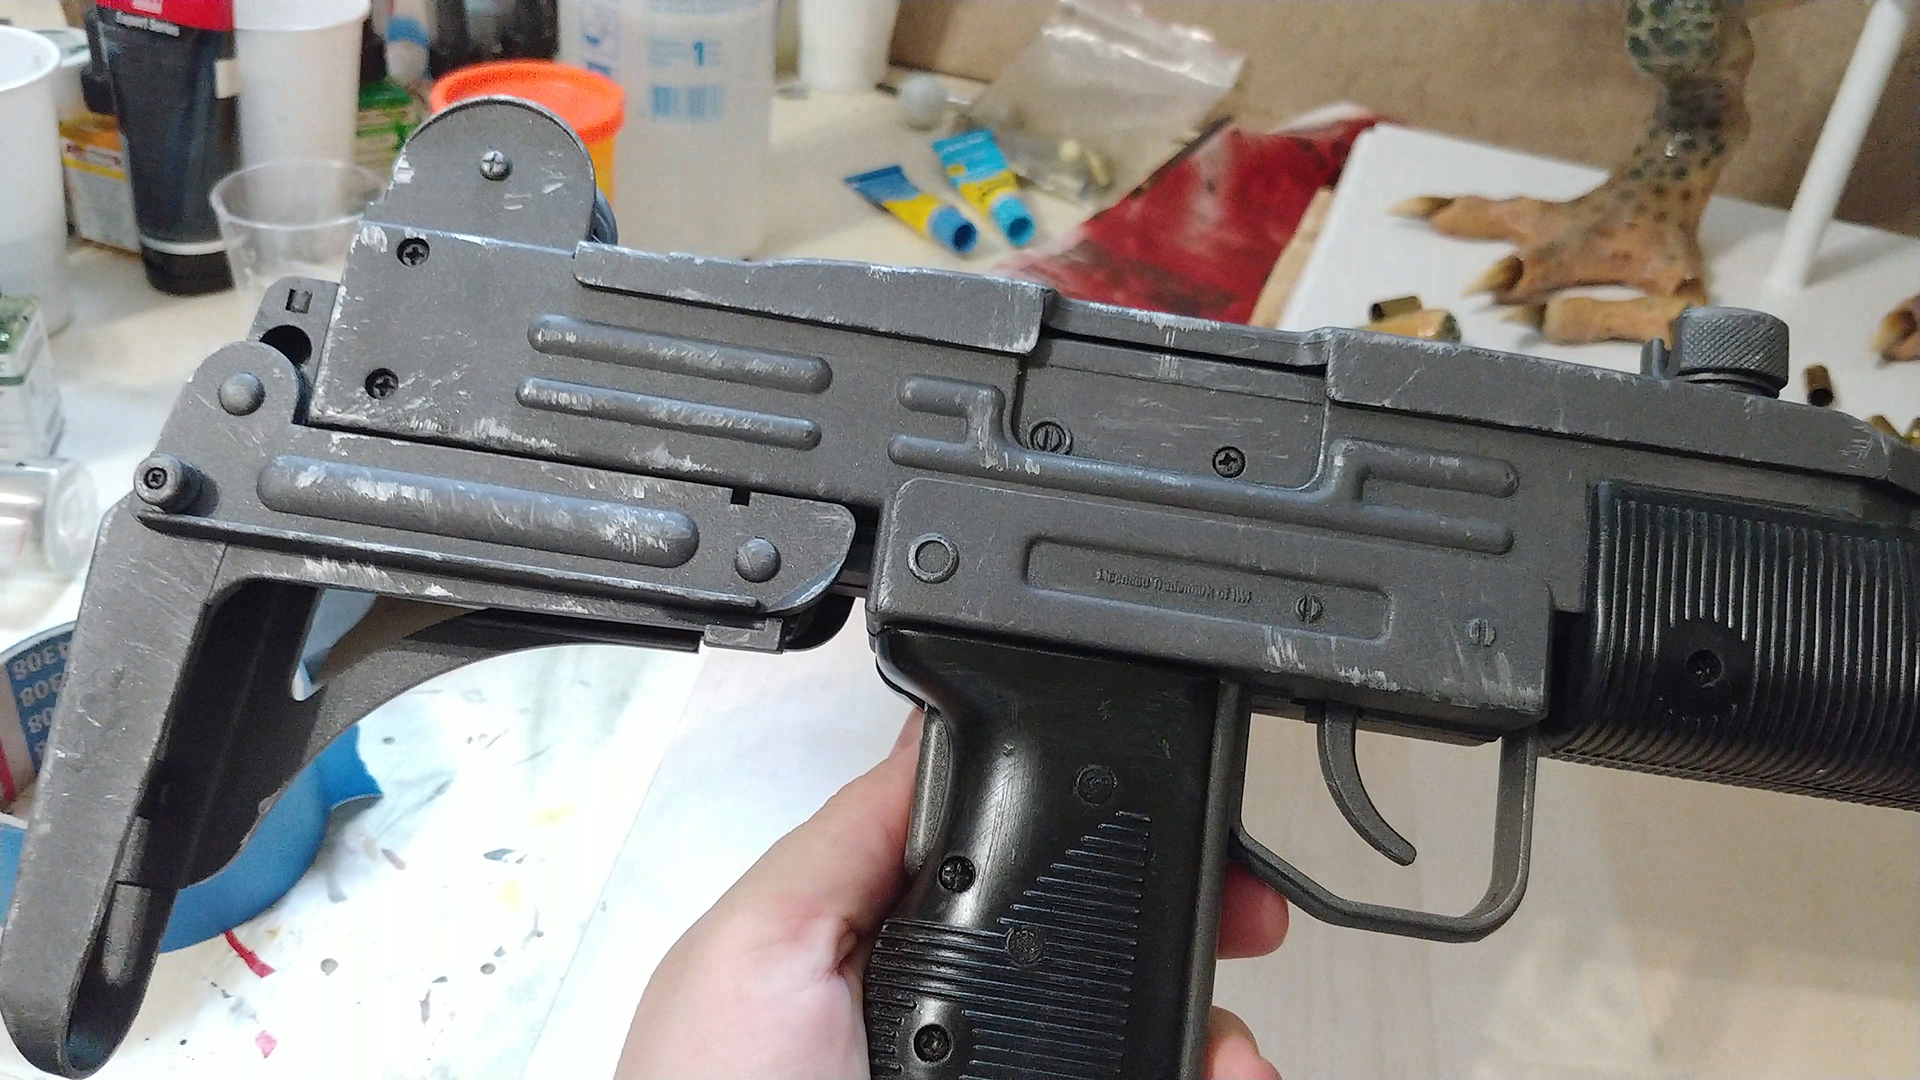
I started with the Uzi. I painted it with a mix of steel effect spray, light and dark grey. Misting over the steel effect with grey to tone down the fake effect.
I weathered it useing some green, brown and blue washes. Very carefully. The scratches were done with a nail file stick (the bendables), sprayed on with chrome and scratched of the edges. This way it will actually scratch the surface a little bit and give it a more realistic look.
Uzi painted
Uzi painted
Painting the Gremlin!
I don’t have a lot of pictures, I’m sorry. I will list some of the steps but can’t go into all of them. It took me 2 weeks (every day working for 5-8 hours on it) to finish it. A lot wont show on pictures (as you know).
I started with a very light beige base color. Again, I work with transparent colors and mix everything myself. I can’t tell you exact colors. I work with Schmincke airbrush colors.
Very bright beige as a base
Followed by a darker skin tone. Always checking the reference pictures. I don’t just spray it on. I go over with circle motions and leave areas out that should be lighter. Belly, arm parts and so on. I don’t like the look of painted hard shadows into the folds and muscles. In most of the cases it looks not realistic.
Darker skin tone. Always check the reference pictures
To give the skin more pattern, I went over and a loooooot of this veiny looking lines with a dark brown.
I would go over and do red veins and some blue and green ones. On top of that comes a coat of the base skin tone to blend it in. this way It will look like the veins are really under the skin. I repeated this proces a few times to get multiple layers with more prominent veins and some very subtle ones.
brown veins
I tried to get the moles screen accurate.
Added moles
Another technique to get more skin patter was spattering the surface with brow, red and blue. It will give the skin more texture. Those spatters will lose intensity after the top coat of skin tone.
Spattering
As I mentioned I went in with reddish for some veins. I also layed out where the thin skin parts would be and more blood vessels would show. Hands and feet are more reddish for example.
Work in Progress veining
After the base skin was done, I started with all the spots. There…..are…..sooooooo many of them. I recommend doing them with the airbrush. On my first gremlin I used a brush and they were too clean and sharp. This time I used a 0.15 needle and very close to the surface. This way they would look natural and not too sharp, also without overypray. I hope you get what I mean.
Startting with the spots
Adding more spots - brown on the head
The pictures show the process of adding spots. It took multiple layers to get them correct.
Work in Progress laying out the spots
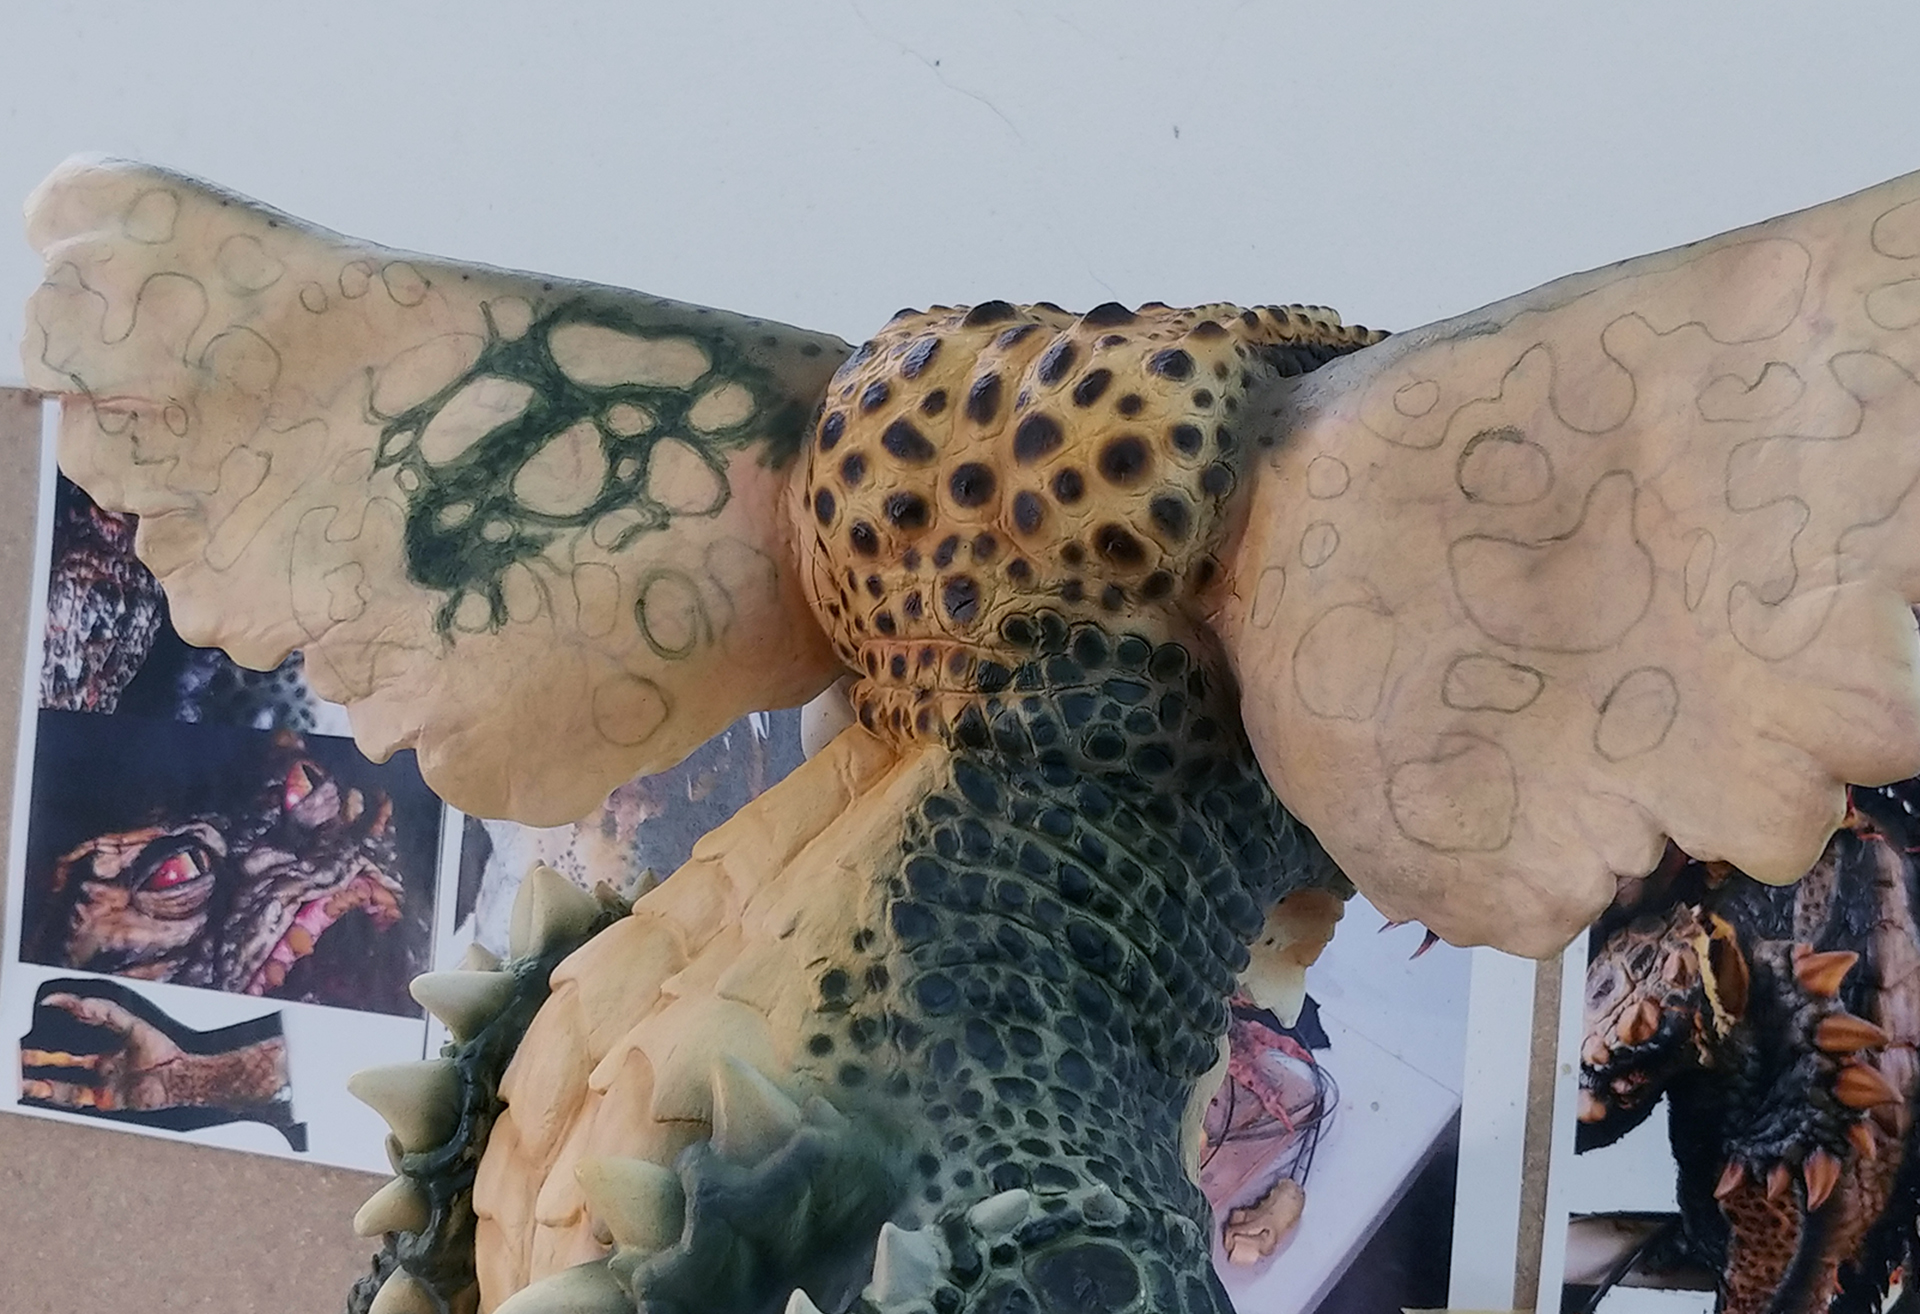
I layed out more or less the original pattern of the backside of the ears.
It was always the same process: Finding the right color, adding details like veins, moles and other textures.
Layout ears
WIP ears
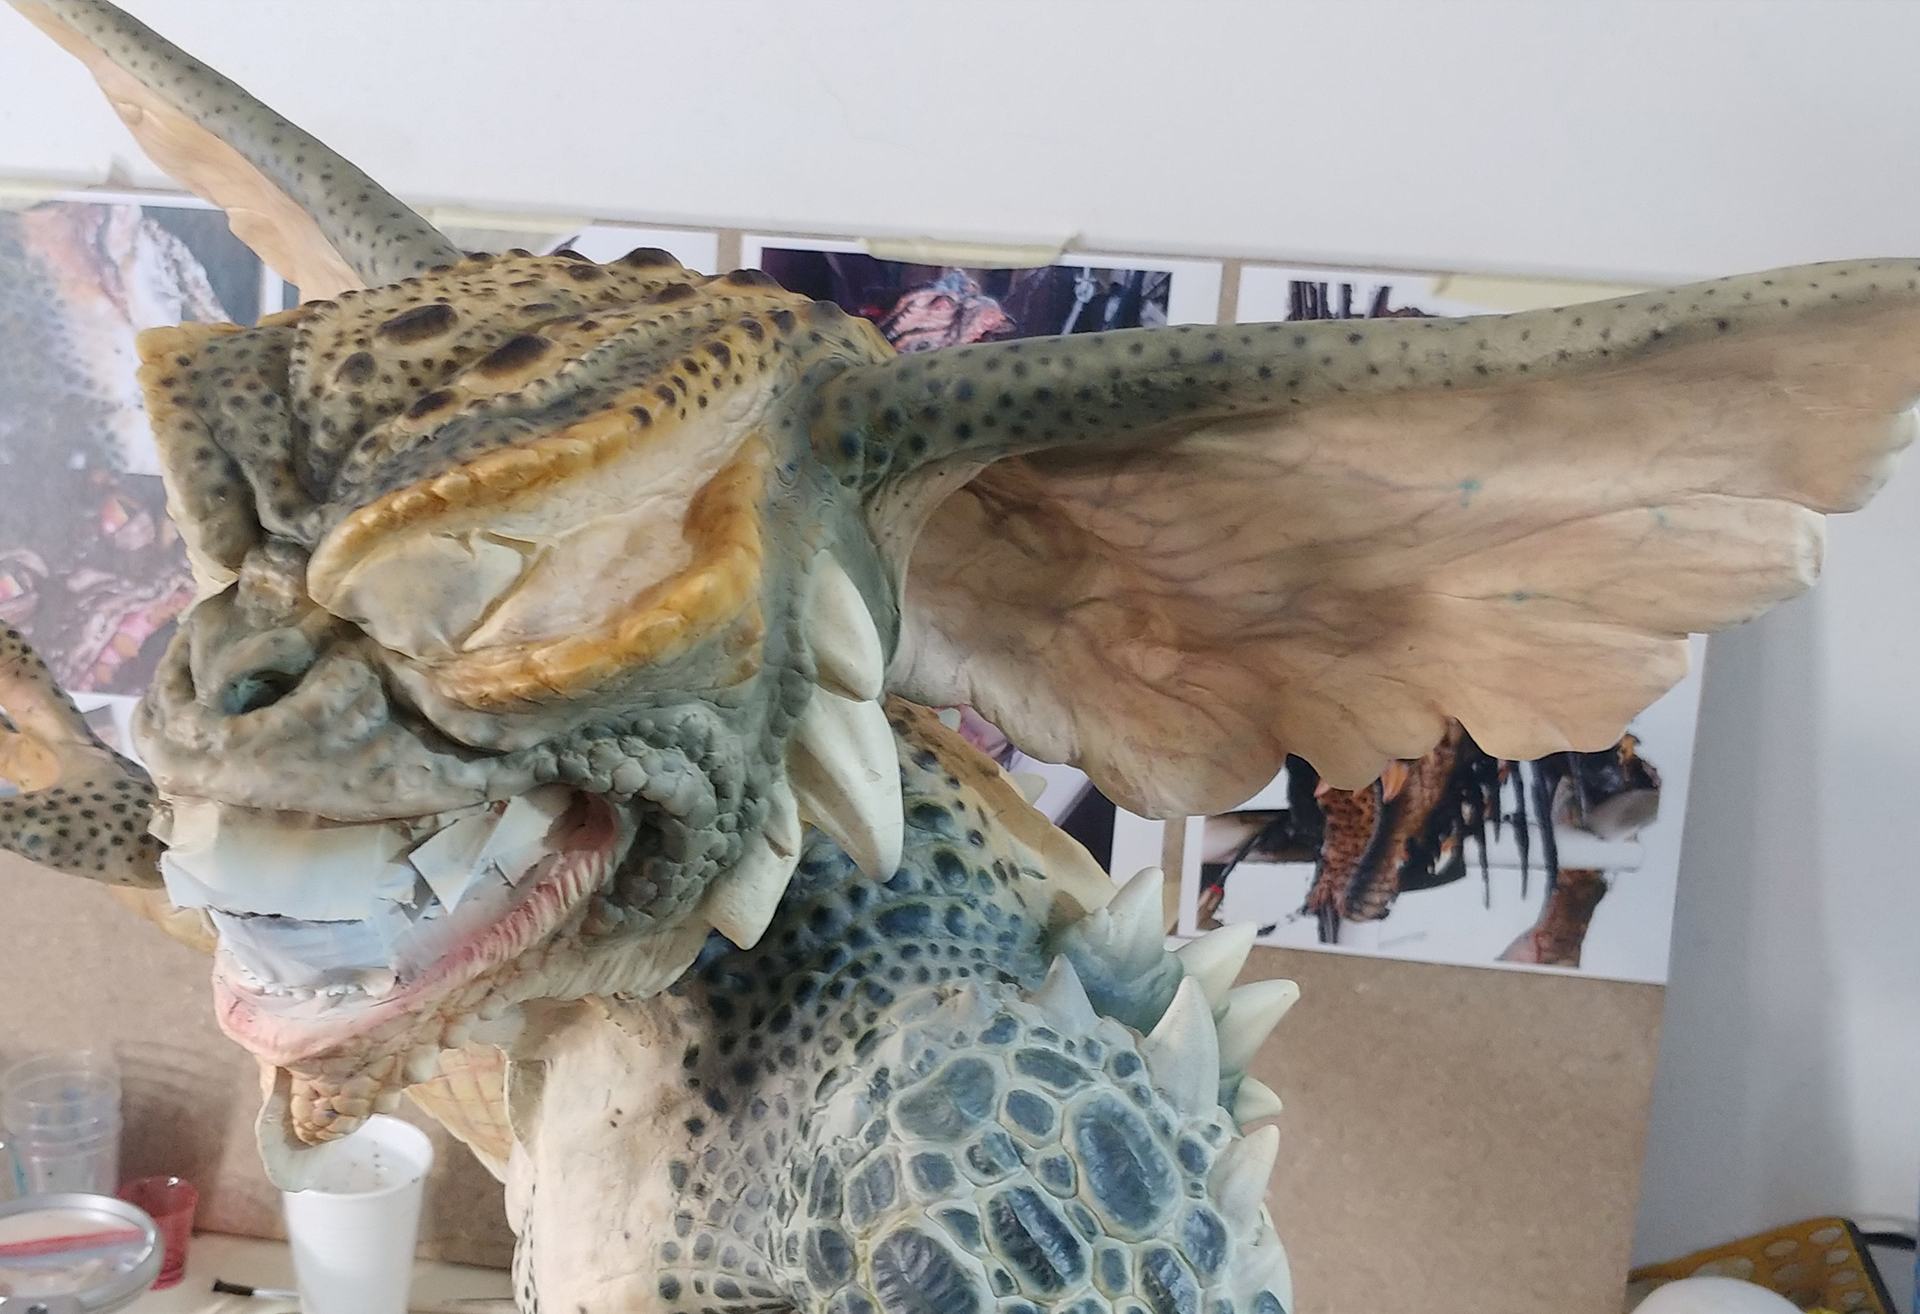
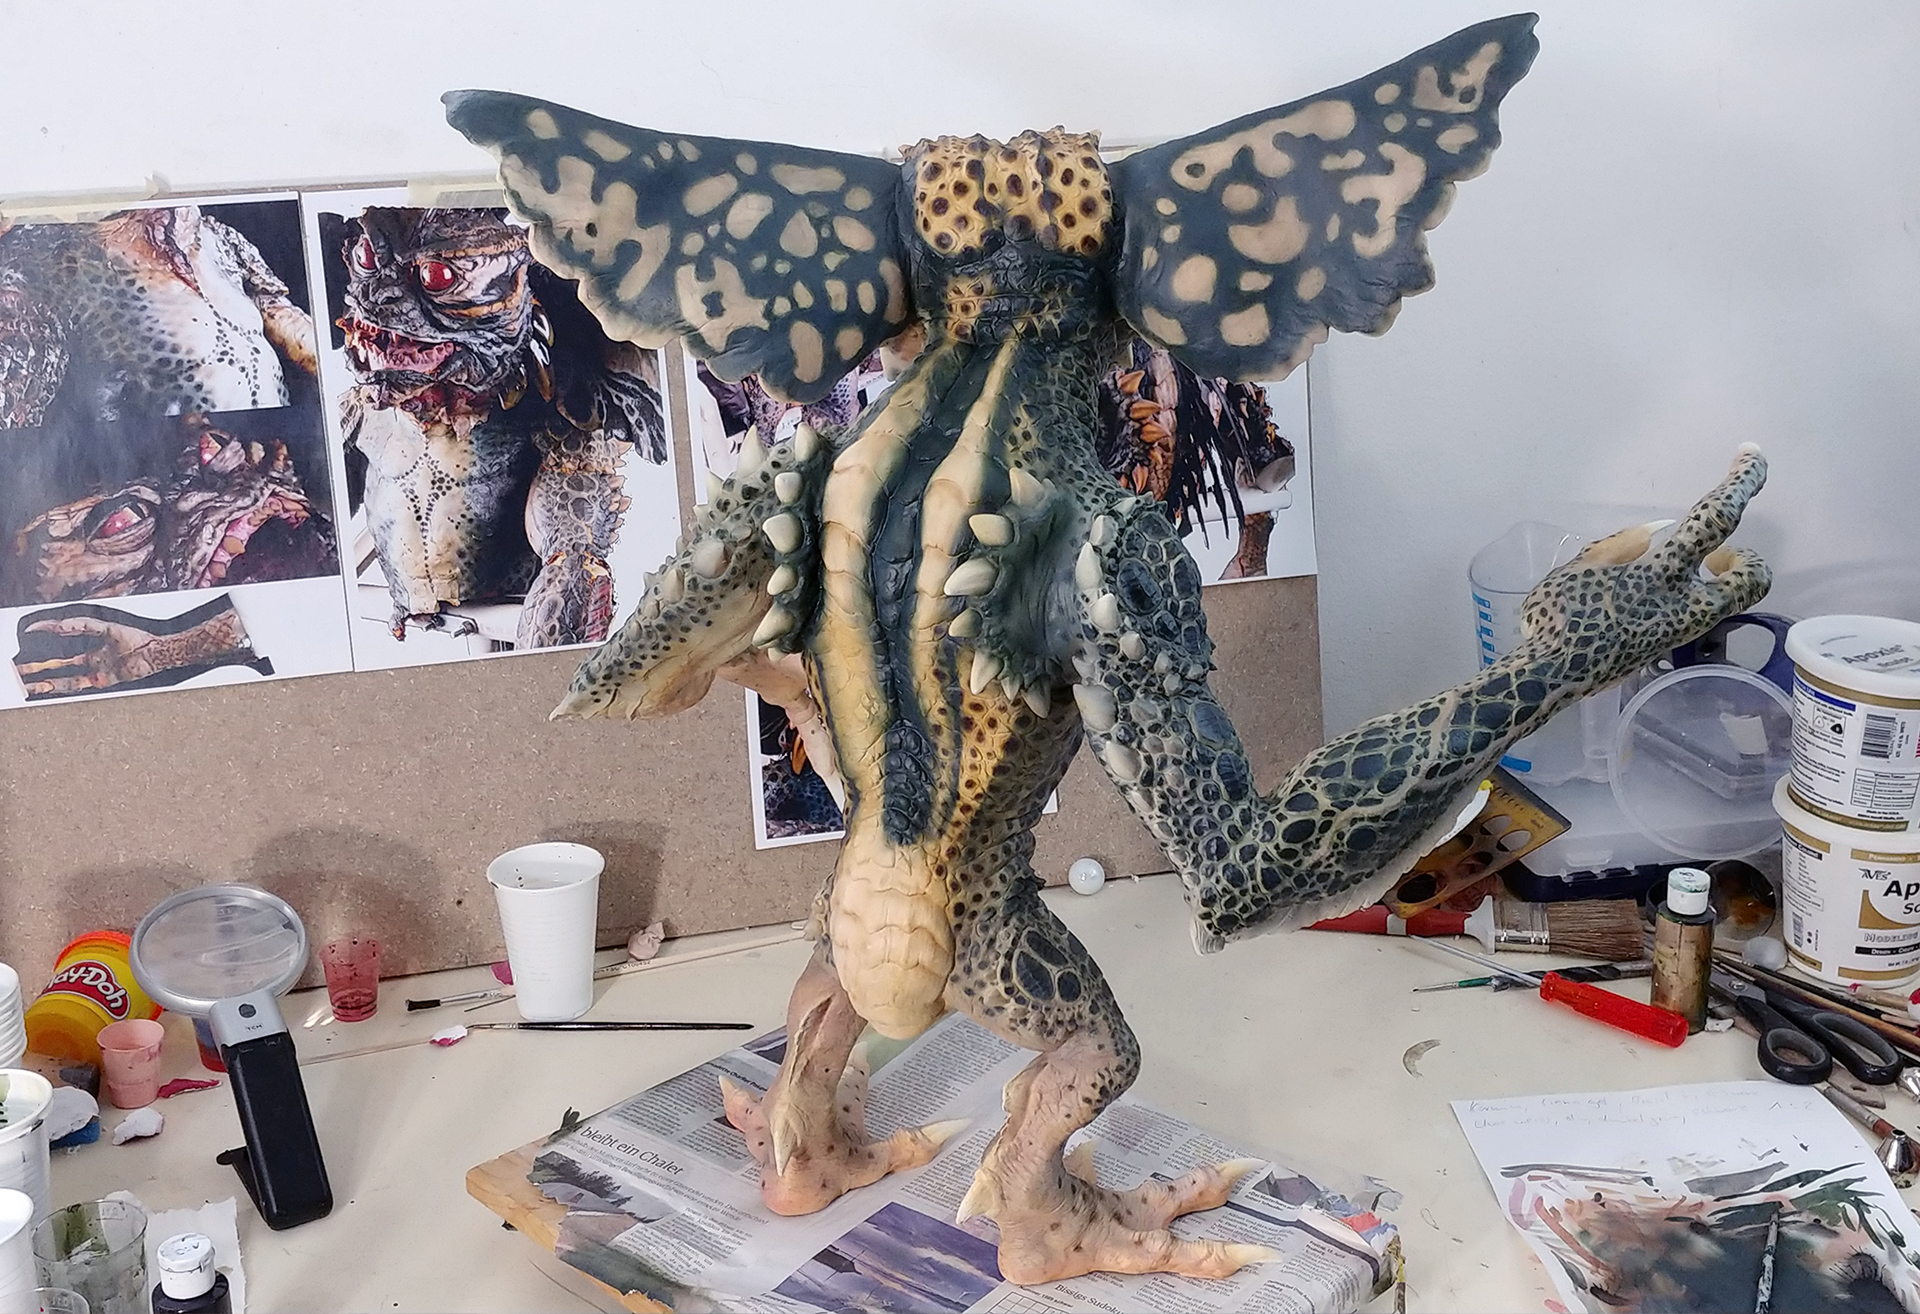
With every layer of details, I found something more I wanted to add or lets say fix. For example, the greenish tone of the majority part. It was too green, so I went over with grey and corrected it with blue to get a more screen accurate color.
Color Correction
Color Correction
Clear Coat
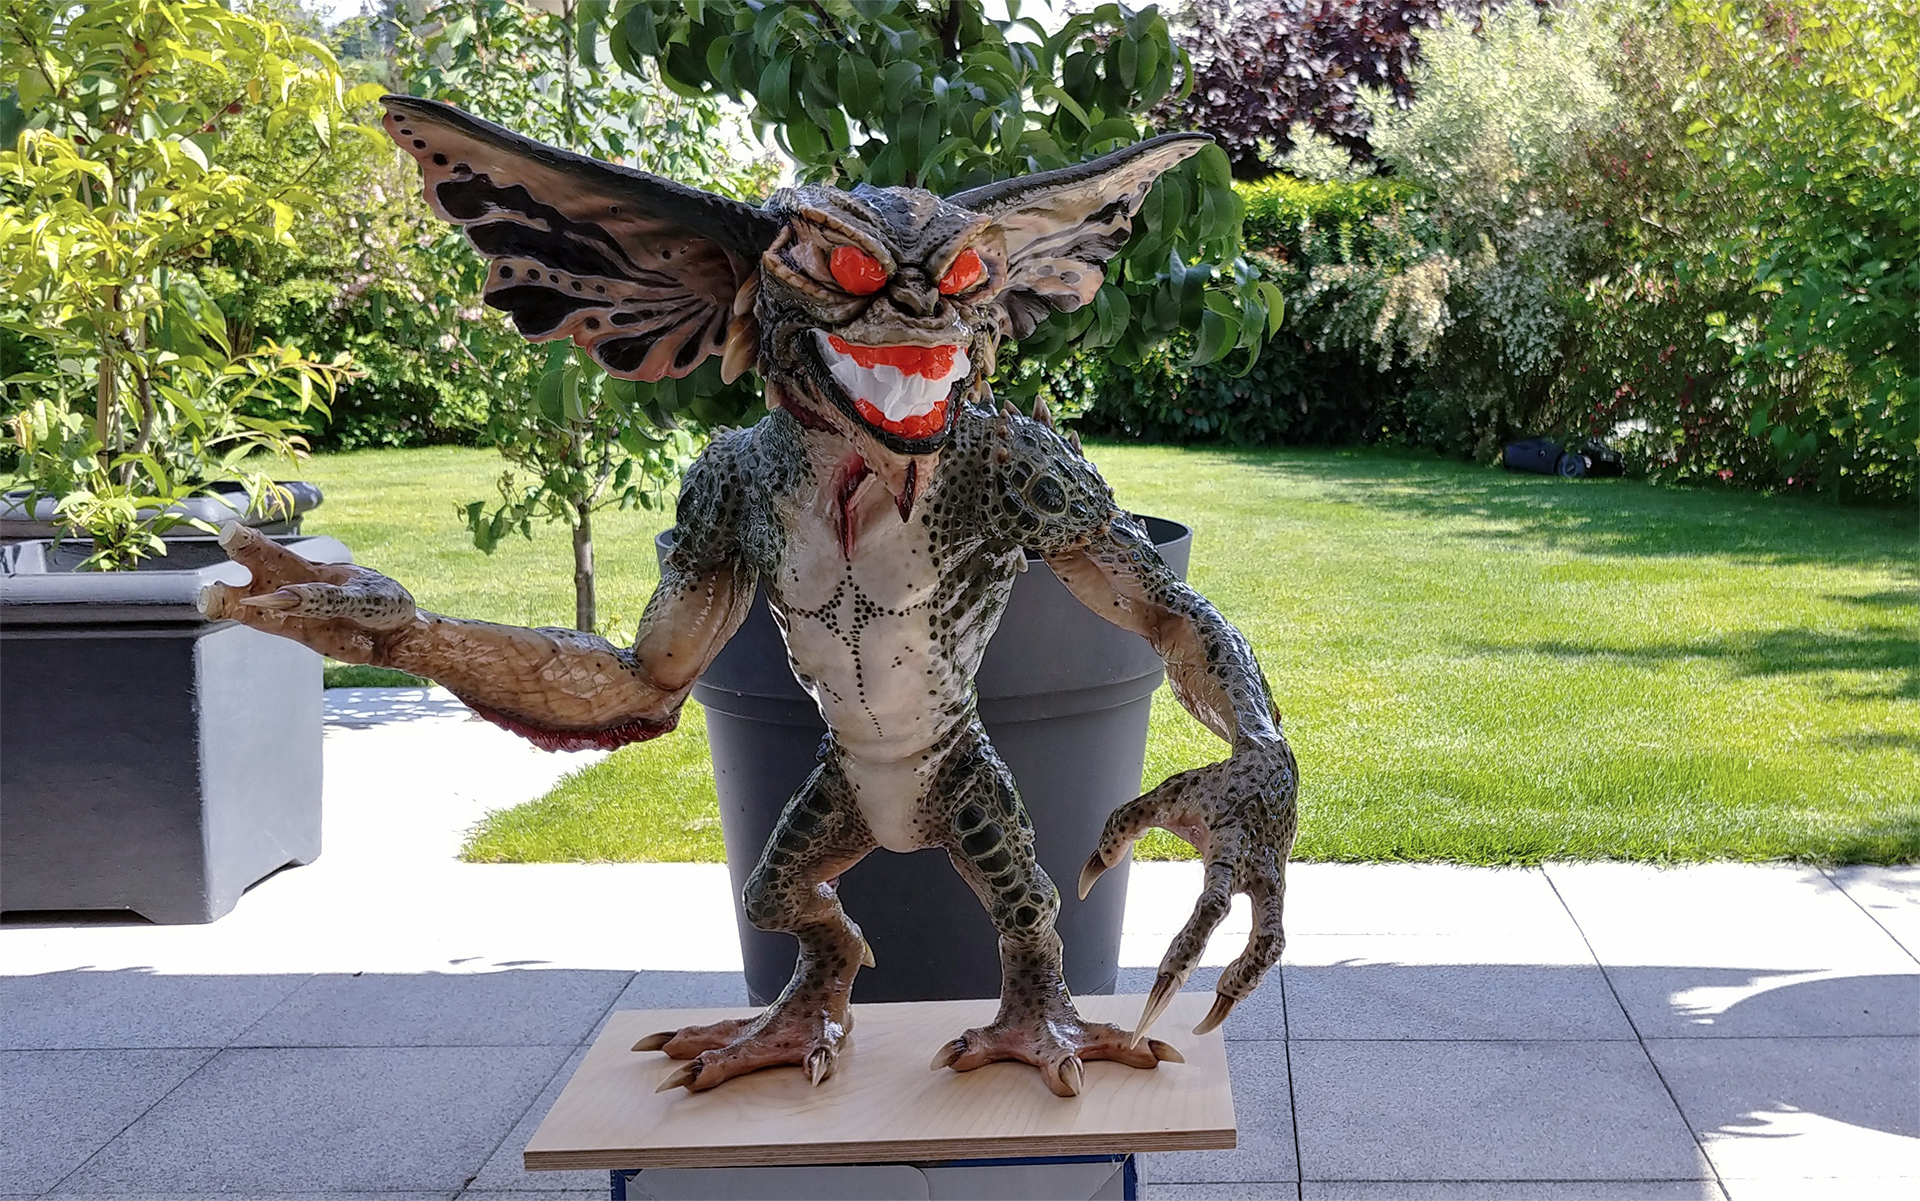
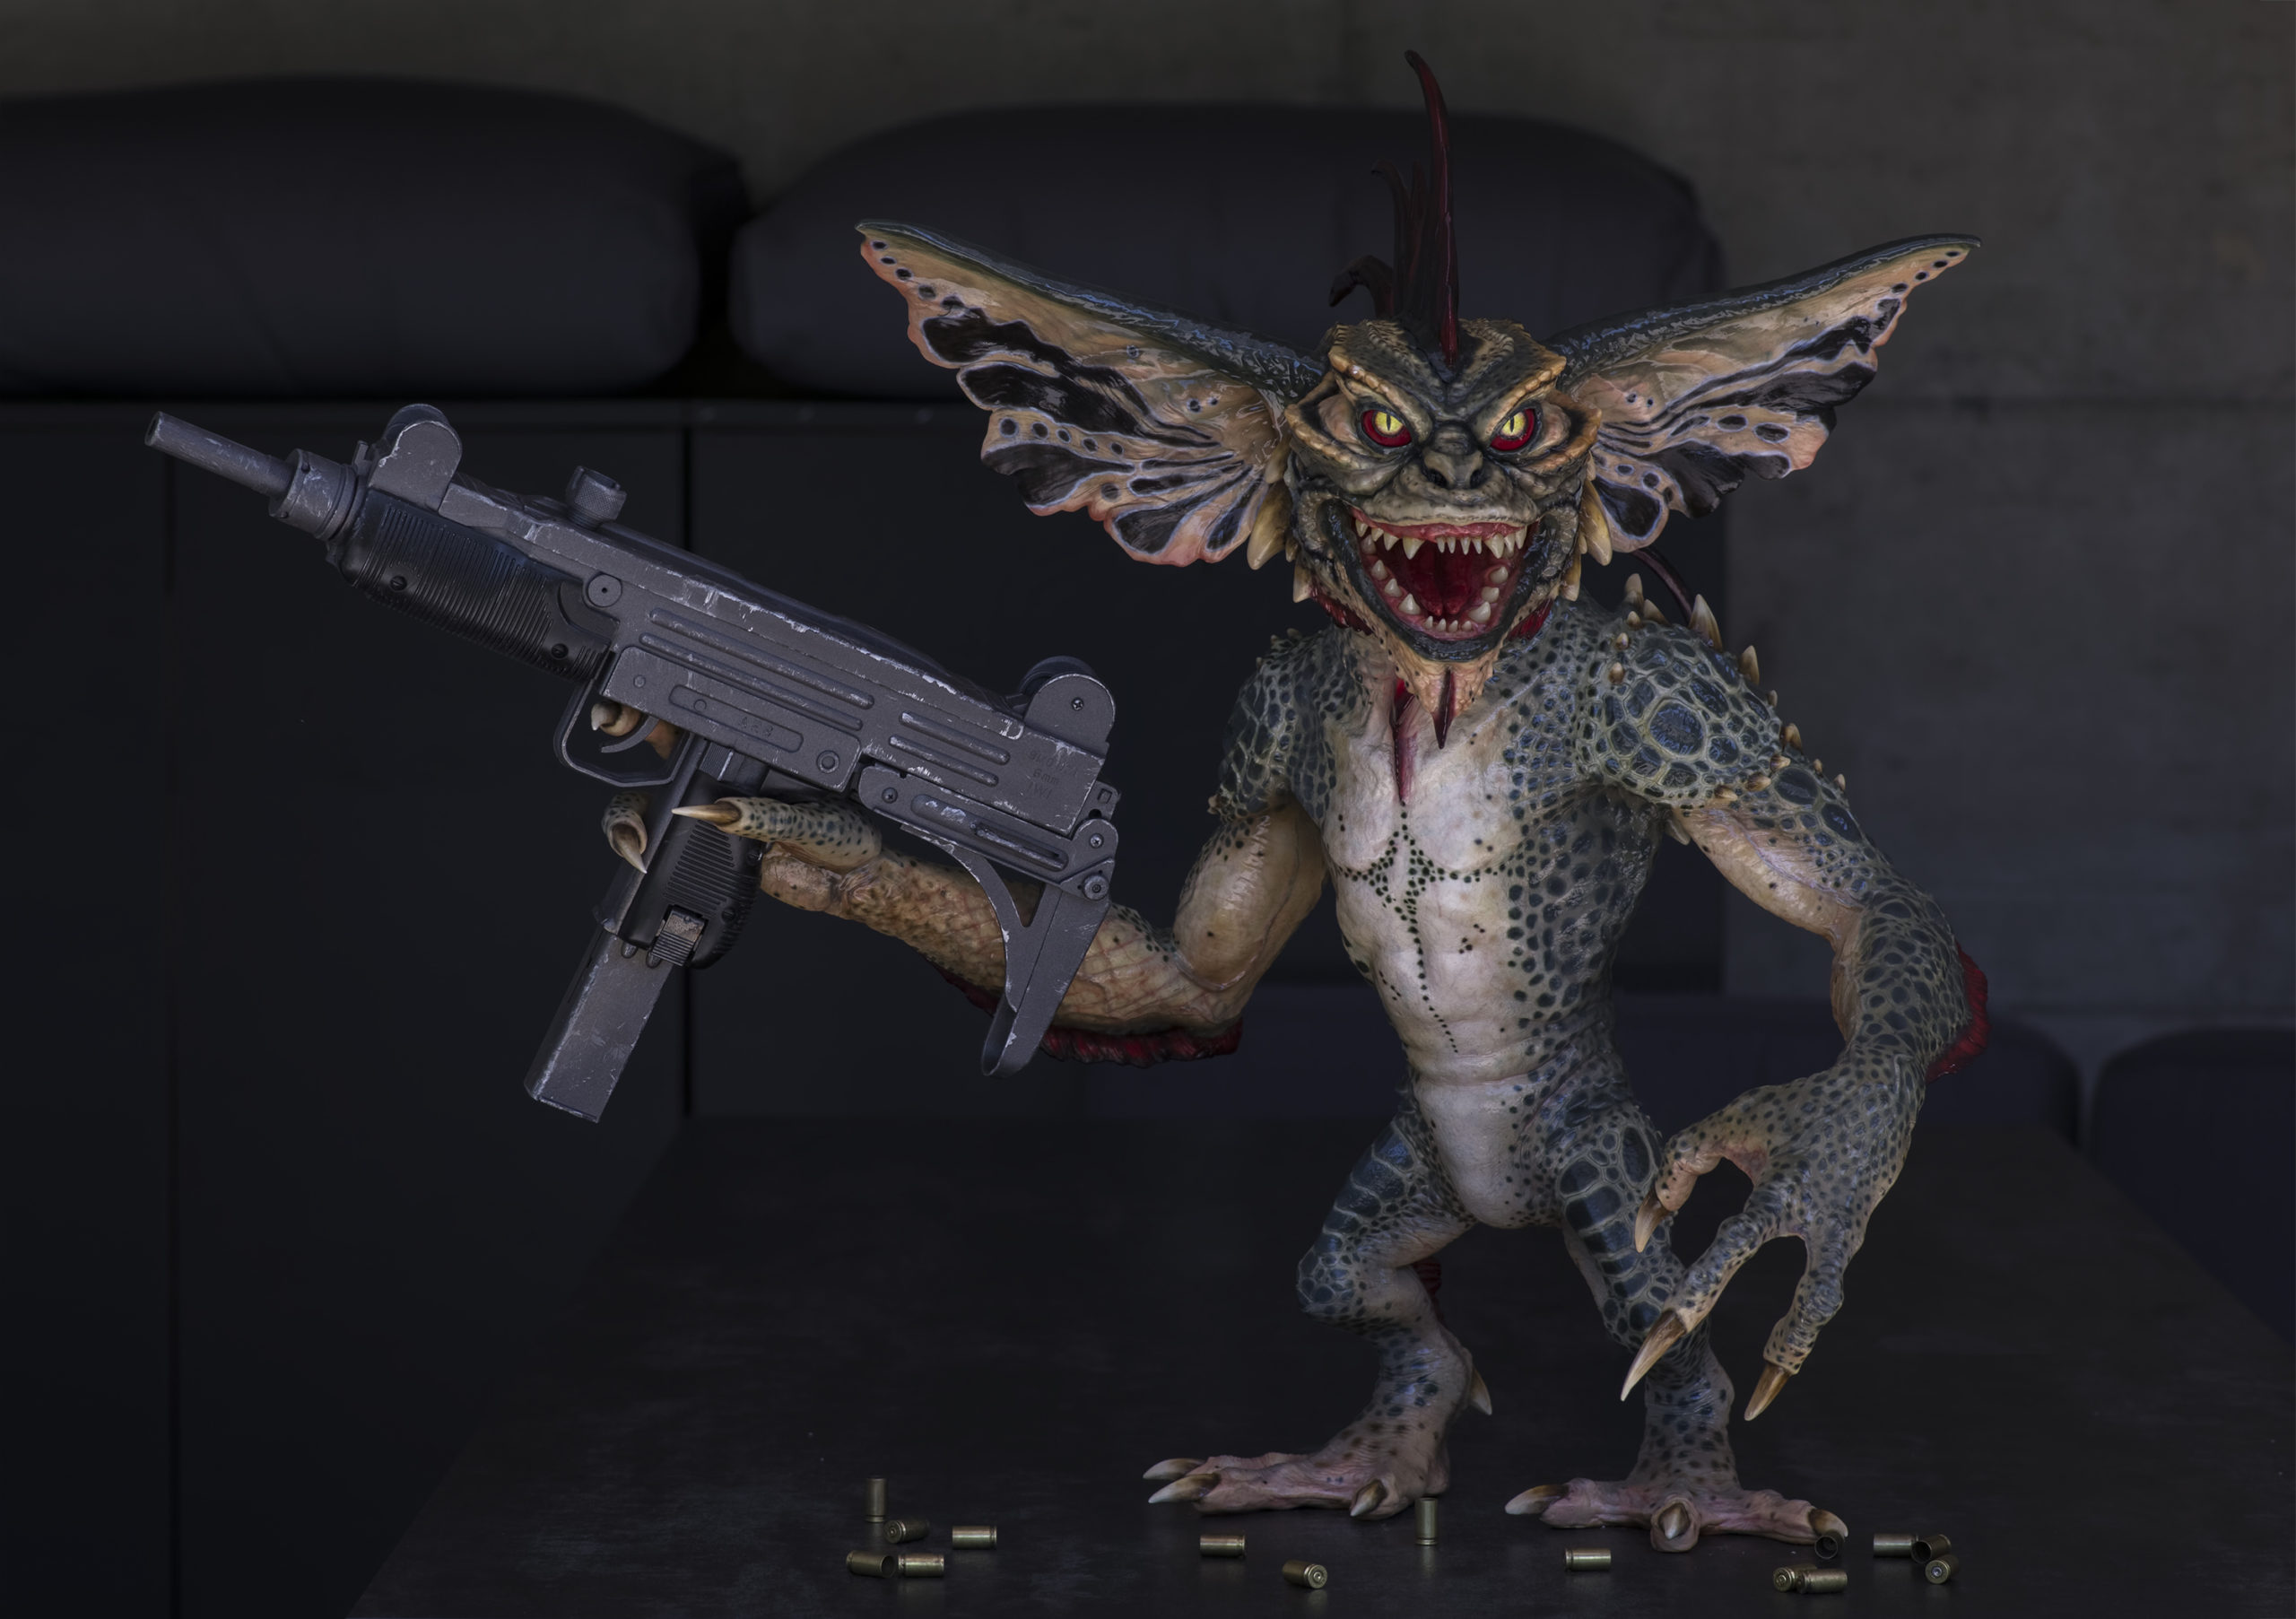
Finished! After the top coat dried. I used gloss, since the gremlins are slimy. It gives extra depth to the paint.
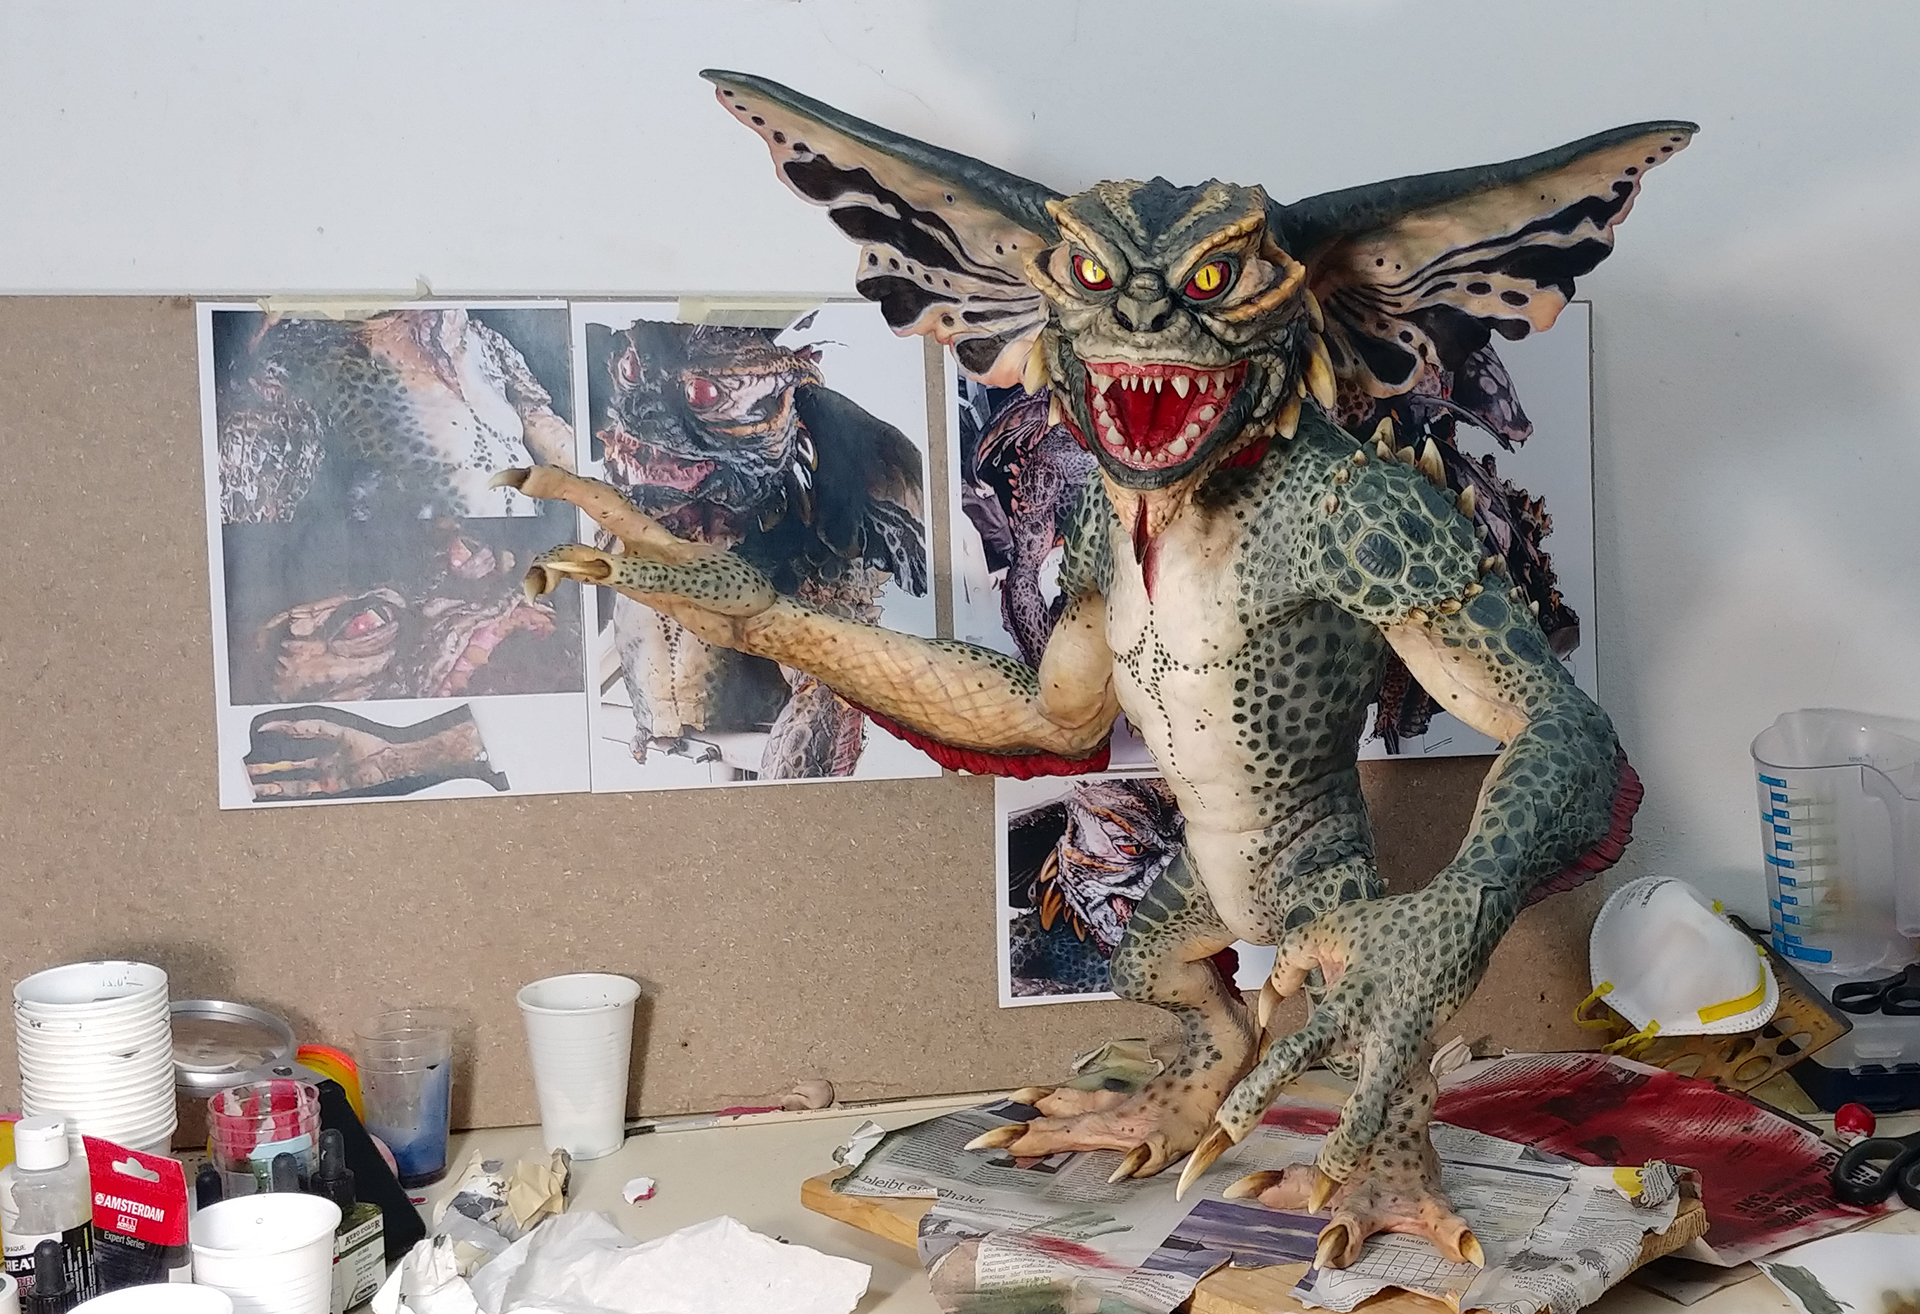
Finished!
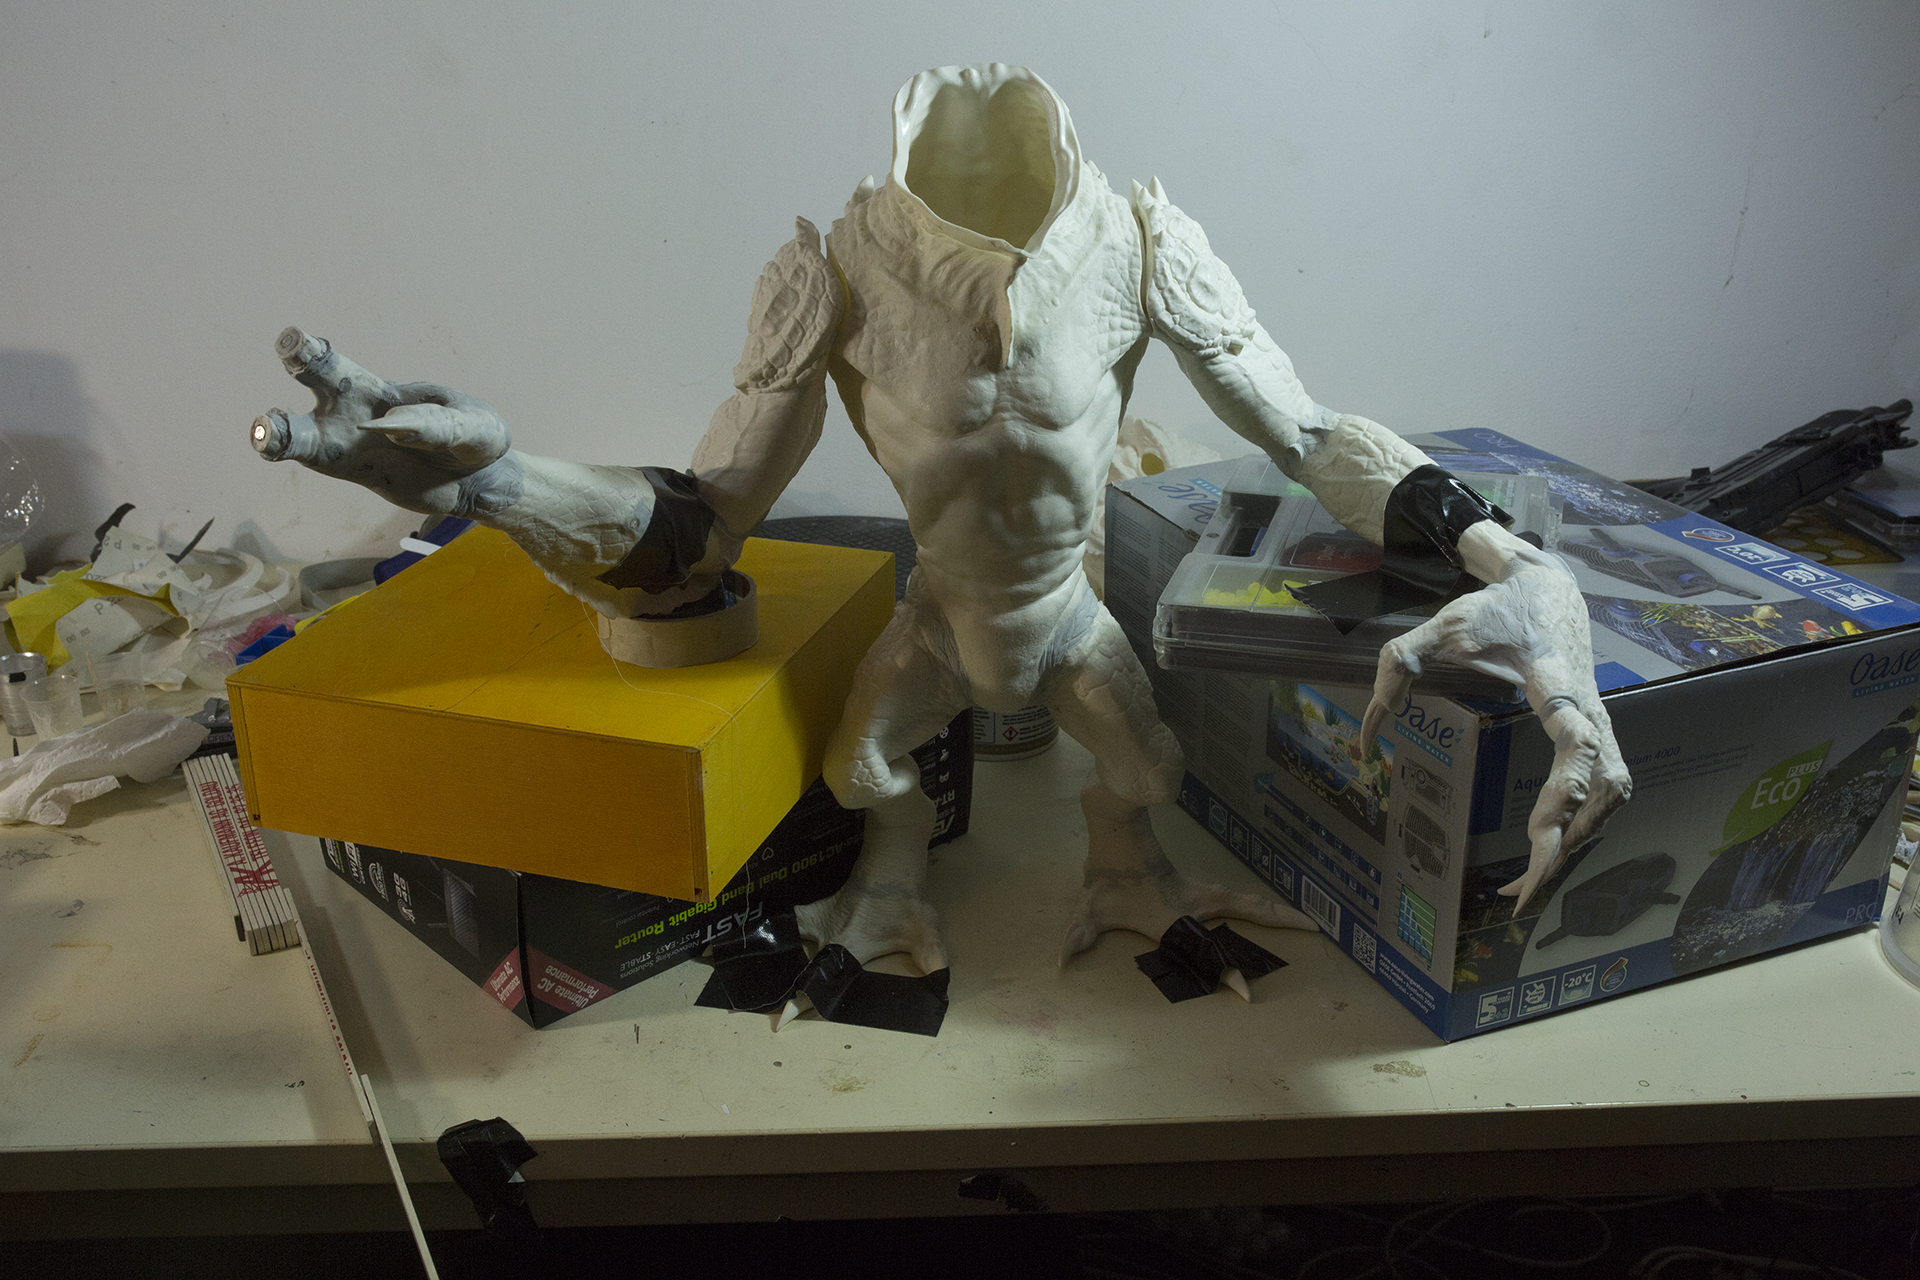
All parts layed out.
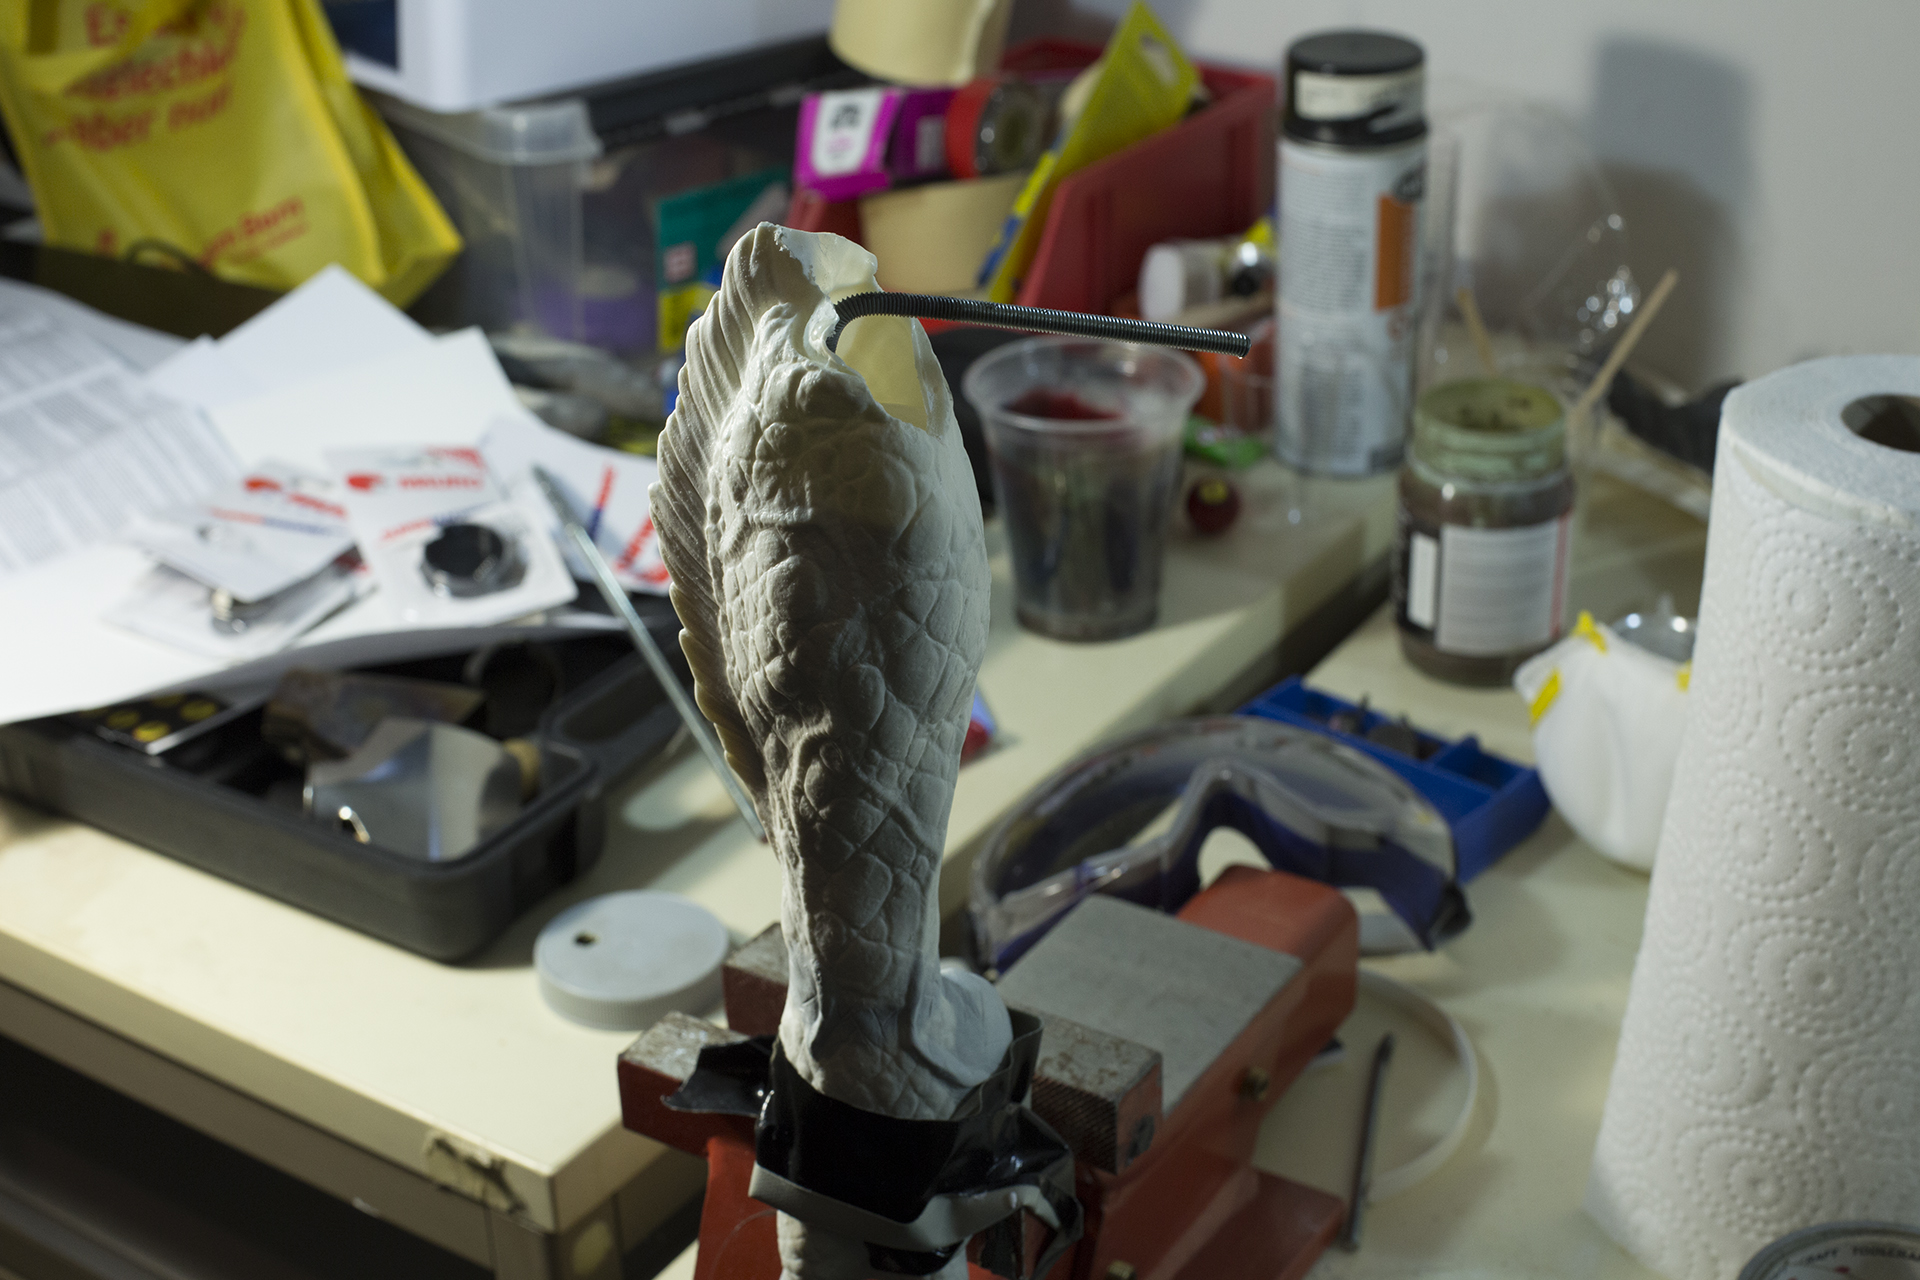
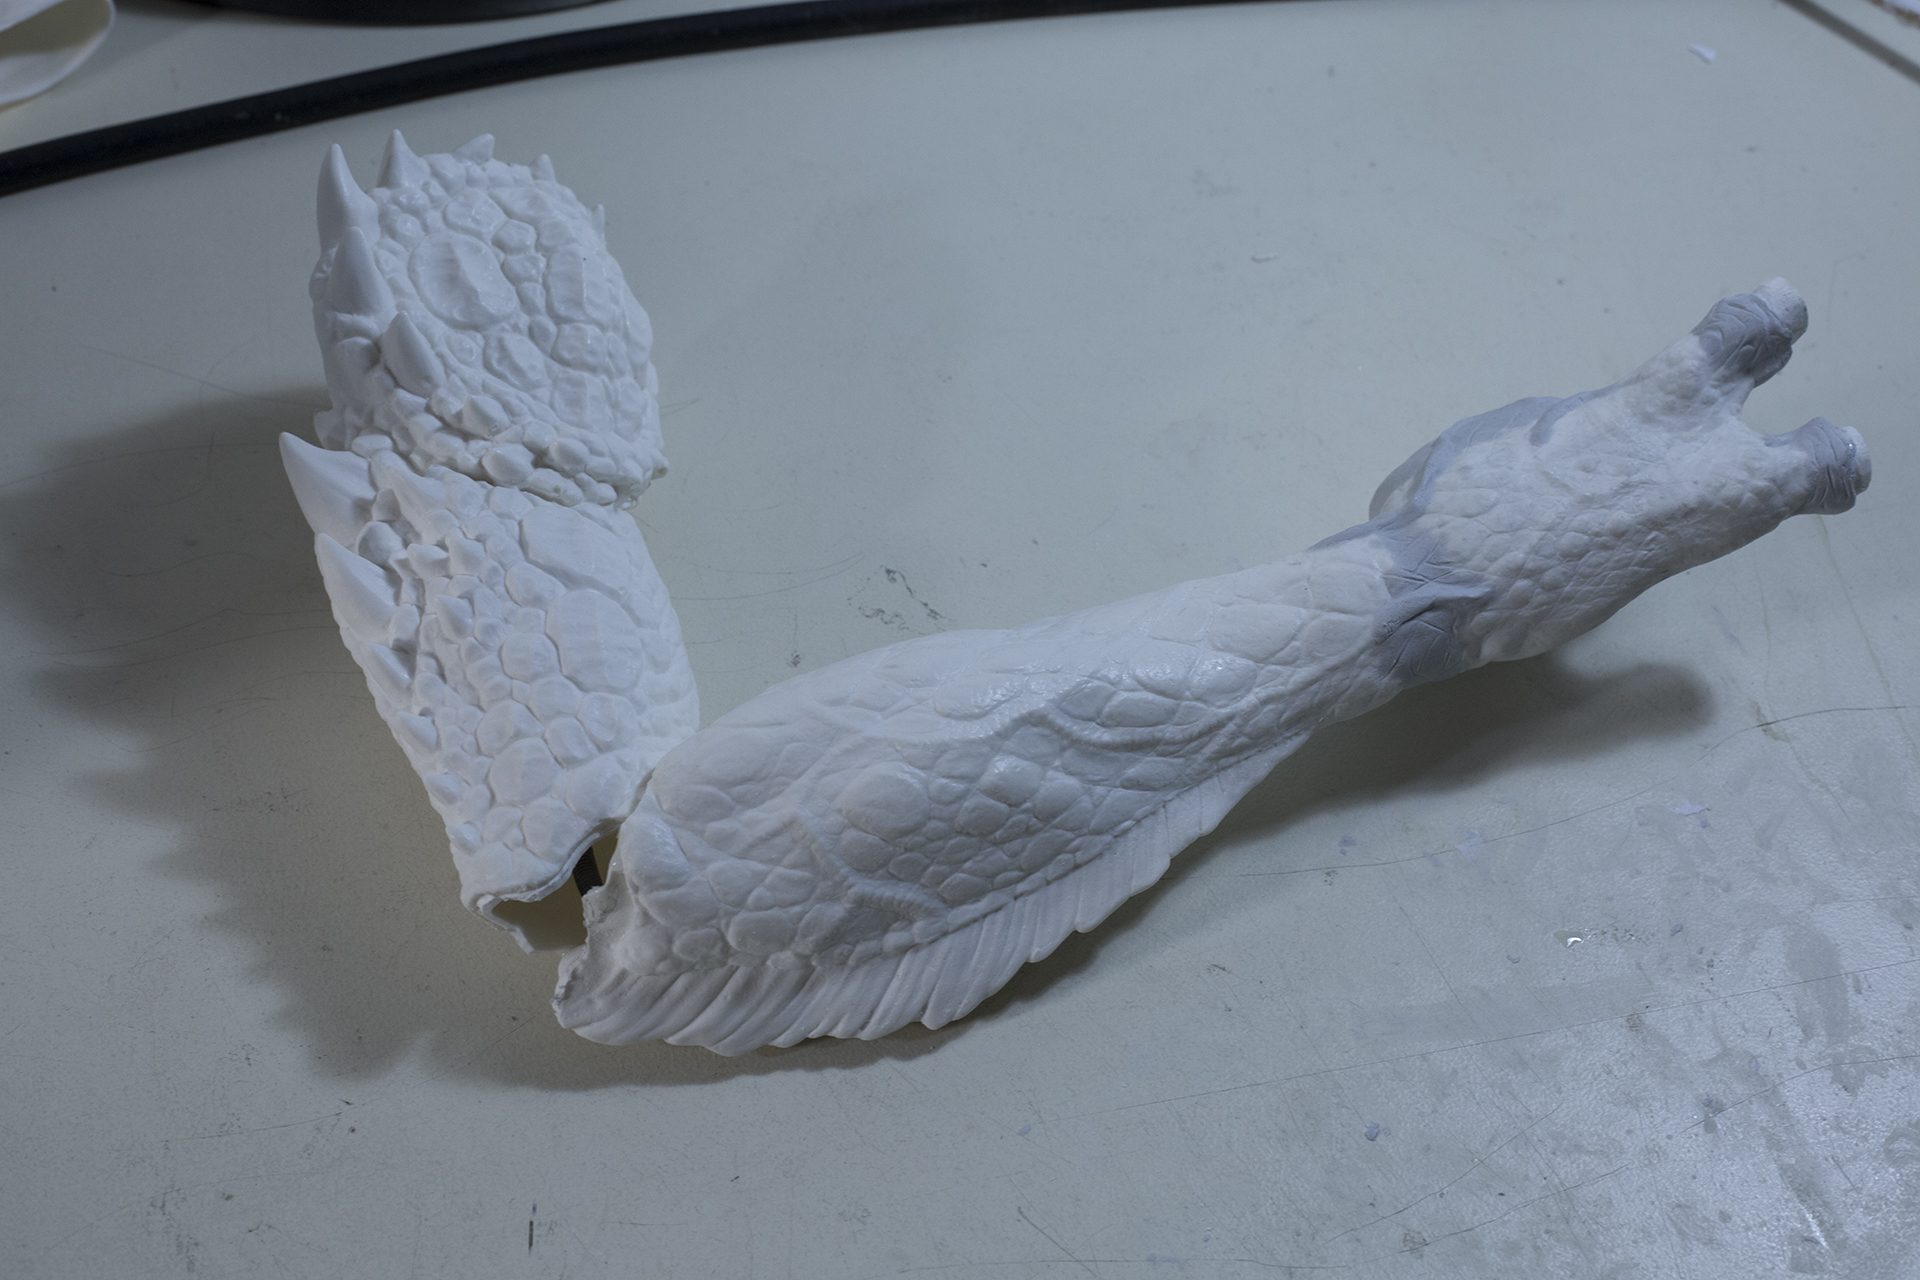
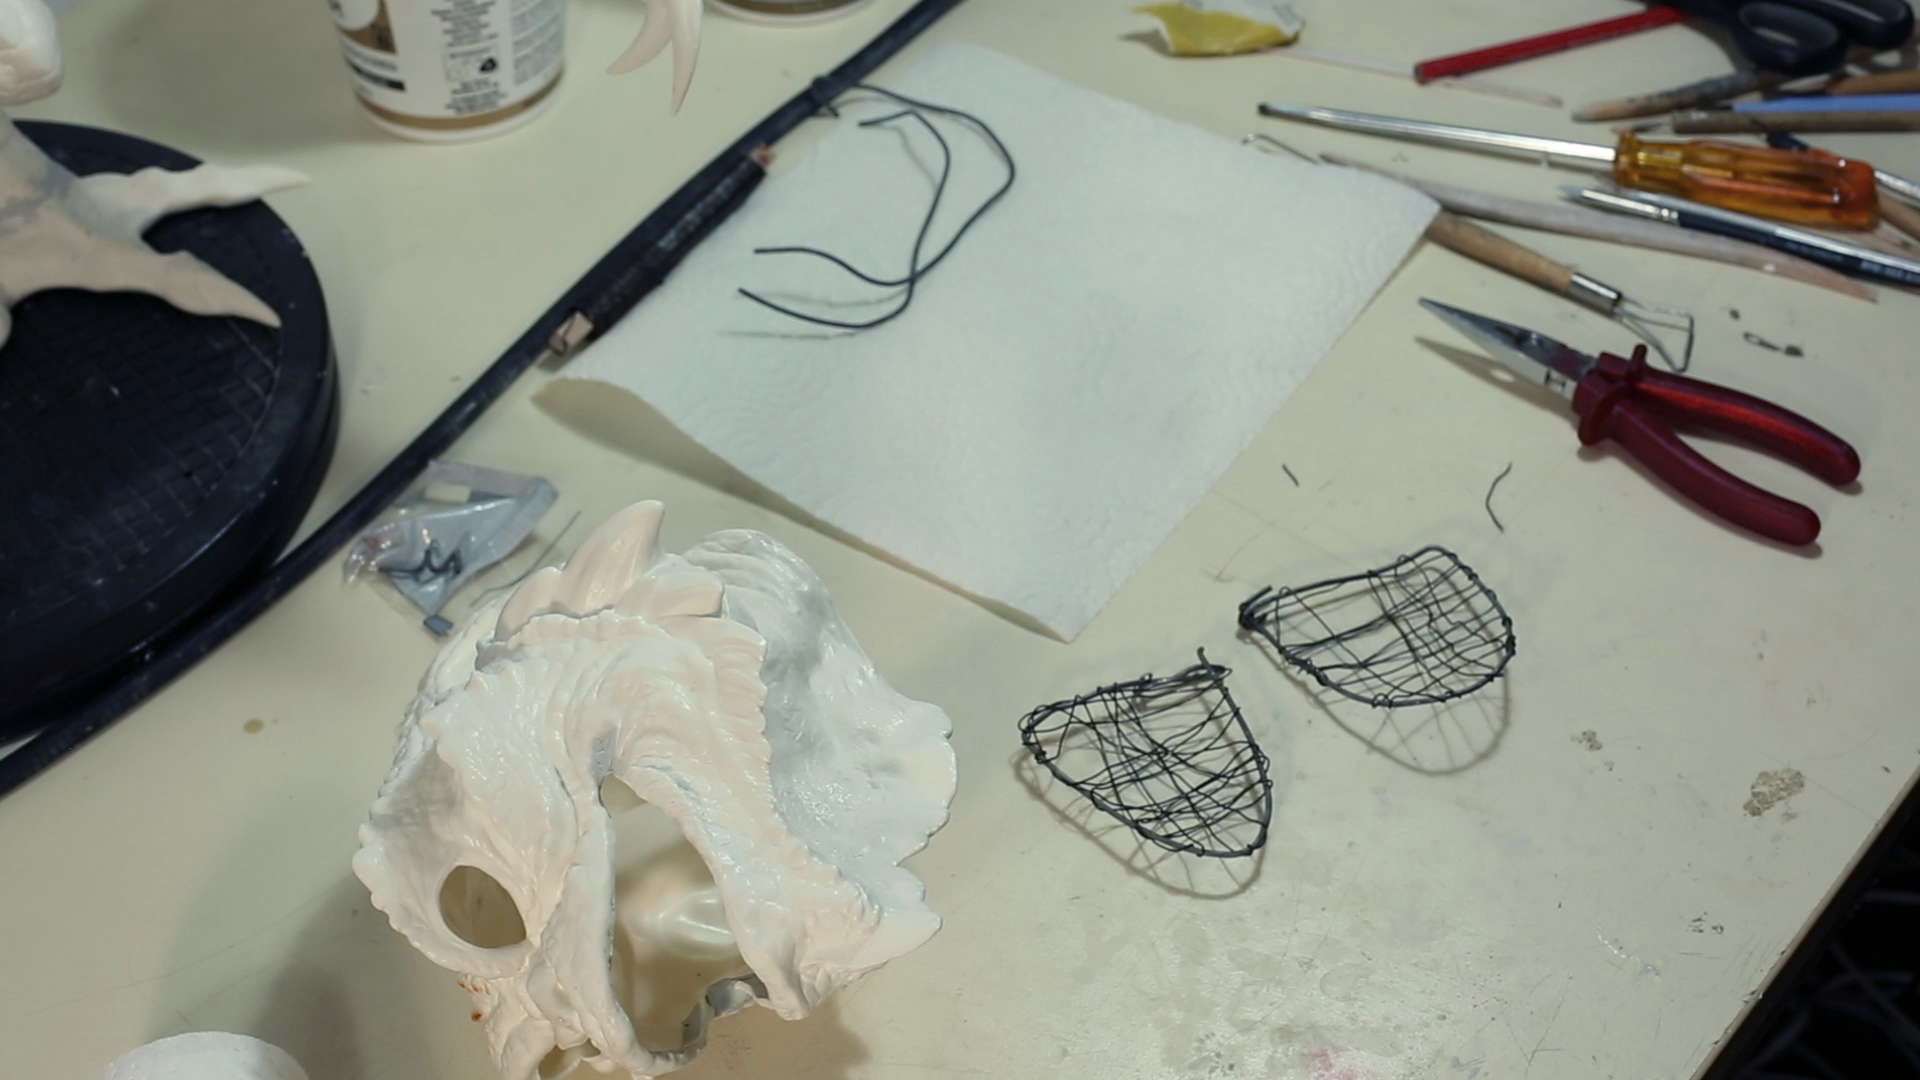
I did the spines the same way as the fingers.
Wrapped everything in cling wrap, remodeled the spines and added apoxie sculpt at the base to blend in to the back/head. I used 2 magnets for the head spines and 3 for the back part.
All parts
Finished! Or not?
Oh, there was another thing. I made a temporarily stand to make absolutely sure he wouldn’t fall over.